Warholing a Rock ‘n’ Roll Stereo GIF

Warhol_It_GIF

Warholing an animated stereo GIF of a rock band

Last night I was writing up my post for “Have a Rockin’ Birthday” with the usual addition of a nice tutorial to share with others since no one had posted one yet.  It slowly dawned on me how much work I actually put into completing one of my DS106 assignments.  I’m definitely puttin’ on my “A” game that ScottLo and “Prof.” Groom referred to in LoDown episode 15 today.  I want more stars!  [Imagine little Rockylou hands on hips, threatening to throw a tantrum.] I think the creative star accounting I’ve used for this particular assignment should help toward remedying the situation.  Especially since I spent practically no time creating this one.

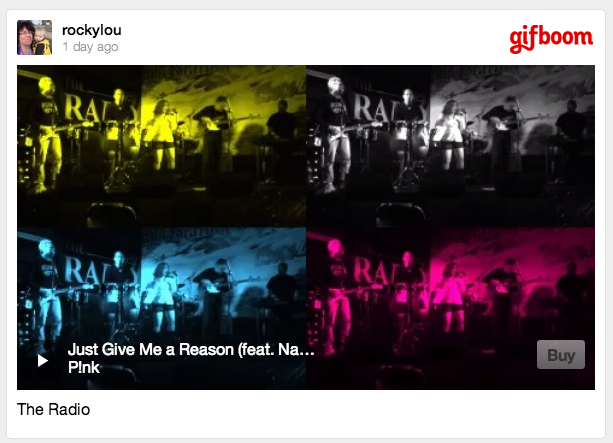
1. I downloaded an App called GIFBoom to my iPhone (for free) that lets me take my own photos and turn them into a GIF.

2. I found two quick shots on my iPhone from a band gig I’d documented a few months back.

Rock ‘N’ Roll ‘N GIF AnimatedGIFAssignments851 (3 stars)

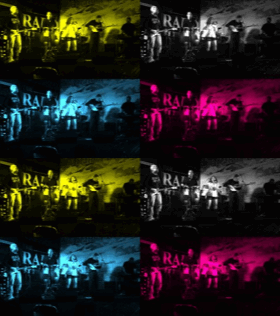
3. They worked great to show the stereo GIF effect.

Stereo GIF AnimatedGIFAssignments991 (1 star)

4. The App gave me several options to add an additional effect.  I chose the Warhol filter.

Warhol Something VisualAssignments560 (2 stars)

5. Ta Da! Assignment complete.  Blog post written.

Animated GIF

Animated, Rock ‘n’ Roll GIF Completed!

By my count that’s 6 stars!  What say you Prof. Groom?

Have a Rockin’ Birthday

I wanted to give my my son-in-law a special birthday card this week.  AnimatedGIFAssignments1086 was just the thing.

Make someone a special birthday card, but make it extra special by including a GIF!!  Try to make the design unique to them (it’s THEIR birthday, after all!).

Animated Birthday Card

‘Shakin’ It Up’ for a special birthday card

I’m starting to get good at this now with all the practicing I’m doing with my new GIFing skills.  I use Photoshop Elements 11 for the Mac as my image editing tool, and here’s my tutorial on the making of this GIF.

Original Birthday Card Image

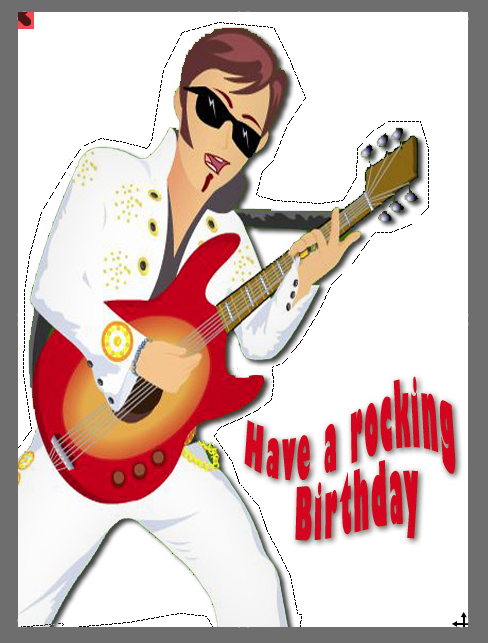
Original Card

Step 1: For this project I started with an image I found on-line from a free create-your-own birthday card site.  I chose this image because it had a solid white background which makes it much easier when you get to the point of merging the layers.  And that was important because on this card I wanted to make the guy dance, but keep the text still.  I also wanted to add a little something extra to personalize it.

Lasso Tool Selection

Selecting Image with the Lasso Tool


Step 2: Use the lasso tool to capture only the guitar player as illustrated above.  Copy and paste it into a new layer with a transparent background.  Then grab the image of the “Have a rocking Birthday” text and do the same thing.  Then you’ll end up with two pieces of the image on two different layers, with transparent backgrounds.

Making Music on the Computer

Step 3: To personalize the card create another layer with your text or a special image.  I used this free clipart icon of a man sitting at a computer making music as my son-in-law, Michael, has just taken up a new hobby learning how to create music on the computer.  I think he might be using Audacity even.

Guitar Player Images

Step 4: Create Guitar Player Image Layers

Step 4: Duplicate the guitar player to create three identical layers.  Rotate two of the images +5deg and -5deg.  You now have 3 guitar players, one leaning forward, one leaning back and one in the middle.

Step 5: For the border I made a rectangle with a transparent fill in PowerPoint (I know my way around the program very well, and it was just easier to do it there.) and saved it as a picture in the .PNG format.  This allows you to maintain the transparency of the images.  We’ll also need a solid white layer. You should end up with 7 unique layers at this point. But we’ll need to make duplicates of layers 4-7 below to be used during the layer merging process.

1. Guitar Player tilted backward (1)

2. Guitar Player in the center (1)

3. Guitar Player leaning forward (1)

4. “Have a Rockin’ Birthday” text (x3)

5. The computer guy icon (x3)

6. The border with a transparent middle (x3)

7. A solid white layer (x3)

Step 6:If you haven’t already, duplicate layers 4-7 so that you have 3 of each as noted above.

Step 7: Now it’s time to start merging the layers together so that you end up with only the guitar player moving and everything else remaining still.  These new merged layers are what will be used to create the actually GIF. Make sure you save your work often and I’d highly recommend saving the work you’ve done creating the individual image layers as its own file at this point – just in case you make an error during the merge process, you have something to go back to.  You really don’t want to start all over again do you?

Note: The white layer should go at the bottom of your stack.  It is supposed to be the background.  Otherwise when you merge the layers you’ll end up with only a white image.

Rockin B-day Final Image

Final merged image

Merged Layer 1: Guitar player tilted back =  1 + 4 + 5 + 6 + 7

Merged Layer 2: Guitar player in center =  2 + 4 + 5 + 6 + 7

Merged Layer 3: Guitar player leaning forward =  3 + 4 + 5 + 6 + 7

Duplicate merged layer 2 (the guitar player in the center) so he’ll rock forward and backward evenly. Ta Da!  You now have the four layers you’ll need to create your GIF.  Center => Forward => Center => Backward. If you’ve done it right you’ll only see the guitar player rockin’.

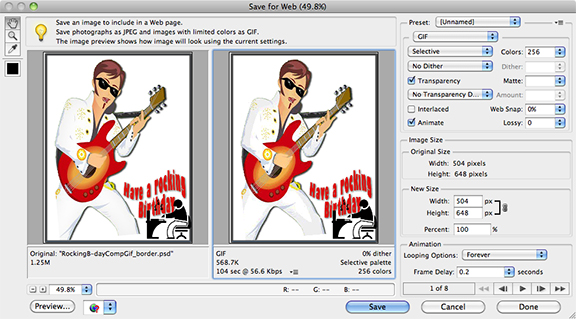
Step 8: In PhotoShop Elements 11 you select “Save For Web” to preview your GIF. On the right hand side menu, select GIF, Transparency, Animate, and set your speed in the “Frame Delay” box at the bottom. The default delay of 0.2 seconds works for most projects. Click on preview over at the bottom left and you can watch your masterpiece in action.

SaveForWebWindow_8in

Step 9:  If you like what you’ve done, save it as a GIF.  To view the file once it’s on your computer you’ll need to open it with your browser.  On my Mac I right click the file, select ‘Open With’ Google Chrome.

Bumping The LoDown

What better way to show my appreciation than create a series of radio show bumpers for my teacher.

Scott Lo hosting the LoDown for DS106 this summer

+

AudioAssignments36 to create a DS106 Radio Bumper

+

HAPPY STUDENT improving her audio storytelling skills

=

5 different LoDown bumpers for Scott to use freely on his radio show and blog posts

What is a bumper? It is a short recording that identifies the radio station with signature music or an expression that makes sure the listeners know what they are tuned into.

Lo DownThere’s no mistaking that you know where you are and where you’re tuned into with this set of bumpers.  I used as my foundation a single voice track that I recorded while in the grocery store parking lot with a new iPhone app, Recordium, that I downloaded yesterday at the recommendation of Scott on LoDown episode 12.  Then the real fun began …….

I’ve been experimenting lately with how a soundtrack can drastically change the mood of the media project I’m working with. A few months back I was creating a photo slideshow for a friend, and it was amazing how the flow of images, and our decision to add title text or not, was altered by the choice of music.  I’m able to illustrate that effect at some level with this set of bumpers.  The spoken audio remains the same, just new music underneath.

I had plans to really show this effect by adding a soundtrack that was silly or comedic. But sadly, couldn’t find an audio file in my stock list of jingles and stingers in GarageBand that fit the bill.  I’m still giggling though at finding the Medal Ceremony (LoDown3) and Broadcast News (LoDown 5) clips.  I hope Scott will be just as amused and want to use them for DS106 Audio Week. 😉 I’d highly recommend anyone who hasn’t worked with soundtracks to try something like this.  You gain a whole new understanding and appreciation for the emotional power of sound.

One last note: I’m sure most of us have run up against the powers that be and have had issues with YouTube or Facebook taking down our videos (or highjacking them by adding product advertisements – grrrrr)  because of Copyright Infringement.  My way of addressing this from the beginning is to use the Vimeo Music Store to locate tracks I can use legally without question. You can even create custom tracks that perfectly fit your videos.  It’s a great resource and there is a lot there. There are free creative commons, $1.99 personal use licenses, and $20+ commercial use licenses available.   I’ll test a tracks suitability and mood by having two windows open on my computer, one playing the slideshow the other playing the music file on Vimeo.  Then when I find something I like, I pay the $1.99 just like on iTunes, and download it. Check it out.

[Other Radio Bumper projects I’ve completed: Obruni Podcasts, Mashing for DS106 Radio)]


Mashing a DS106 Radio Bumper

Thanks to my fellow DS106 students who made sure they clicked on the “Allow Downloads” button in SoundCloud, I was able to mash this DS106 Radio bumper.  It’s short and sweet, just like this post. AudioAssignments36

Big kudos to my unsuspecting contributors….

Dylan Gott – Brooke Parker –  Kristen Lamb – Jennifer  – Rapt’nRent

ds106.ioAnimatedNewOldFriend_290

Podcast Bumpers for Obruni Series

For an earlier audio assignment to create a 90sec story out of at least 5 sound effects, I used sound effects that I already had on hand from a series of podcasts I am producing with my daughter, Amber. As before, I’m again making a slight tweak on the formal assignment description for DS106 Audio Assignment 36, “Create A Ds106 Radio Bumper”.

What is a bumper? It is a short recording that identifies the radio station with signature music or an expression that makes sure the listeners know what they are tuned into.

It’s still a bumper, but for a podcast, not DS106 Radio. There are three different audio files posted in the series.

Track 1: “Intro Music RLProductions” is used like an abbreviation or I what I like referring to as an Audio Icon for anything associated with Rockylou Productions. I’ll digress just a minute hear to say that I know I’m mentioning Rockylou Productions  often in my posts. I’m not trying to promote myself, this just happens to be my personal playground of creativity where I spend much of my free time, and I have material I can easily pull from to complete the assignments in a more compressed time frame.  I then have time to create tutorials for the assignments that can help others.

Back to your regularly scheduled program…….

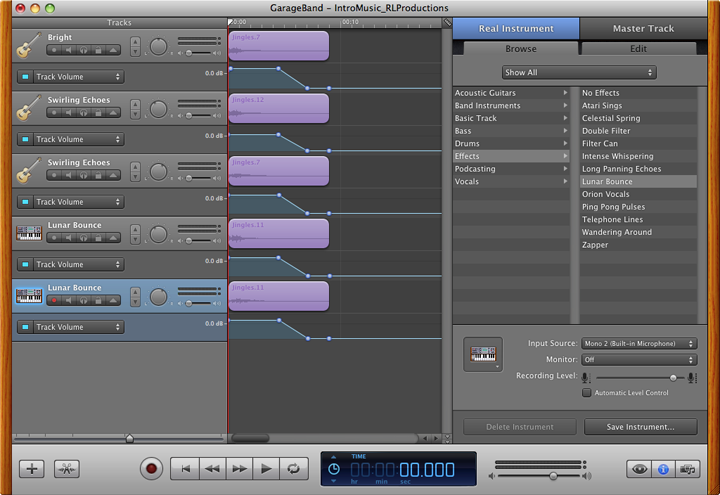
The Audio Icon is used at the beginning as part of the intro and at the very end.  We also use this chord as part of the final credit sequence for some of our videos. It was made by recording myself playing a simple “D” chord on my 12 string guitar.  Then I used GarageBand to layer 5 different tracks by playing around with different effects. It was a fun morning putting that together.  I just kept trying this or that, until I stumbled across a combination that I felt was memorable.

GarageBand screen shot of the layered tracks for  the Rockylou Productions "Audio Logo".

GarageBand screen shot of the layered tracks for the Rockylou Productions “Audio Logo”.

Track 2: “Obruni Bumper Start” is an example of the template and style we use for our intro.  The chord plays to let you know that you’ve arrived.  Then I welcome the listener and give a short introduction of the podcast they are about to hear.  We want this to be short, but descriptive enough to grab the listener’s attention and they’ll want to keep on listening.

Track 3: “Obruni Bumper End” is an example from another podcast in the series, “Transportation”. But the format is always the same.  At the end of the spoken text of the story I increase the volume of the soundtrack that we have associated with the Obruni podcasts.(See note.) I then fade in the the audio credits – like who it was written by, an attribution for the soundtrack music, and anything else that may be needed. At the very end you hear the familiar Rockylou Productions chord strum that lets the listener know we have now “left the building”.

Note: I had to track down the publishers to obtain written permission to use the Fanti music, Apatampe, so that I wouldn’t infringe on copyright issues.  It took some digging, but I finally found the publishers and they were very nice about it.  As long as I included an attribution and I didn’t use it for commercial purposes, it was fine to use for my projects.

Up, Up, And Away


Animated Movie Poster GIF

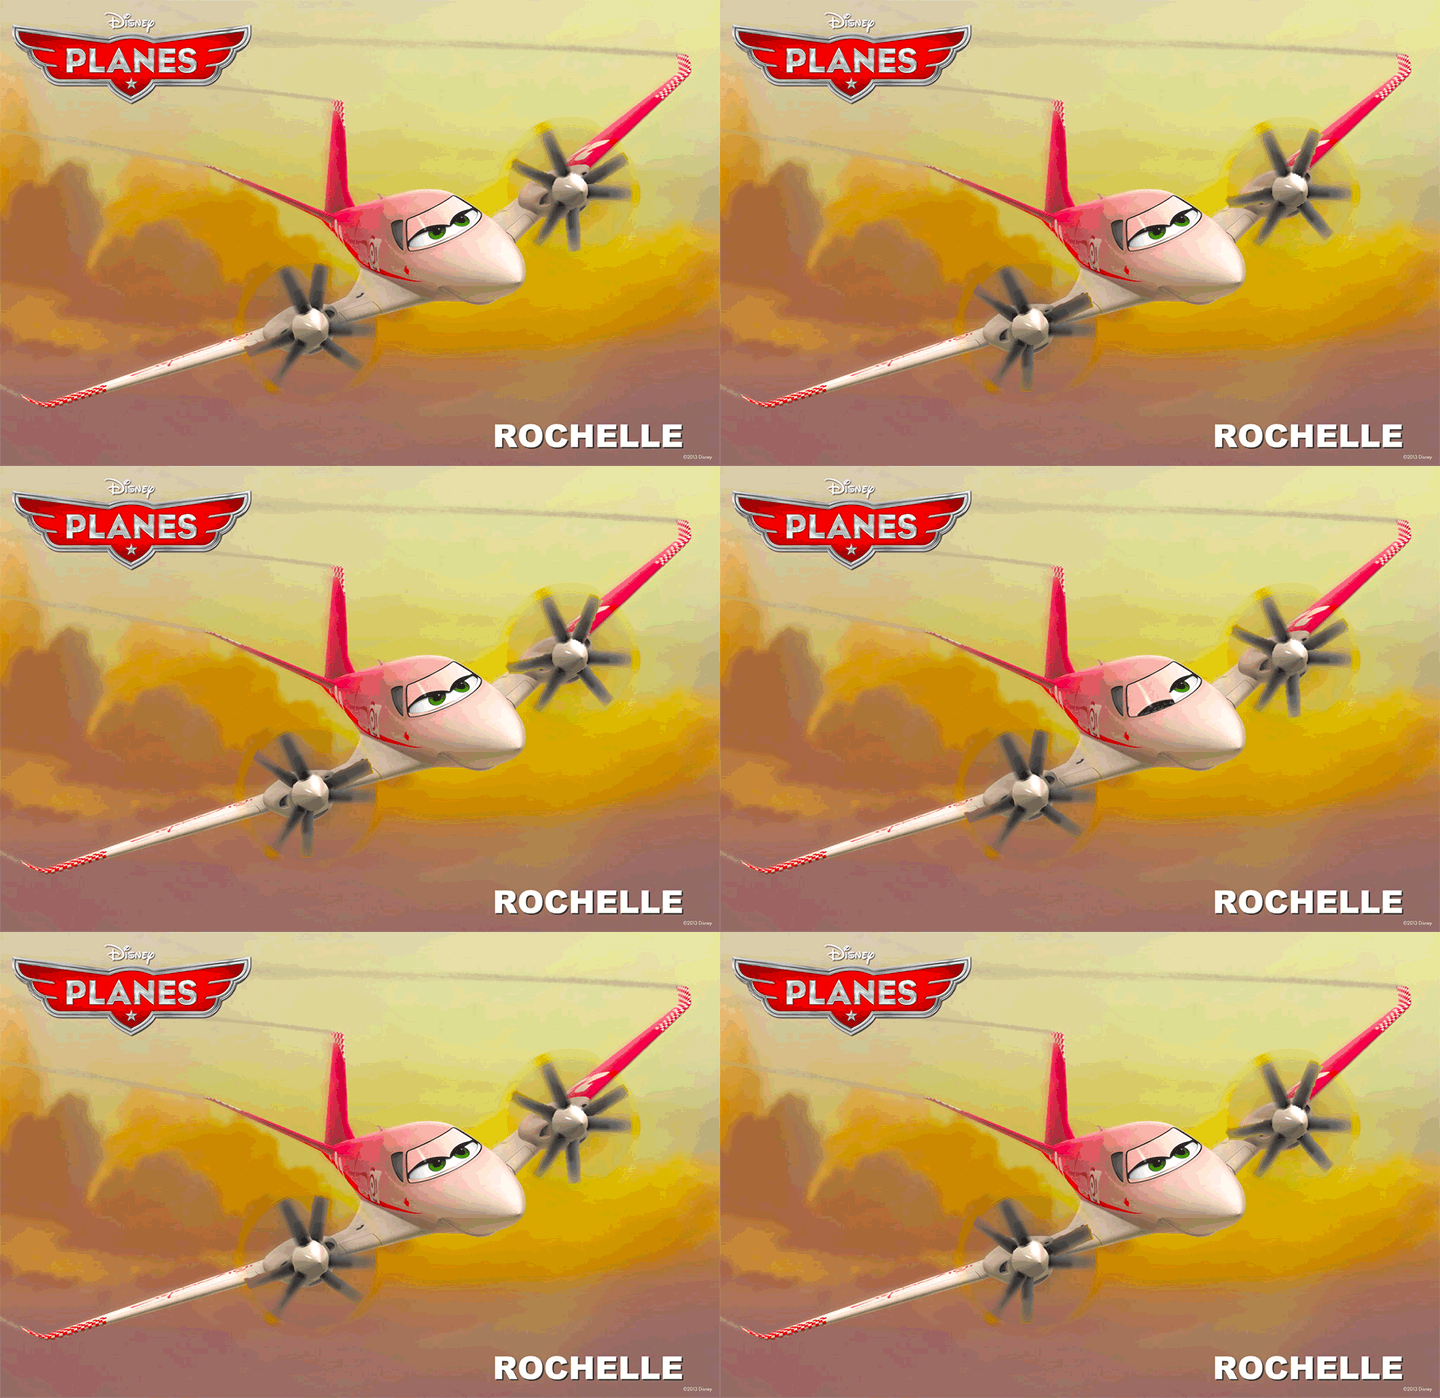
Meet Rochelle from Pixar’s movie “Planes”.

Still enamored with creating GIFs, I stayed up way too late last night creating this animated movie poster from the movie Planes by Pixar to be released in theaters August, 2013. (DesignAssignments313)

Let me give you a little background on why I chose this particular movie poster. My name is Rochelle, and it’s not a very common name in the United States.  I met only one other Rochelle growing up, and that was in High School.  I’ve met maybe 5 others my whole life. So when a Facebook friend posted on my timeline that Pixar would be introducing a new character in their upcoming movie about planes, I was beaming,

 “I have a cartoon character named after me?”  

Now this assignment would give me the opportunity to create something out of a real movie poster that had my name on it.  How cool is that? If I liked it, I could see using it in other circumstances around the web. I do like my final product, so you might see it popping up again.

Keeping with this week’s design theme, I studied the poster to understand what is being conveyed in the image.  Since the movie isn’t even out yet, I read the Pixar synopsis of the movie and more specifically the plane character, Rochelle. (voice of by Julia Louis-Dreyfus)

Excerpt from Pixar site:

Rochelle

Pla rochelle rolloutimage v3-0simp

(voice of Julia Louis-Dreyfus)

Rochelle is a tough racer and the pride of the Great White North. Always confident and capable, she got her start running mail to small towns in Quebec, picking up home remedies for mechanical maladies along the way. She also developed a knack for fast travel that ultimately inspired her to give air racing a try. Rochelle never looked back (this competitive contender doesn’t need to). She is relentlessly pursued by charmer El Chupacabra, but steadfast Rochelle is much too focused on winning the race to return his affections.[20]

I would also need to keep in mind the file size limitations of a GIF, how many frames I’d be allowed in my photo editing software, and since I didn’t want this project to consume my life for days, the number of frames I’d actually have to create.  I decided that the important elements of the poster to focus on would be that this is a plane, and then illustrate something about Rochelle’s personality.  My first overly ambitious thoughts were to have her fly on the poster.  Moderating my initial exuberance with a dose of reality, I admitted to myself the work required to make the plane actually fly in or out of the poster was way too complicated to pull off.  My rational, although still very creative self, went with animating the propeller props, and giving her a wink.  I’m not totally at peace with the symbolism of her winking, since the character synopsis says she is steadfast and much to focused on winning the race to return another plane’s affection, but I’ve seen the blinking effect used in a lot of other GIF projects (Ben’s “The Colorized Zone” was a big inspiration), so why not give it a try.

[An illustrated detailed process of creating this animation will be documented and posted as a tutorial eventually. Until then, you can view a tutorial example with only one animation zone.] 

A summary of the process using PhotoShop Elements 11 for the Mac:

1. I used the lasso tool to grab an image of each of the propellers and the eyes/windshield of the plane. This was pretty painstaking while I experimented with which parts of the propeller would work best to create the rotating effect.  I then duplicated the propeller images and rotated them 30deg and 60 deg. I ended up with 3 different propeller images for each side of the plane.

2. For the winking eye I used the lasso tool again to capture just the left half the windshield image.  Then started stretching, erasing, copying, pasting, aligning… until I had something that looked right.

3. Once all of the individual image layers were created, it was time to merge the appropriate layers to create new combined images that would animate correctly.  Oh my was this a chore as it became closer and closer to midnight.  I was creating a total of 3 animation zones?! My brain just wasn’t working as well anymore and I was having a hard time following tracking of what went where.  And remember that ambitious enthusiasm I spoke about? Well I added in an additional challenge to have each of the propellers appear to be spinning a little differently. And believe you me, it was no walk in the park to properly align everything so that those parts that were supposed to be still remained still.  I didn’t want any distracting jumping around of the animation.

4. The timing of the animation sequence was also important.  I didn’t want her constantly winking, yet I wanted the propellers to be moving at a quick rate to provide a better spinning illusion. I was able to create the effect I wanted by duplicating more of the image layers for the propellers and sandwich the winking effect in the middle. All-in-all I ended up with a total of 14 frames: 8 propeller frames + 2 winking frames + 4 propeller frames, all running at 0.2 seconds per frame.

As I mentioned above, this post only gives a high level synopsis of creating this GIF.  The tutorial will have much more detail with screen shot images and examples at each stage as I move through the creation process.


Obruni Arrives in Africa – Sound Effect Story (Slight Variation)

[soundcloud url=”http://api.soundcloud.com/tracks/94573148″ params=”” width=” 100%” height=”166″ iframe=”true” /]

Amber arrives in Ghana, Africa. The new “Obruni”, or white person, both delights and scares the young children of Takoradi, and she soon discovers the way music can transcend cultural divides. Listen to the original full length podcast episode the sound effects were taken from at http://rockylouproductions.com/2010/10/18/obruni-take-it-up/

Audio editing is not for the faint of heart.  Especially if you can be a perfectionist or have a tendency towards OCD. [Guilty as charged…]  You can fiddle around and fine-tune forever.  (Note: The audio clip attached happens to be an updated version from what I posted earlier this morning.  I didn’t like that the car racing by in the beginning was inaudible on my iPhone. So I fixed it!)  But it can really be worth it when you come back months later to a piece you created and go, “Wow, I did that?”  

Inspired by LoDown episode 8, I jumped in to create my own sound effect story – Audio Assignment 70 with a slight variation of having a bit of spoken and sung text.  The assignment asks us to create a 90sec or less story with at least 5 sound effects.  I decided to use sound effects I had from a podcast I had created with my daughter, Amber, in the fall of 2010.  We really didn’t know what we were doing back then at moving her stories off the written page and making them audible.  I didn’t have any experience with sound editing software, and I didn’t even know what a Podcast was.  Amber had to suggest listening to StoryCorps and WYNC’s RadioLab to help me become familiar with the genre we were embarking upon. 

I’m a big Apple fan and went with GarageBand as my sound editing tool.  I wasn’t up to the VERY steep learning curve for the more professional stuff. (And I hadn’t heard about Audacity. I’ll have to check it out at some point during the course.)  I have plans for a future blog post (possibly a series or a LoDown co-hosting gig) that will go through the creation process for the entire podcast episode, but for this post I’m going to stick to the sound effect story.

A story needs to have a beginning, middle and end- now doing that in 90 seconds can be a challenge.  Finding the right sounds, keeping in mind copyright issues, [link to my YouTube playlist on copyright and creative commons] is also a big challenge.  We used freesound.org, pulled sounds off of creative commons YouTube videos, and even created some of our own sound effects if we couldn’t find what we wanted. But again… that’s a story for another blog post.  My storyline for my sound effect story could be an audio trailer for the larger podcast.  The over arching story is about how the people of Takaradi, Ghana reacted to this new white person in their midst and how she responded.

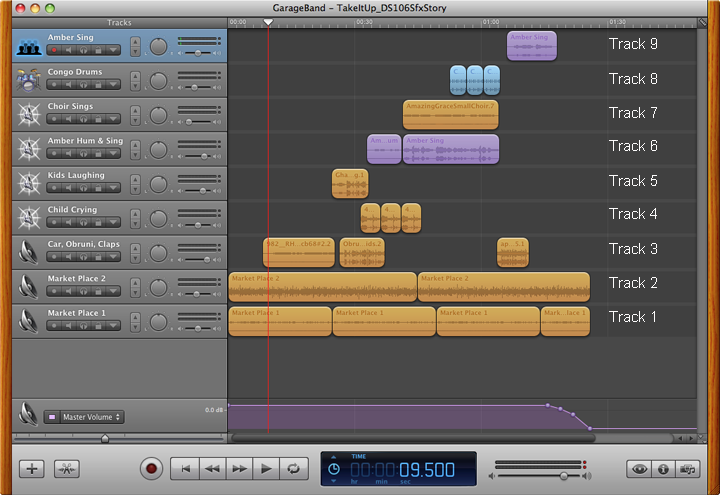
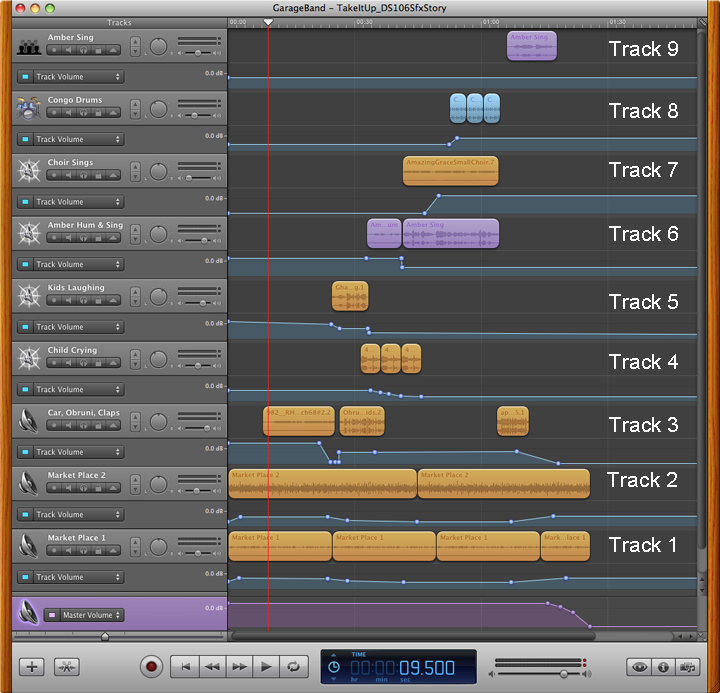
Let me take you through at least a portion of my process. Below is a screen shot of the final GarageBand file. I like to build my layers (technically called tracks) from the bottom up when possible. That way I know where I’m at, and it makes sense to me as I layer on my sounds. So that’s how I’ll be referring to them as I move along.
GarageBand Screen Shot

GarageBand Screen Shot of sound effect tracks only

Setting the Scene (track 1 & 2) To set the scene we used a lively chaotic market place sound effect that is actually a combination of two different sound effects grabbed from freesound.org.  (Called Market Place 1 and Market Place 2 above.) Neither of them sounded right alone, but the combination was just what we wanted.  Experimenting with different combinations is a great way to find just the right sound you are looking for.

The first “event” in the story was the addition of a car racing by on track 3. Remember I’m counting from the bottom up. If you listen with headphones or good speakers you’ll be able to hear the stereo effect as the car goes whooshing by.  There are things happening in and around the market place.

Our story gets more personal when track 5 brings in the children laughing, while track 3 changes over to shouting out “Obruni”.  Both of these effects were pulled from YouTube videos. So… why you might ask don’t I put each sound effect on its own separate track? (Track 3 has 3 different effects.) Because it’s a visual nightmare when you have to keep scrolling the screen to see where you are at. I try to limit the number of tracks I need to what can fit on my computer screen.  For our big podcasts that almost never happens -but we try. And labeling your larger tracks with something you understand, as well as the individual clips, is a good practice.  All things we learned the hard way!

With track 4 we hear a child crying and Amber fading in, softly humming “Amazing Grace”, to soothe the little one on track 6. Track 6 continues and morphs into Amber actually singing. With track 7 the choir joins in. Amazingly we found this little, slightly off key (just what we wanted) choir with a YouTube search. A set of congo drums joins the party on track 8.  Then it’s back down to track 3 with the audience applause.  Our final track 9 brings the story toward a close with Amber singing alone again.

I very purposely chose segments of the sung lyrics to coincide with an event in the story or a feeling I wanted to impart. The child is crying, Amber hums then sings, “that saved a wretch like me.” Amber is then saved by the choir joining in. I could have used the humming again at the end, but concluding on “Amazing Grace, how sweet the sound…” was just too much to pass up.  Like a good poem, there are many layers of meaning that can be interpreted by a listener.

At the very end the market place sounds coming back into auditory focus to take front and center stage.  Life continues on with one final master fade out.

Fine Tuning: But least you think we are finished… Oh No… you would be wrong.  You can consider this version of the audio file a rough draft.  But at least these aren’t just end-to-end clips. I’ve talked about some layering here. How these sounds are in relationship to one another is a big deal.  Blending one sound effect into another and adjusting the volume balance between clips can add a lot to your story.  Panning the sound effect into one ear or the other or the stereo effect like the car racing by are nice details to add.  You have to be careful with this though.  You don’t want to end up making your listener dizzy because what they are listening to doesn’t make sense. With the screen shot below I’ve opened up the track volume areas so you can actually see what I’m talking about.
GarageBand Screen Shot

GarageBand file with volume track shown

Track 1 & 2 market sounds fade in at the very start. We don’t want to alarm our listeners with an abrupt beginning. The idea is to create and maintain a listening experience that someone wants to join and hang-out in. If it feels “chunky” (as Amber & I refer to it) anywhere in your audio file your listeners will pick it up.  Maybe not consciously, but they’ll know something isn’t quite right.  Choke back the false pride and fix it!  You’ll be glad you did.

I made sure the track 3 car sound effect faded out nicely so you knew the car was fading into the distance. And the clip we used for the kids laughing on track 5 had an erratic volume level.  It was too soft at the beginning, so I bumped it up and brought it back down toward the end of the clip.

When the child is upset and crying (track 4) at seeing this person with a different color of skin than her own, she cries full on.  Then her effect begins to trail off as Amber’s humming effect on track 6 crosses over.  At this same time I reduce the background market audio (tracks 1 & 2) so that the listener is able to focus on the next event in the story.  But since my story takes place in a market place, I don’t want to mute it completely.

As Amber is singing (track 6) the people in the market place gradually join in (track 7) and then someone fades in with a beat on drums (track 8).  I get a sense of a subliminal cadence that I follow to get the timing just right.  (When that “chunky” feeling pops up that I mentioned above, I’m most likely out of step with the piece and keep tweaking till it feels right.) We then linger here just a bit on this climactic moment of the story before the the audience claps. (Back down to track 3.)

The clapping trails off, and Amber returns alone,(track 9) but this time with a more ethereal sounding tone. That’s why this clip was placed onto track 9 instead of remaining on track 6 with the other Amber clips.  I wanted to modify the basic sound effect to give the feeling of a dream or fade away into the distance.

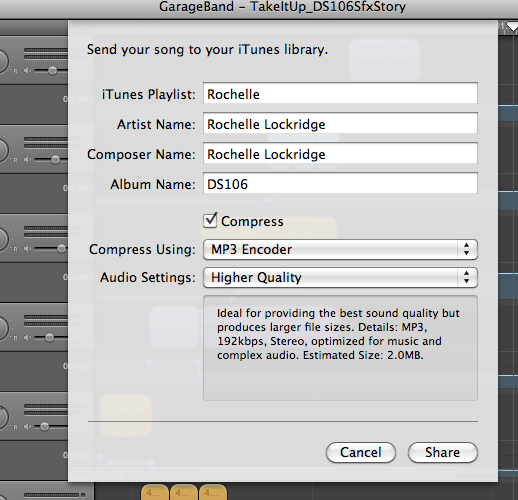
There is more mixing and “Mastering” of the final audio that happens next to give your audio file more life, but I’ll save that for another post. As well as going into how to export your file so that you aren’t shocked at the low sound quality that you disappointingly ended up posting.  Scott Lo and I are contemplating a LoDown episode for audio week 3 entitled, “How come what I posted doesn’t sound like what I made?” Any interest in that topic? In short it has to do with the audio file compression you need to do so people can download and listen to them on your mobile device.  This 90 sec story uncompressed (AIF) is 23 MB, while the compressed MP3 that you listened to above is only 2.9 MB.  And it could be even lower if I used the standard bit rate compression of 192 KB rather than 256KB which I prefer.
192KB MP3 Compression Settings

Typical “High” quality compression rate settings for GarageBand.

Okay… That’s going to wrap up this post.  It’s time for bed.  Let me know if you have any questions or would like me to explain in more detail how I did something.  Hopefully I’ll have the time to write up more posts on the subject.

Week 1 FIREHOSE Summary

ProfGroomFireHose_DS106

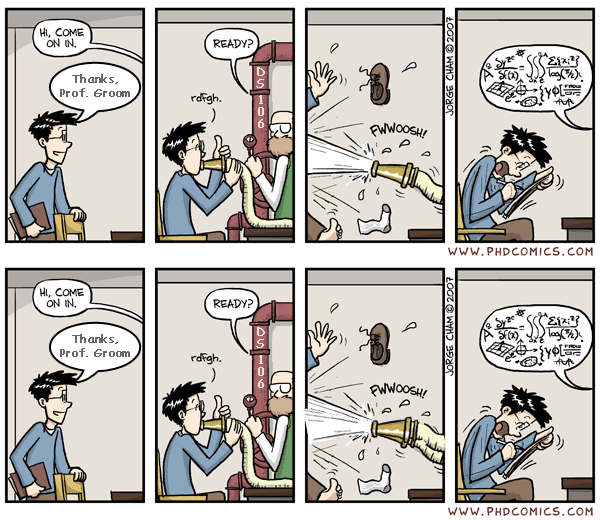
DS106: What was I expecting? [Original Image from “Piled Higher and Deeper” by Jorge Cham]

Oh my… What was I thinking when I decided to sign-up for this course?  I’m taking this class, DS106,  as an open online student, and I wasn’t expecting the level of work requested by the instructors and the speed at which the material and assignments are rushing by during this summer version of the course.  I’m planning on doing what I can now and participating again during a future full semester course, hopefully this Fall.

Although warned when first reading over the material that this was not something to take lightly, I was still not prepared.  My own enthusiasm has surprised me with wanting to fully absorb the material being taught, completing the assignments and taking the time to do them well, and my desire to interact with my fellow students  There is so much good information, as well as the technical skill learning, that I feel I just don’t have enough hours in the day to digest it all.  Writing up this weekly summary is a huge job in and of itself. Any suggestions on how I might streamline the process?  Is this time well spent and appreciated by the instructors or my class mates if I’m just an open onliner?

THE BLOG: I started late in the game (Thursday of week one) and creating my new blog site was the first hurdle.  I unsuccessfully attempted to create my first blog site with the RapidWeaver software I have been using for the last couple of years.  After hitting my head against the wall for a couple of hours I decided to try using WordPress, since it was being used for the UMW students anyway, and I knew I could get additional help if needed.  GREAT DECISION!  My web hosting site, BlueHost, had a simple script download option for WordPress that worked great once I got out of the way with my RapidWeaver obsession and let it do its thing.

I liked and used the free 2012 theme that was offered.  Then customized it with the banner header and background color I use at my Rockylou Productions website. (The tree logo was designed by my daughter Amber.) I love all of the widgets and how easily I can update my pages and blog entries with WordPress from any computer or mobile device. I’ve used all of my Apple devices at some point, my iMac, iPad and iPhone. I watched the tutorial videos for week one on setting up your blog, checked out the Embedding Media in Your Blog Tips page and happily followed all of the recommendations, as well as TalkyTina’s requirements for becoming her “true friend”.  I will definitely be changing over my current blogging tool for Rockylou Productions to a WordPress template when I finish up the course.  I’m continually tweaking my DS106 blog design and pages (especially my About page as I learn more about its purpose and importance), and updating past posts with new links when it seems useful. I’m not happy with the Twitter feed formatting though, or the recent comments format in the sidebar.  I’ve seen some better formats on other blogs and will be asking for suggestions soon.

GETTING SOCIAL: I’ve had a Twitter account, @rockylou22, for at least 3 years and finally tweeted my first tweet this week.  YIPEE! Learning the proper etiquette and how to utilize the hashtags correctly has been quite a learning curve.  I don’t think I’ve got it right yet since I don’t always see my posts at the #ds106 feed. I had my privacy settings to restrictive at first, but  I thought I fixed that. I’ve also had a Flickr account for quite some time, but never posted anything until now, just used it to gather creative commons photographs for some of my video creations that I post to my YouTube channel.  I not only created my SoundCloud account, but uploaded a podcast that my daughter and I had created a few years ago to see how it worked.  (Link to the rest of the podcast series. ) No issues there. Oh… and I almost forgot.  I created my gravatar too.

DAILY CREATES: I’ve enjoyed playing with these, but since I’ve had to play catch up they are all posted to one blog page.  But I’ll get into the swing of things this week.

Daily Create Assignments: Introducing MyselfAlien Rochelle500th Daily Create CelebrationLife, Love & Laughter with my grandson, iPad + Toes = FunFunFun

VISUAL AND DESIGN ASSIGNMENTS: Again, it’s unfortunate that I didn’t learn about the course sooner so that I had time to complete the required number of assignments.  I’m hoping when I have a whole week to work on them it will be different. But with a full-time day job as a Business/Technology Opportunity Analyst at 3M, I’m not sure if I will be able to. If not, I’ve decided to prioritize those assignments I choose as enjoyable and worth while for me personally.  I’ve not had too many technical issues yet.  I’m pretty well versed in the technology needed to complete the assignments I’ve chosen so far.

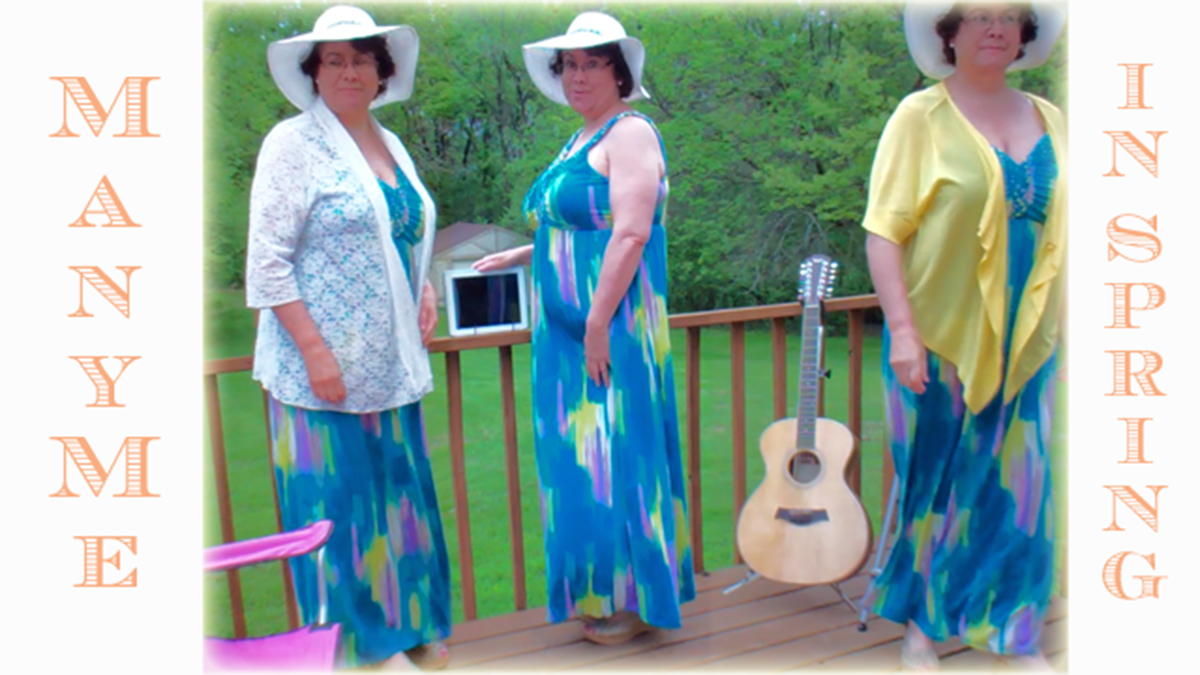
  • ManyMe In Spring Multiply Yourself: VisualAssignments943 (5 stars)
  • Splish Splash Splash the Color: VisualAssignments340 and VisualTutorials340. (3 stars)  While I was at it I thought I might as well create a quick one-page tutorial on how to make one of these photos with Photoshop Elements.  Do I get extra points for that? 😉
  • Go Daddy…. Wheeeeeeee Required GIF VisualAssignments920 (4.5 stars).  This was my first attempt at creating a GIF. FUN!FUN!FUN!  I used one of my own videos to cut down on the time required to find a clip I could easily use. I felt the downloading and watching a Twilight Zone episode was better spent on learning how to create the GIF itself. I loved this assignment.
  • GIF Evolution of ManyMe Photo It Like Peanut Butter: VisualAssignments347.( 3 stars) I enjoyed the GIF assignment so much I wanted to use my newfound skills for another project.  I started to make it and realized that maybe there was an actual assignment heading I could use.  Yep… there was.  Killed two birds with one stone.  I had fun with a new skill and got to claim it as a completed assignment. You’ve no doubt noticed the creative GIF I made for this post?  🙂 Any extra stars for that one too?

MEDIA REFLECTIONS:

Scottlo’s Podcasts: I haven’t found them especially informative yet.  So I’m listening for style.  I found his vivid description of the beach in episode 4 to be a good audio technique learning moment.

Gardner Campbell’s essay and video Key take-ways:

    • “No digital Facelifts”, Open education is not just open to content, but open to other ways of doing it.
    • I am the architect of my own digital life.
    • The objective is to be a participant AND a producer. Narrating, Curating, Sharing.
    • 3 levels of openness: Open to the world, open to each other, open to ourselves

Michael Wesch’s presentation (Part 1 , Part 2):  Now this was some powerful stuff. I had to keep pausing the video to take notes.  I didn’t want to miss a word. A few key take-ways:

  • Learning to BE rather than learning ABOUT
  • GLOBAL DANCE, GLOBAL COLLABORATION
  • The goal isn’t to learn the technology.  It is to do something much larger by using these tools as a resource.
  • Media are not just tools, not just a means of communication.  Media changes the way we connect with one another
  • Web 2.0 is linking people: Sharing, trading and collaborating.  We need to rethink copyright, authorship, identity, ethics, aesthetics, rhetoric, governance, privacy, commerce, love, family, ourselves.
  • “Long slow death of the middleman”, 10% of financial loans expected to be peer to peer.
  • A ubiquitous, context-aware, semantic, social network of things, people & information
  • All the reasons to learn to read & write are relevant to creating video now.  Being a good citizen and having an effect on the world.
  • Moving from Information Literacy => Meta-media fluency => Digital Citizenship (Gardner Campbell)
  • Meaning Seekers => Meaning Makers
  • People think we are creating an unstructured environment, but we are actually creating a structure for participation
  • Creates possibility for more, but has darkside as well.
    • Freedom < – > Control, 
    • Openness < – > Surveillance
    • Community < – > Isolation
    • Participation < – > Distraction

GIF Evolution of ManyMe


The Evolution of ManyMe

The Evolution of ManyMe

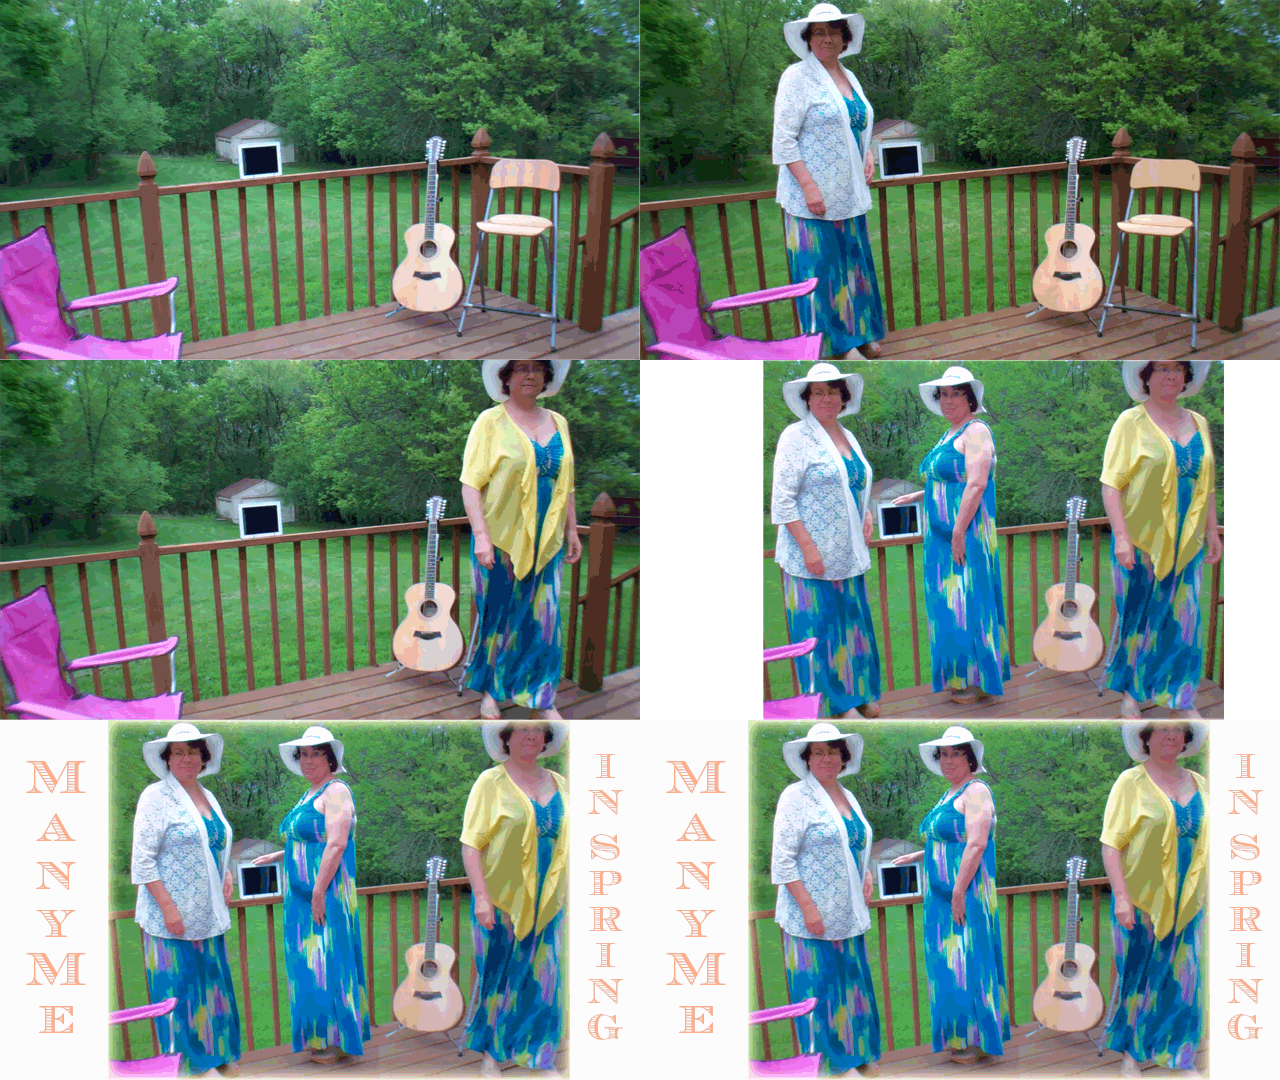
Inspired by my recent DS106 assignments I decided to take two of the projects I had completed this week, ManyMe and Go Daddy_Wheee, and use the skills and final products I created to visually illustrate the evolution of my ManyMe photograph. (Assignments: Multiply Yourself, Animated GIF) The objective of the Multiply Yourself assignment was to take two or more photos of yourself in the same location and combine them into one photo. I’m going to go one step further here and label this GIF project a completion of the “Photo It Like Peanut Butter” visual assignment 347 where we’re instructed to:

Use a GIF to illustrate the generation of a real world object/place by using your own series of photographs as the source material.

Phase I: The original images to work from were pulled as still frames from a 4min video taken walking in and out of the frame and placing myself at different locations.  (See earlier post for more background.) When making one of these photographs it’s important to have your camera on a tripod and that you get your shots as quickly as possible so that the lighting doesn’t change drastically.  If you have a controlled lighting environment you don’t have to worry about it.  Just make sure your background isn’t changing. )

Phase II: Using Photoshop Elements I cropped the single image shots.  I had strategically planned my placement in the photographs so that I could do a simple rectangle crop by making sure I hadn’t crossed over into another shot’s field. The guitar, iPad and chairs were my boundary markers.  No messing around with a tedious Lasso Tool.

Phase III: Next came the adjustment and fine-tuning of the cropped images for alignment and lighting.  Yes, even though I took the video in under 4min on a very overcast day, the center image of me was brighter than the two outside images.  Go figure!  I also didn’t like the diminished resolution quality of my images since they were taken from video footage in rather poor lighting.  Fiddling around with a few filters I found a combination that brightened and slightly blurred the entire photo that I found appealing. (Although my daughter later confessed she didn’t like the effect.  She thought it made me look like an alien and the image had lost its warmth.) As a final touch I cropped the entire merged image (attempting to improve the photo composition) and then created a fuzzy yellow border that complemented the yellow jacket I’m wearing in the right side image.

Phase IV: Creating the GIF… I gathered and organized the needed photoshop layers from earlier in the project into one new file.  Again, making sure that the alignment between images was spot on took some fine-tuning.  I didn’t need to worry about the lighting this time, since I wanted to show those changes if they were there. Once I had it assembled and previewed the first GIF, I noticed that I wanted it to run a bit slower so the viewer could take in each of the image changes more easily.  This was to show an evolving process, not just a quick action clip. I increased the overall frame rate to 0.8 seconds and cloned the initial empty frame and final frame to allow for lingering even a little longer on those shots.  The addition of the title text at the end capped it off nicely.

ManyMe_GIFTutorial_Titled_4X6

Go Daddy…. Wheeeeeeee

DaddyDJSlide_GIF_Short

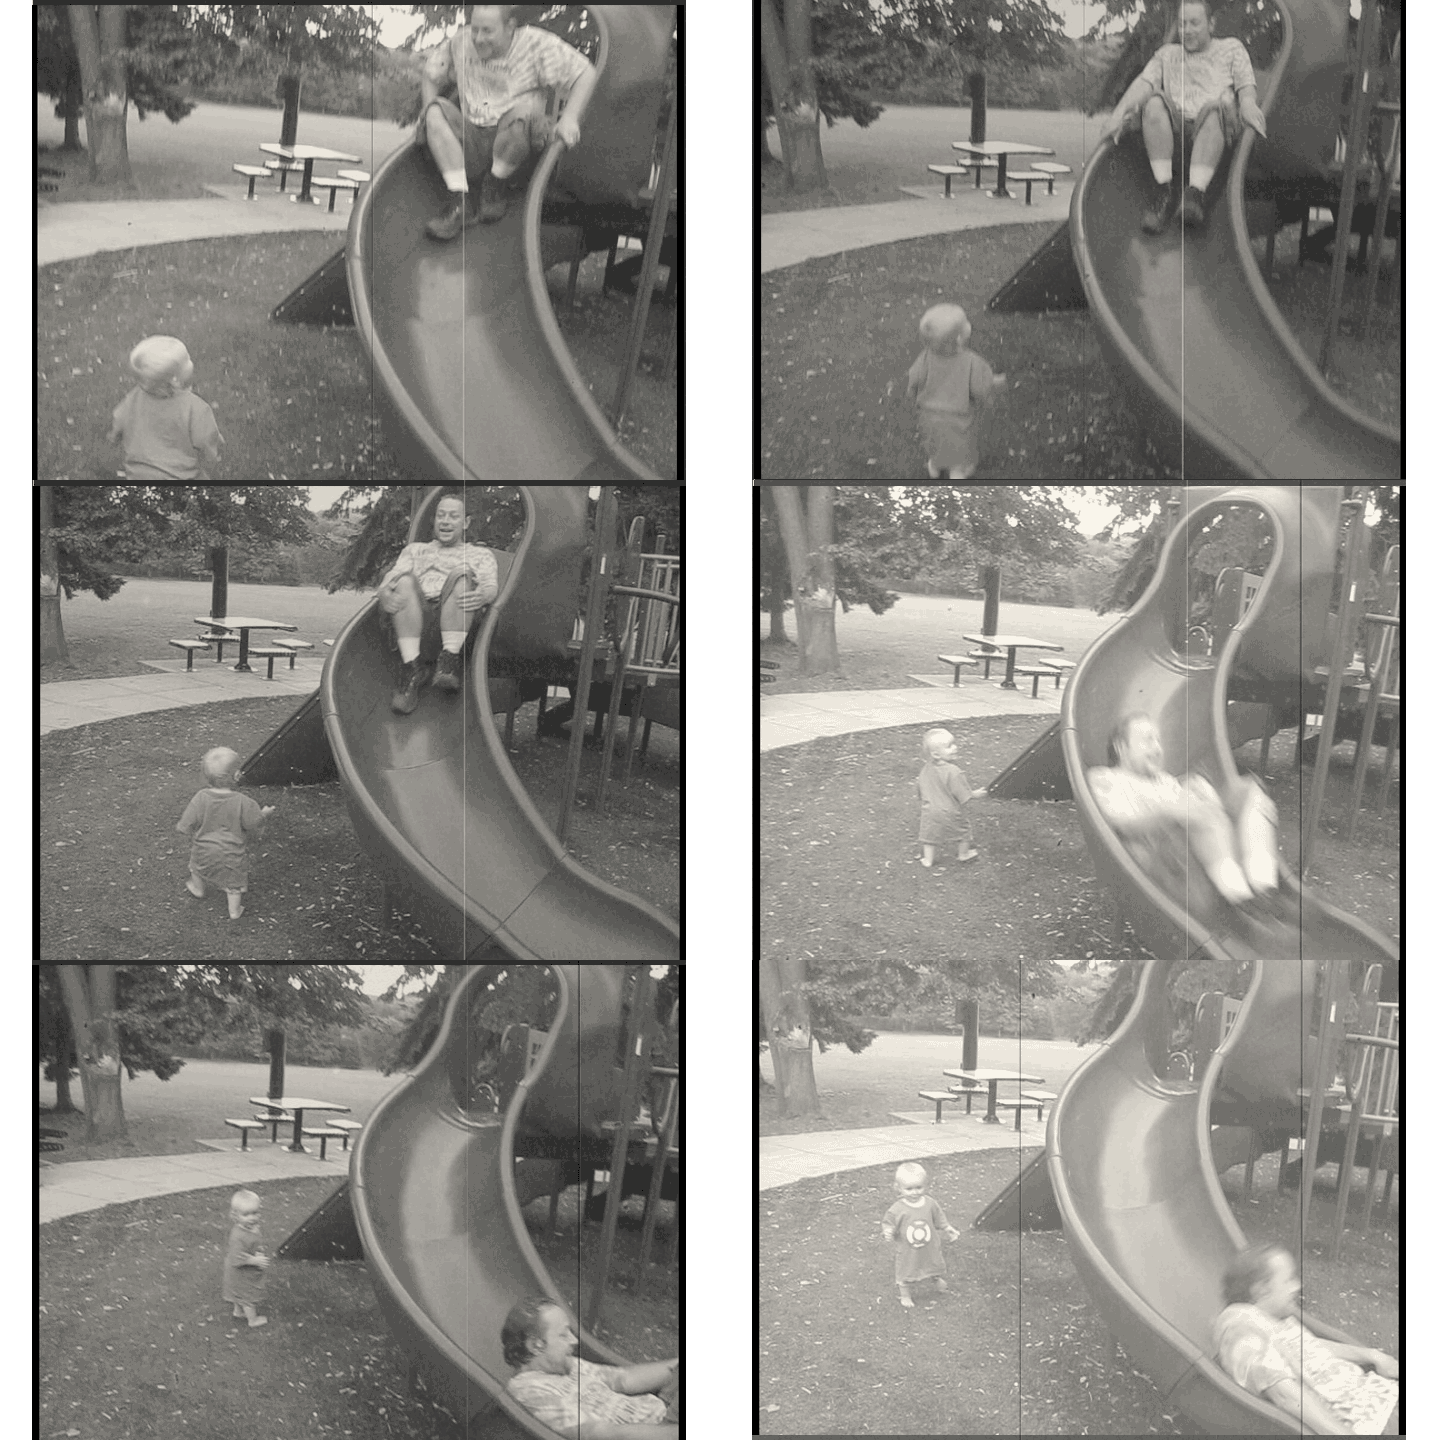
Grandson and son-in-law having fun last summer at the park.

Our only required DS106 assignment this week was to create an animated GIF from a Twilight Zone episode.  Me bad… I didn’t use a Twilight Zone clip…  But according to Talky Tina, who gave us the assignment, my GIF fulfills most of the other requirements. It’s B&W.  And it’s capturing a really nice childhood moment.

“But that’s okay, because a black-and-white sequence makes for a smaller GIF anyway! Can you help me relive my childhood (and perhaps your childhood, or that of your parents?) with some nice, friendly b&w animated GIFs From The Twilight Zone and Beyond?  Try to capture all of the really nice childhood moments! You know the really, really best and funnest parts!

I’ve never created a GIF before, so this was a bit of an adventure.  I had to first figure out what these things were all about.  Luckily my daughter was over for family Sunday dinner tonight and she pointed me to some fun examples at James Vander Memes.  It turned out after doing some research on the web and viewing a few tutorials on YouTube that my Mac versions of Adobe Premiere Elements 11 and Photoshop Elements 11 software would work.

The clip I’m using was taken from a video of my grandson and son-in-law called “Playtime With Daddy” that I created and posted to YouTube at the beginning of the year.  At the time I was acquainting myself with new video editing software and was having fun trying out new effects like changing the speed of the video and adding in an old news reel effect.

I had some trouble figuring out which format to publish the video clip so that it would turn into sequenced images. Publish+Share => Computer => Image (use for exporting still image) => open the advanced menu and choose “export as sequence” under the video heading, then save.  My next glitch showed up as I was moving each of the still images into a single Photoshop file.  For some reason my Photoshop Elements wasn’t letting me easily copy and paste the layers between files like I had done with earlier versions.  I found a work around. Again, after some trial and error, when saving it to the web as a GIF I needed to check the sequence box.  Then it would only play in reverse?  What the ….??? After trying, without success, to manually reorder the layers I finally found a checkbox that said reverse on it, and I was on my way. Only to be stymied one last time when I previewed my blog entry and the original Flickr link didn’t work correctly.  I ended up just inserting my own media.  I’ll update my post if I get it working correctly.

I enjoyed this assignment and am looking forward to learning more about what others have done with a GIF.  I wonder how I’ll be using this form of story telling in the future?

Daddy Slides for DJ