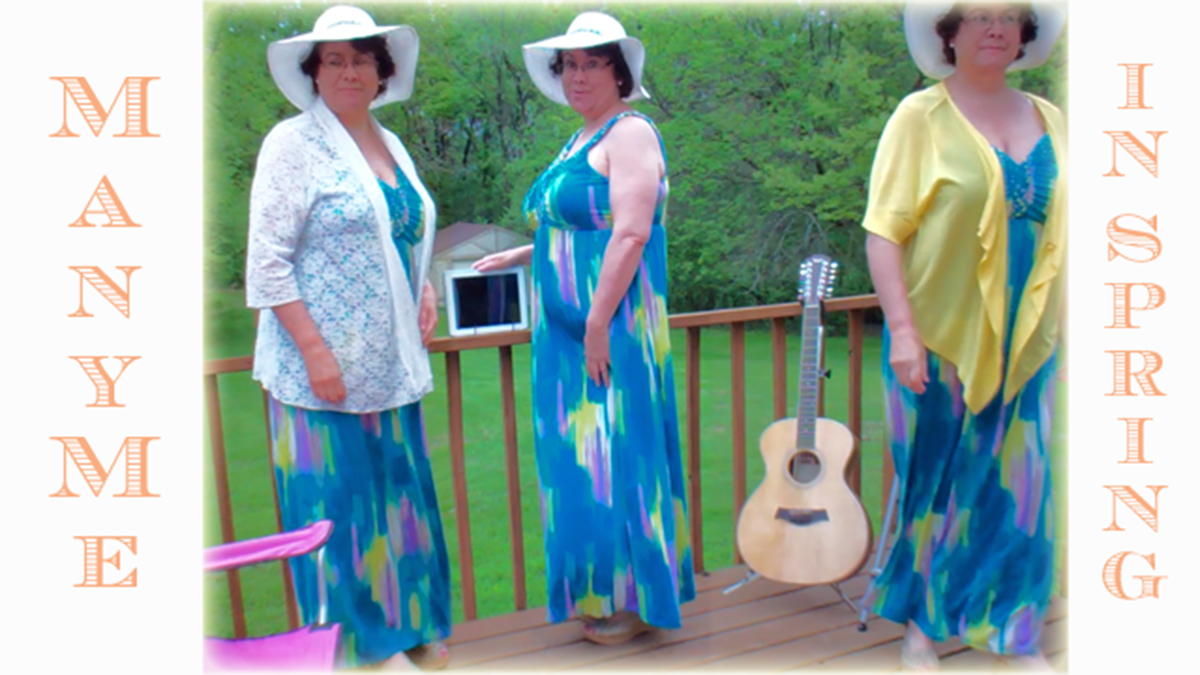
The Evolution of ManyMe
Inspired by my recent DS106 assignments I decided to take two of the projects I had completed this week, ManyMe and Go Daddy_Wheee, and use the skills and final products I created to visually illustrate the evolution of my ManyMe photograph. (Assignments: Multiply Yourself, Animated GIF) The objective of the Multiply Yourself assignment was to take two or more photos of yourself in the same location and combine them into one photo. I’m going to go one step further here and label this GIF project a completion of the “Photo It Like Peanut Butter” visual assignment 347 where we’re instructed to:
Use a GIF to illustrate the generation of a real world object/place by using your own series of photographs as the source material.
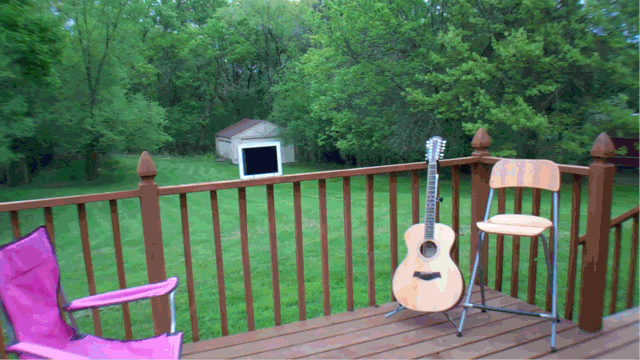
Phase I: The original images to work from were pulled as still frames from a 4min video taken walking in and out of the frame and placing myself at different locations. (See earlier post for more background.) When making one of these photographs it’s important to have your camera on a tripod and that you get your shots as quickly as possible so that the lighting doesn’t change drastically. If you have a controlled lighting environment you don’t have to worry about it. Just make sure your background isn’t changing. )
Phase II: Using Photoshop Elements I cropped the single image shots. I had strategically planned my placement in the photographs so that I could do a simple rectangle crop by making sure I hadn’t crossed over into another shot’s field. The guitar, iPad and chairs were my boundary markers. No messing around with a tedious Lasso Tool.
Phase III: Next came the adjustment and fine-tuning of the cropped images for alignment and lighting. Yes, even though I took the video in under 4min on a very overcast day, the center image of me was brighter than the two outside images. Go figure! I also didn’t like the diminished resolution quality of my images since they were taken from video footage in rather poor lighting. Fiddling around with a few filters I found a combination that brightened and slightly blurred the entire photo that I found appealing. (Although my daughter later confessed she didn’t like the effect. She thought it made me look like an alien and the image had lost its warmth.) As a final touch I cropped the entire merged image (attempting to improve the photo composition) and then created a fuzzy yellow border that complemented the yellow jacket I’m wearing in the right side image.
Phase IV: Creating the GIF… I gathered and organized the needed photoshop layers from earlier in the project into one new file. Again, making sure that the alignment between images was spot on took some fine-tuning. I didn’t need to worry about the lighting this time, since I wanted to show those changes if they were there. Once I had it assembled and previewed the first GIF, I noticed that I wanted it to run a bit slower so the viewer could take in each of the image changes more easily. This was to show an evolving process, not just a quick action clip. I increased the overall frame rate to 0.8 seconds and cloned the initial empty frame and final frame to allow for lingering even a little longer on those shots. The addition of the title text at the end capped it off nicely.