Category Archives: Assignments

Meet Digital Diva Abby

Abby_CharlieBrown_500px

Abby & Her Charlie Brown Halloween Toy

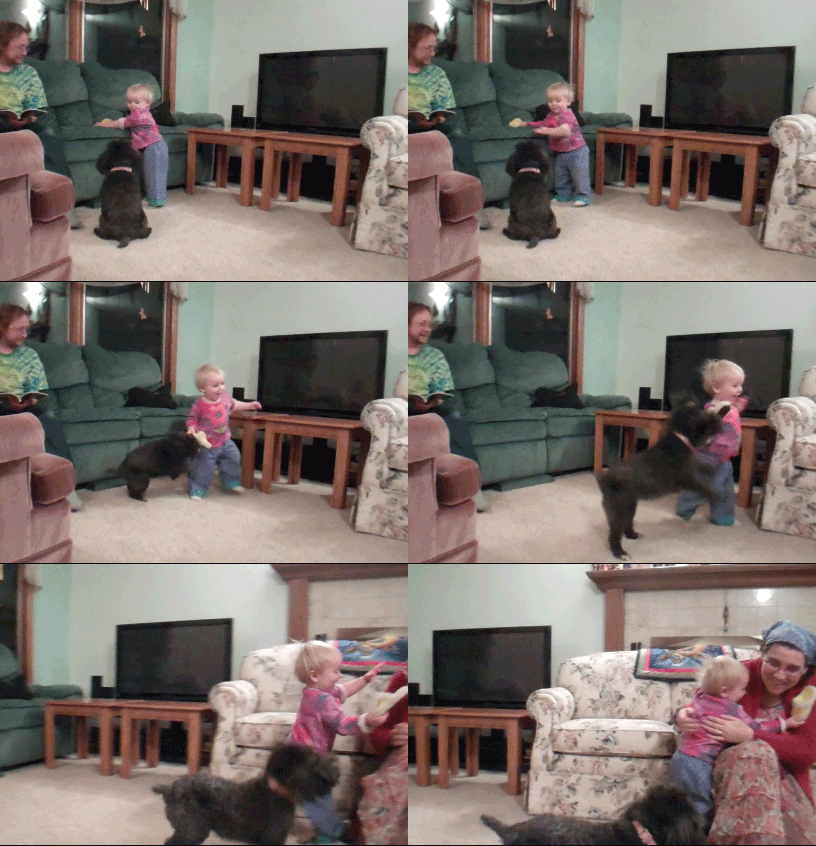
Yesterday’s ds106 daily create tdc644 was all about capturing an image of a dog.  Although the suggestion was to either take a picture or to draw one and take a picture of that, I figured since I have the digital media already hanging out on my computer, why not go a step further and share my little doggie Abby on video and throw in a new GIF for good measure.

She’s such a media diva.  Or is it that I’m the digital media diva and she’s just an unwilling subject of my creative endeavors? But then how would you explain how she’s annoyingly tried to insert herself into a couple of my projects? [The making of the Obruni podcasts on the Scott Lo LoDown summer of 2013 and the Headless ’13 week 4 audio reviews.] Which subsequently required the editing out of her attempts to “audio bomb” my projects.  I’ll think I’ll leave those bits and pieces for an audio out-take reel if I ever decide to make one.

So here she is…..

AbbyDJRound_GIF2

Help! Mommy, help! Abby is gonna get me!

The DS106 Matrix

 “Do you want to know what IT is?….Unfortunately, no one can be told what DS106 is.  You have to see it for yourself.” – Morpheus from The Matrix

I’ve been working this week in Headless ’13 ds106 learning how to read movies.  The initial part of the week 10 assignment to analyze a scene from a movie will be posted soon.  I had decided on using the lobby shoot out scene from The Matrix.  A portion of the assignment asked us…

To get practice in basic video sequencing, locate at least two smaller portions within these clips that demonstrate the points you made in your analysis above.  We want you to put these scenes together in a short montage, sequencing them together so that you get some basic experience with video editing.

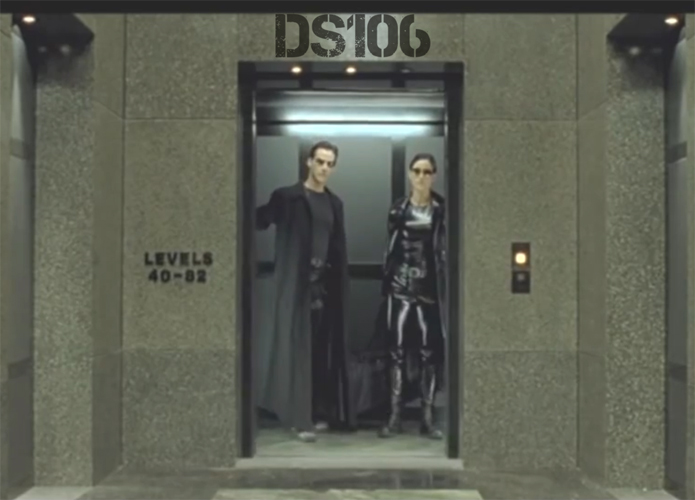
MatrixRemixThumbRemixing of video and other digital media is a skill I’m familiar with already.  [See Talky Tina – Sweet as Tupelo Honey].  So I modified the assignment to give me a bit more of a challenge.  I remixed the clips to create a montage/trailer for the DS106 course experience rather than demonstrating the points made in my video clip analysis.  I tried to find a DS106 video assignment or mashup assignment for something like this, but didn’t see one.  Did I miss it?  If not, I think I’ll create one for us.  I created one for us: VideoAssignments1232

Production Notes

I downloaded 3 clips from The Matrix with the Firefox add-on Video Downloader.

I was drawn to snippets of the dialogue that I felt I could string together to have them talking about the chaos we experience and the perplexing situation we have trying to tell someone else what DS106 is all about.

For my video editing software I used Adobe Premiere Elements 12.  Making the clip transitions cleanly from one to the other took a bit of fiddling around by shortening and lengthening the clips so that I didn’t have massive jumps between shots that looked out of place.  At about 20 sec in there’s one cut that didn’t quite work right.  The rest I’m pretty satisfied with. I really had a chance to see and understand how the cuts from one character to another or one scene to another are made as I put this together.

The audio went pretty smoothly.  There were two spots where I wanted to dub in “DS106” – one with Neo and one for Morpheus.  It helped that my voice at the moment is pretty low due to a cold, but I’m not really satisfied with the quality of the dubbing job.  I opted to let it go since I didn’t want to work that hard to make it “perfect”.  I know I could’ve taken the audio into GarageBand and played around with effects and stuff,  but it was good enough this time around.  Personally I think it’s funnier that it stands out as being dubbed anyway.

The DS106 logo overlay onto the elevator was created with the addition of a .png formatted still image onto a new layer above the video track. Reducing the opacity down to 70% made it look more realistic. Finding the location to place the logo was the hardest part. I had to look for a somewhat logical spot in the video that had a stationary image for at least 5 seconds.  Above the elevator worked fine.  The logo had to be resized initially, but no zooming or tracking was required.  Both a white and a black version of the logo are attached below for others to download and use in their projects.

Source Videos:

http://youtu.be/oUBdyntL2Ag

http://youtu.be/Es2uYtSJh-Y

DS106 Logos in .png format for download

They’ll have a transparent background.

ds106_Black

ds106

DJ Rocks The Mic for DS106 Radio

[soundcloud url=”http://api.soundcloud.com/tracks/114642943″ params=”” width=” 100%” height=”166″ iframe=”true” /]

Introducing a future DS106 Radio DJ in training. He may only be starting to string words together, but with the magic of audio editing DJ and Nana have created a new radio bumper for DS106 Radio. [audio assignment 36]

DJ-Rock-The-Mic

This all started because I noticed on my regular Wednesday afternoon visit that DJ was wearing a “Rock the Mic!” t-shirt today.  There was no way I wasn’t going to snap a photo of that to post for audio week. (Camera+ app on my iPhone).  DJ loves having his picture taken.  He poses and smiles when asked, and wants to see the results of his “modeling” efforts right away.

Then using the Recordium App I was able to capture DJ repeating back to me, one word at a time,  “Nana listens to DS106 Radio”.  (And letter at a time when it came to the DS106 portion.) He did almost all of them on the first take! Both Mom and Nana were surprised.  It was great fun to replay the recordings and have him repeating the words all over again as he listened to it.

After dinner I downloaded the .wav files into GarageBand and chopped out the bits I wanted. I like that I start with the “can you say” phrases then follow up with a closely edited sound clip that strings together only the DJ parts. It tells more of a story and makes the bumper as a whole more interesting.

You can bet you’ll be hearing this little guy’s radio bumper the next time Nana hits the DS106 radio waves. 

UPDATE: The JunioRS added this bumper to the end of their DS106 Radio Show, “Spinning Round” aired on 10/22/13 for the Headless ’13 Radio Show group assignment.

How do you make a micrograph “pop”? (3M-DS106 Repost)

This is a repost from an internal 3M blog by “WS”3M-DS106 Salon member

How do you make a micrograph “pop”?

3MMMI’ve been in electron microscopy for over 10 years (my first class on the subject was in 2000), and something that took me a while to figure out is “how can I present my images?”

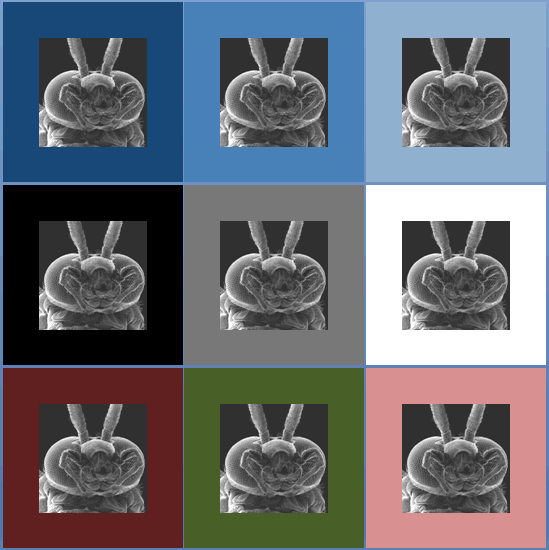
You’d think this is a simple solution, just throw them in PowerPoint and send them off.  But let me ask you this…what background color should you use to give the best appearance to your images?

Take a look below:

BugMicrograph

As seen, some colors help make portions of the micrograph image stand out while some make them appear ‘washed out’.  When I have a choice, I usually opt for a dark blue background.  It’s a personal choice.

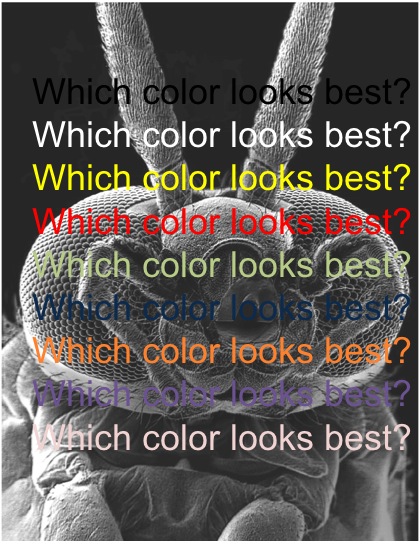
But what about identifying items within your micrograph?  What color then???

Bug_FontColor

Font color legibility test.

Again, above shows some options.  What color do you use?  I generally like yellow or red depending on the features darkness in the image.  Sometimes white and black can get lost in features within the image.  The best answer is trying it out.

WARNING: If you are presenting – make sure, make sure, make sure, to test your images on the projector first.  Your PC screen is not like most projectors regardless of the color used.  Take the extra time to test your images on the projector and make sure the brightness and contrast levels on your images make them easy to view and follow.  Just my $0.02.

Note: The original nanoparticle image used for the internal 3M post could have been considered proprietary.  Rather than take the risk, we have substituted a public domain image of a bug from the Dartmouth College electron microscopy images gallery.

3M Comment from “HC”

It has been a long time since I sat down at a EM instrument and I had never thought to put a border around the image – very thought provoking. Would it also make sense to change the gray scale palette into a sepia one – kind of like false colour? It would at least stand out more than just regular EM images.

Another thing that one has to consider in identifying things in the image is also the font in addition to the colour. Since you are going to ‘overwrite’ something with the text, would it make sense to put a small background so the text pops through?

From Academia to Industry, from Bench to Plant. [3M-DS106 Repost]


Originally posted Oct 4, 2013 on an internal 3M blog by “HC” a 3M-DS106 Salon member

From Academia to Industry, from Bench to the Plant. (3M-DS106 Repost)

HCHeadlessGIF

“HC” 3M-DS106 Salon Member

This week one of my friends from Australia finally landed an industry position in the US after many years.  He did his masters degree where I was doing my postdoctoral research and that was when our path first crossed.  He later moved interstate to another university to do his doctorate (when I started working at 3M).  He finished his research and then went to Virginia Commonwealth University for his postdoctoral research.  As his project is winding down, he asked if 3M was hiring any inhalation scientists and at that time, we unfortunately weren’t.  Found out this week that he got into PPD (Pharmaceutical Product Development) in Middleton, Wisconsin and one of his first comments was that “Industry is so different from Academia!”

I agree with that statement, and now that I have about the same experience in industry (5 years at 3M vs 4 years as a research only academic) I see some similarities and a lot of differences.  Some people prefer the deep understanding that being in academia can get you while some prefer taking that knowledge and commercialise into products.  Academics live off grants (unless they get tenure, but even then, grants are still good), while in industry we use internal grants to fund research/development on projects that interest us and could lead to success for the business and company.  There are plenty of articles comparing the two ‘worlds’ and I probably won’t add too much wisdom to that body of work.

Having said that, one thing that my academia friends might not get to see is the manufacturing plants (or even those friends in Silicone Valley).  It is a complex facility that also require ‘magic’ to get products out.  This is where 3M also excels in, taking development from the bench and scaling it up in manufacturing.  Currently I am working through scale-up of one of the products that I am the project lead on and looking at the manufacturing path on how we can make the products.  We typically draw a schematic of the process flow but what if we can animate it to understand the flow better?

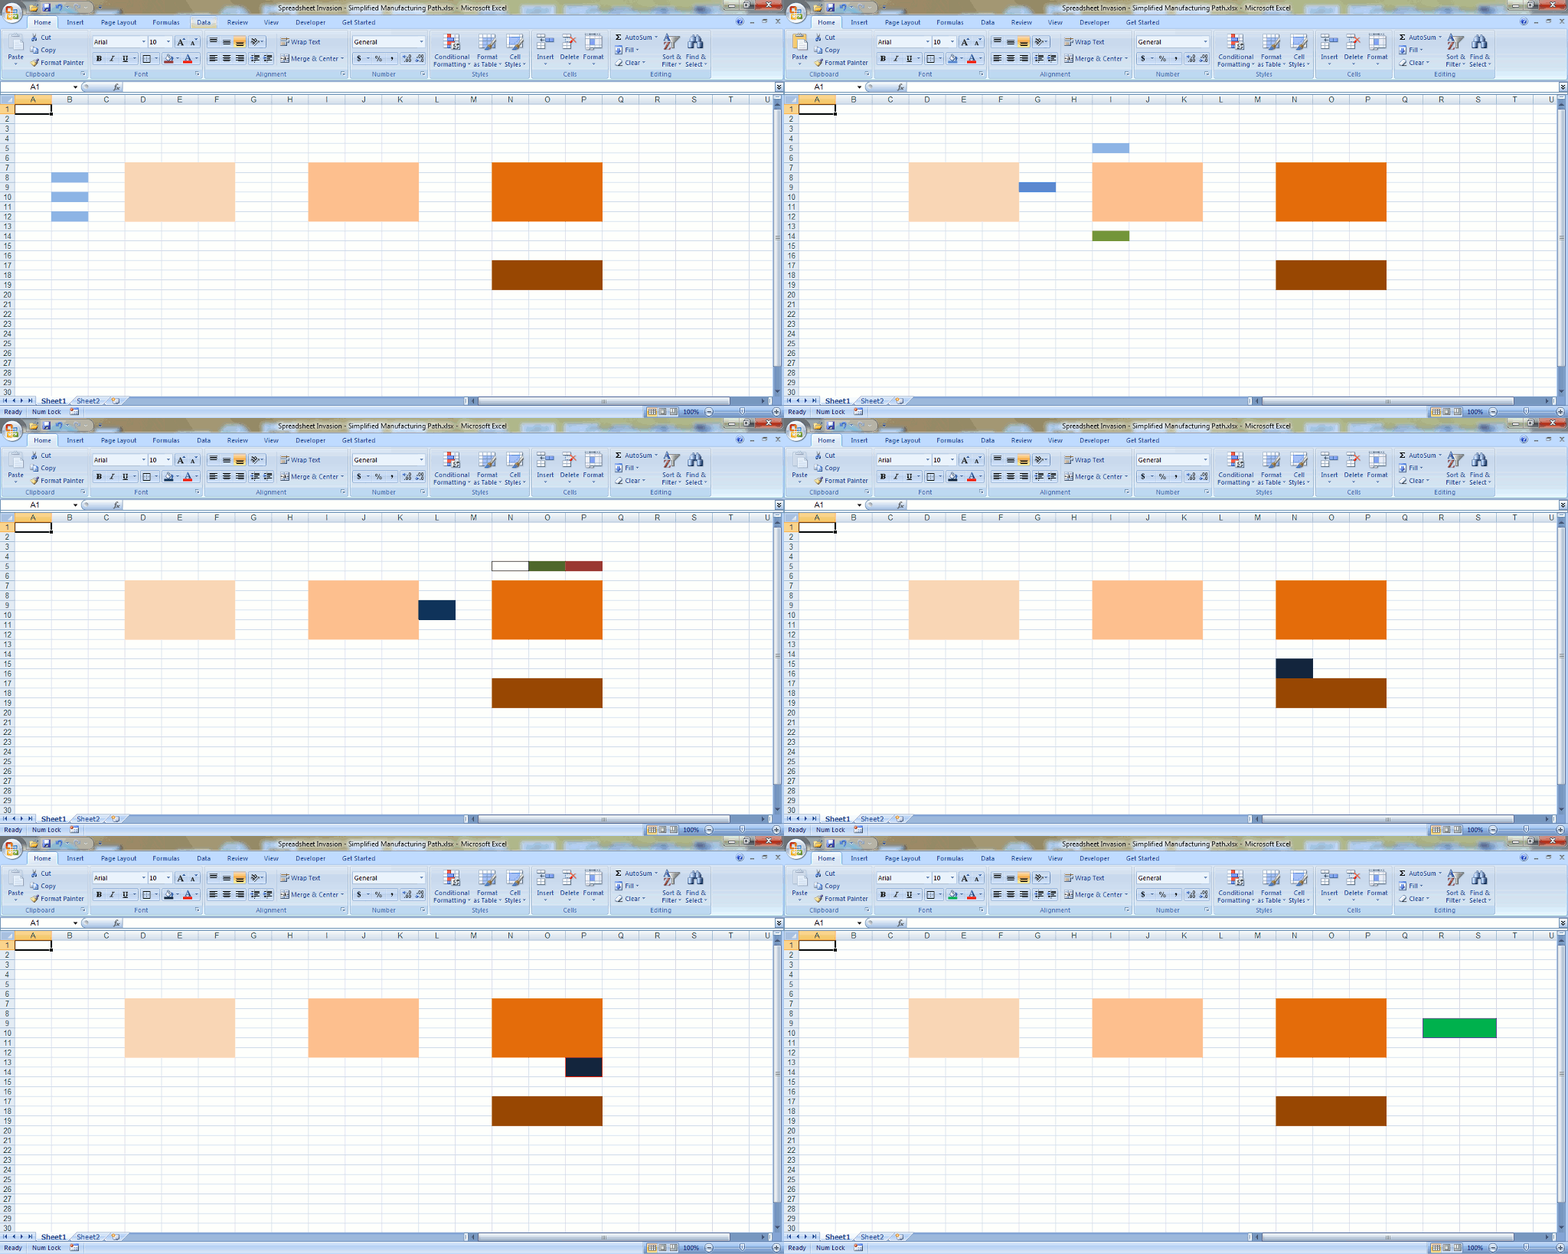
One of the DS106 assignments had a topic that is “Spreadsheet Invasion“, where you use a spreadsheet (in this case, Microsoft Excel) to do your animation on.  I decided to do a rough schematic that is kind of realistic (probably 80 % close) but not exactly the process I am using..

Spreadsheet Invasion - Example Manufacturing Scheme

This shows how complex the manufacturing process can be, with multiple inputs at different site locations.  It is also something we like to show how much work our Product Engineers do such that the end user does not notice any change in performance of the final product – that particular information has been animated using PowerPoint in a presentation and will not be shown here as it does show real actual manufacturing processes and the number of input materials as well as test standards to maintain.

Do most people know how complex manufacturing can be when they were still studying?

—-

Animated GIF notes:

  1. Planned the images to draw and the sequence
  2. Coloured the cells for the frame, do a screen capture of everything.
  3. Paste As New Layer in GIMP
  4. Save as GIF, as an animation.

Tending to My Cherry Red


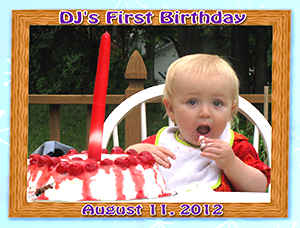
DJBDay1_ChildMuseum_thumb3_edited-1Once again I’m employing my DS106 time saver maxim to Reduce – Reuse – Recycle by creating a video that takes a close look at the food we eat (for DS106 daily create TDC 633) with photos and footage I had already taken. This time it’s with my favorite birthday cake which has made several appearances in daily creates and other digital storytelling projects. 

This beauty had to make another repeat appearance since fellow DS106er Stephanie Jeske was unable to view the time lapse video of me frosting my cake a few weeks back.  I use a small section of ZZ Top’s Cherry Red as the sound track and YouTube in Germany has blocked it because of copyrighted content.  I’m using an even longer section this time, but I’ve uploaded the video directly to my website, so no autobot is going to block it.

UPDATE 11/2/13: Just discovered there’s a video assignment for this type of project VideoAssignments1024.  Yay! Yet another Reduce-Reuse-Recycle for this one.

How it was made.

There are a number of sections to this video that was assembled in Adobe Premiere Elements 12: Intro GIF, Time Lapse, Still Photos, Outro GIF.

The GIF at the beginning of DJ licking the frosting off of the number 2 that was on his cake was made with two photos taken fairly close together.  They weren’t close enough to make a smooth GIF right away.  I ended up doing some work in photoshop to adjust the size and skew of the photos so that they blended more when flashed from one to the other.

Using the Lapse It Pro app I photographed myself frosting the cake.  In reality it took about 20 minutes (551 frames) that was reduced to 46 sec when all was said and done.  The app did all the work.  I just set my iPhone up on a tripod and went to work using the default settings since this was my first time out using this app.

IMG_1213

2 yr old’s beauty

The cake really did look beautiful when I had finished, just like the one I made for DJ’s second birthday.  But I made a fatal error by frosting the cake while it was still warm.  I was in a hurry to get to my birthday massage and for some reason was driven to take the time lapse photography right then and there.  Why I couldn’t wait is a mystery to me now that a little over a month has past since I made it.


Melted Cake

Aaahhh! It melted!

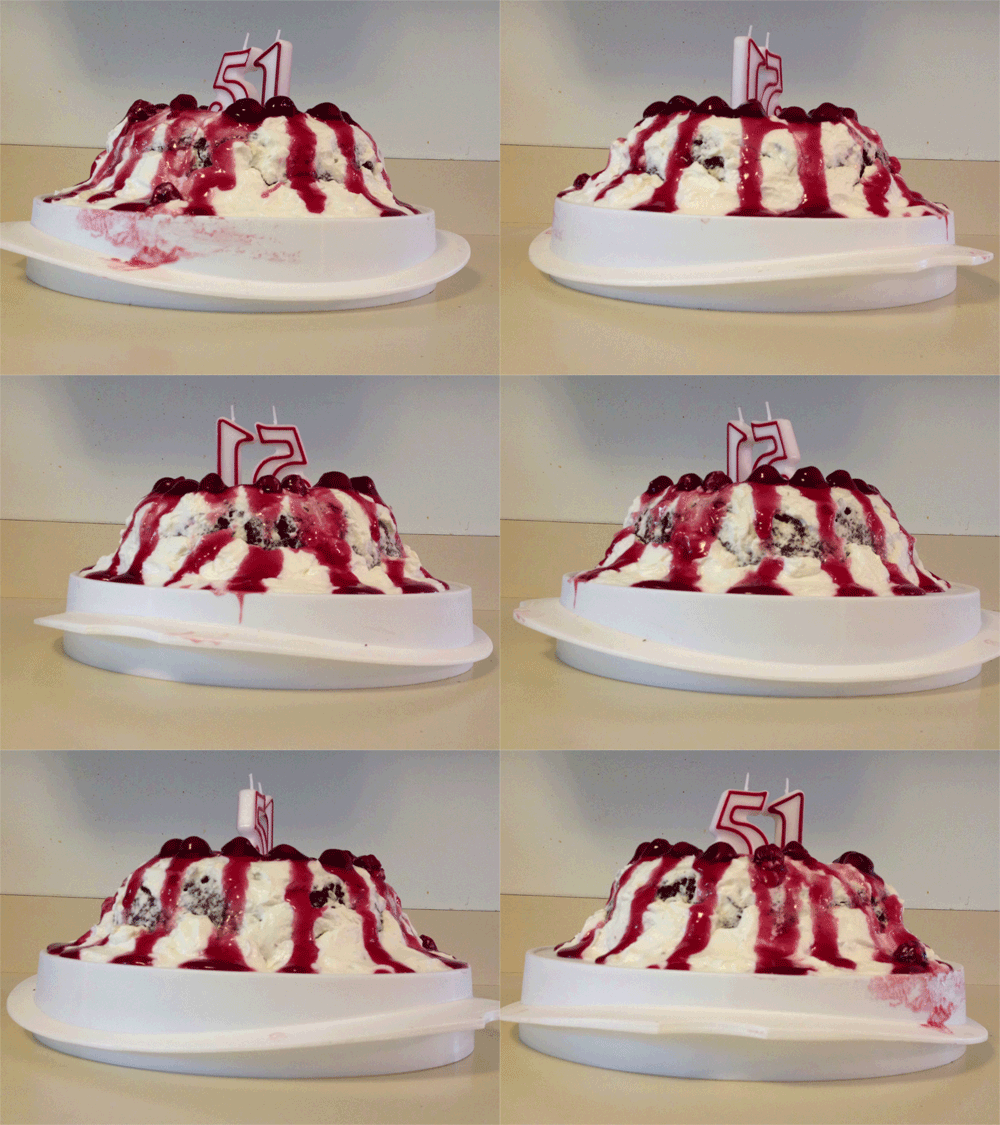
When I returned from my massage, I removed the cake from the refrigerator and this is what it looked like. To my horror my beautiful cake had melted.  I briefly thought about throwing it out and starting all over again. But I didn’t want to do all that work again.  It was my birthday and I wanted to play, enjoy myself, go get my hair done….. While I was running around having fun I came up with a brilliant idea on how I could pass off this monstrosity as something creative- if nothing else.


Cake_51

At 51 you’re showing your age.

My guests are accustomed to this gluten-free birthday cake and had just a few weeks earlier joined in the celebration of DJ’s second birthday.  Of course a 2 year old’s cake would look fresh and new, no wrinkles or bags, or cracks showing through.  But a 51 year old’s cake? Now that’s a different story.  They all laughed and dug in. It still tasted just as good and moist as it always does.  And really…. by the time I get it on their plates it’s a mess anyway.


Cake51_PS_GIFpsd_Small

51 in all her glory. No shame required.

The final GIF segment of the video clip was made with a series of still photos as I turned the cake slowly around in a circle.  For a first time effort, it’s not too bad. (Note to self… Next time have a marker of some sort on the counter top so I can line up the placement of the object from shot to shot.) The photos were uploaded to Photoshop, assembled as separate layers into one file and turned into an animated GIF.

Music Attribution:

ZZTop_AntennaHead

I certainly will give credit where credit is due though, and wish to express my appreciation to ZZ Top for making such good music.  You can buy “Cherry Red” on

LoDown Part 1 – (Episode 17)

[soundcloud url=”http://api.soundcloud.com/tracks/95490369″ params=”” width=” 100%” height=”166″ iframe=”true” /]

[UPDATE Oct. 7, 2013: This post was originally published on Scottlo’s DS106Zone LoDown blog on June 5, 2013. I am republishing it as a post on my own blog. Easy link to audio file.]

LouDown_RockylouHello… This is Rockylou standing in for Scottlo over at the ds106 open course in digital storytelling. We’re giving him a much needed break from producing the daily episodes of the LoDown. I can’t imagine trying to do this daily for 35 days straight. Making one of these is a lot more work with the behind the scenes preparation and post-production that you can’t appreciate until you’ve made one yourself. And keeping the time of the episode to 15 minutes or less is no easy walk in the park. By the time we finished recording our conversation we had so much material we thought it best to turn it into two shorter episodes instead of one VERY long one. [Link to 2nd episode] But I’ve also been on that “wild ride” that Scottlo and Prof. Groom were on in episode 15 of the LoDown. It’s a lot of fun when you are actually doing the recording.

AmberTiltedFace_PodcastIn this episode my daughter Amber agreed to join me to discuss our back and forth process when creating our own podcasts based on short stories and letters she had written while an AFS exchange student in Ghana, Africa in 2000. With a focus on sound effects, we talk about how we’ve had to deal with generational and different life experiences when deciding on the “right” sounds to be used for a character in a podcast. I’m envisioning sexy gamblers, while she’s intending clownish “antelope man.”

Like I mentioned above, it takes a tremendous amount of time and effort to create our kind of podcast. So why do we continue to make the sacrifices? What keeps bringing us back when there’s so much work that has to go into it? For me it’s all about spending time with my daughter, creating together. Although sometimes that creativity can get a little out-of-hand if we’re not careful. “Mom, we want them to say, ‘Please give us more. NOT Please make it stop.’”

As we were preparing for the podcast Scottlo prompted us to have Amber question me about my experience of being in the #ds106 course. What brought me here, and what are my impressions thus far? Great questions for any of us to reflect on. [Reflecting on DS106]

A shout-out to my fellow students whose work I used for the DS106 bumper (zinger?) mashup:

You can listen to all of the Obruni Podcast episodes with the audio player below. Photos and scripts are also available.
Episodes referenced in part one of our conversation:

  • Sound Effect Story was created from SFX in EP01- Obruni: Take It Up
  • The “Antelope Man” (The Entertainer) in EP05- All’s Hair in Love and War
  • +  EP01- Obruni: Take It Up
  • +  EP02- Obruni Ko Skuul
  • +  EP03- Transportation
  • +  EP04- Devil's Hairground
  • +  EP05- All's Hair in Love and War

Know-It-ALL Thru Storytelling

Rochelle and John at 3M

“It’s the undisclosed knowledge- the anecdotal knowledge.  It’s the stories that are missing. There’s an efficiency in story telling that you can not get from just the written text and then recorded videos.” – John Woodworth, 3M IT Manager

I am currently in the midst of coordinating  the 3M-DS106 Salon in coordination with the Fall 2013 “Headless” DS106 open on-line digital story telling course. One of my favorite technologies that we work with is audio, and I’ve been curious as to how or if podcasting might be an unexplored opportunity at 3M. So… last week I sat down with one of our 3M IT managers, John Woodworth, to discuss and record his thoughts on how vignettes and story telling can be used as an effective and often quite efficient mode of communication and knowledge transfer in the corporate environment.  John is an avid story teller who illustrated many of his points by telling a story.  As you can imagine, the time flew by and we talked for almost an hour.

This segment of my podcast experiment at 3M captures the second portion of our conversation specifically focused on story telling.  The first half on vignettes was much longer and needs to be edited to a more reasonable length or split into a couple of episodes.  If you find this interesting and would like to hear more, let me know and I’ll work up and post the remainder of our conversation.

  • +  Know-it-ALL thru Storytelling


Music Attribution: “Skirting Boards” by Bleak House (Creative Commons License)

NOTE: I want to apologize to John Woodworth and my listeners for the poor sound quality of the recording.  John sounds off in the distance with some annoying room echo.  I am still learning how to use my audio equipment (a Samson Meteor Mic plugged into an iPad using the Recordium App) and what room environments work best. (Definitely not John’s office with my set-up. I’m even wondering if I was actually recording through my iPad mic instead of the nice Samson.)  I did my best to try and fix it during post-production within GarageBand.  Most of the advice out there in Google Land was to trash it and start over again.  But one guy talked about how he adjusts the noise gate and EQ settings, and that it might take a second pass. I gave it a valiant effort, trying all sorts of different effects as well as what was recommended, and will do better next time around. What can I say in my defense… I’m a technical person by heart and enjoy getting out of my comfort zone to experiment with new technology. That’s one of the traits 3M hired me for!

Gifs, Gimp and Me (3M-DS106 Repost)

Originally posted 10/2/13 on an internal 3M blog by “JS” a 3M-DS106 Salon member

3M_JS I decided to go with the less creative title “Gifs, Gimp and Me” instead of what I originally thought of, which was “I ain’t no Gimp!” Which struck me as funny and worked on several levels but was a little unprofessional.

I am not a Gimp-ophile. Not by a long shot. I have learned several things, though, and I was able to create my own gifs! Thanks to the internet and what sounds like a preteen girl and a teenage boy. See videos below.

I downloaded Gimp and checked it out to see what I could intuit from it. The answer: NOTHING. I literally could not understand what any of the buttons meant besides the basic: line, fill, lasso. Very humbling. I felt very stupid.

So I Googled: “How to make a gif using Gimp” and got the Gimp website’s tutorial, a girl who explained how to make a gif of Jennifer Lawrence (Katniss Everdeen) shooting an arrow over and over and the boy who drew a stick figure walking. The Gimp website was less than helpful. I could not understand what they meant by “Gaussian blur” or “alpha to selection”. The girl and boy were much better. I learned about layers and timing and playback. (Which is located under Filters -> Animation -> Playback, by the way. Who knew? Talk about a steep learning curve).

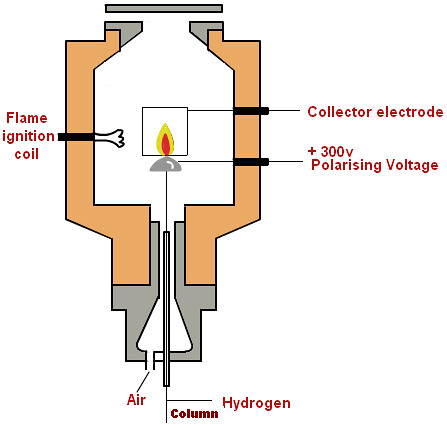
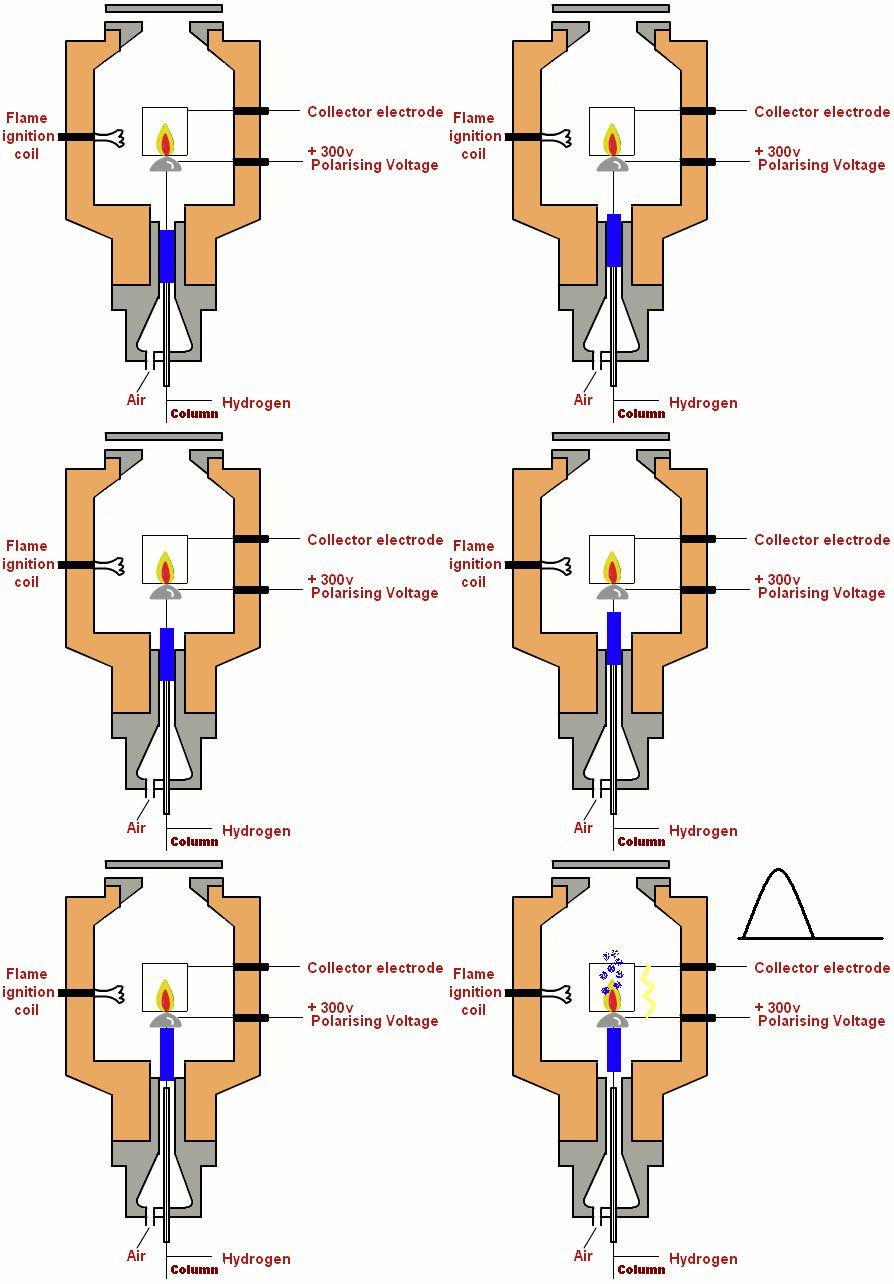
I have a presentation coming up in which I will describe how a Flame Ionization Detector (FID) works. Just the basics. Of course, I get the brilliant idea that I will animate the FID diagram to literally illustrate my point. Because what could go wrong?

Have I mentioned that I like to tackle big projects instead of working through little ones first? I do that with baking all the time. Why start small and boring when you can do a BIG EXTRAVAGANZA with FROSTING and FLAVORS and COLORS! Except that it is often more difficult and frustrating than if you would have started small. But the emotional payoff potential is really big. Cost-effective? You decide.

There really is no stopping me – short of dismemberment – once I start so here I go….

The FID diagram by itself:

FID diagram

Now, I need to show that the separated gas coming from the column in the gas chromatograph hits the flame and is ionized. The resulting electrical charge creates a peak on the chromatograph which we can use to identify how much of that particular analyte is present. So easy even a caveman can do it!

My attempts to do this in Gimp resulted in disaster. I do not like how once you create a shape in Gimp it becomes part of the picture. You cannot move the shape without taking the background with it. I’m not used to this. When I create shapes in Excel they are independent until I group them together. I can move them alllllll over the place. It’s great. Not so in Gimp. You better get your placement right the first time otherwise you’re screwed. This is incredibly difficult to do when you are trying to precisely animate a section of gas moving through a column.

Also, each of the layers I created just compounded on each other so instead of the gas moving up through the column; it was just one long line of gas building on top of each other. I tried several things and Googled a lot. Nothing helped so I looked for an easier program. I downloaded Paint.net. Bad idea. Not any easier. So I switched to Paint. Still the problem with the whole placement thing but I figured out a way to get around it.

I am familiar with animation in the traditional, drawing sense so I knew that I needed a frame for each move and I needed the background to always be the diagram. I know that animators use transparent paper to see their changes and then add the background later but I couldn’t figure this out in Gimp. What I did instead was I created a single file for each of the frames that I would need. Starting from one frame, I copied the rectangle shape that I needed and noted it’s location on that previous frame. Then I pasted it in the next frame, same location, and moved it up two pixels by hand. Super tedious. But it worked.

I used that method of noting location and movement for the entire animation. The result: 95 frames cut down to 50 frames for a shorter overall animation time. Then, – thank you Katniss Everdeen Gimp girl! – I used Gimp to take all my frames and put them together in an animation. I thought the animation went too fast for the flame part so I went back and changed the timing on the last few frames – thank you stick figure Gimp boy! (This can be done by right clicking on the layer, selecting Edit Layer Attributes and putting the frame delay (in milliseconds) in paranthesis next to the layer name. Like this: “Layer 1 (250ms)”. The default layer delay is 100ms.)

Here is my animation:

FIDAnimation

 I also wanted to signal heat for a different part of my presentation so I made this simple one using Excel to create the shapes, copying them into Paint to make it a .png file and then Gimp to animate my two frames. Much easier!

Here is heat:

Heat

Next post – getting rid of the background in your picture (.png) using Gimp!

Story Telling, Dance and Product Development (3M-DS106 Repost)


3MCenter_2
Originally posted 9/30/13 on an internal 3M blog by “HC” a 3M-DS106 Salon member

Sorry that I haven’t taken the time to write a blog post recently, it isn’t from the lack of interest but the lack of time due to various project related pressures all coming together at the same time.

As we have given away our TV about 6 months ago (we gave it away because we noticed we haven’t plugged our TV into the power socket for over a year), we haven’t been following what is the latest in TV apart from what one might read on blogs, newspaper articles or hearing this or that.  Manly what has gone viral (or back in my day, ‘hot’).

Talent shows usually get a lot of press and in themselves, there are stories about their background.  This time I am looking further than that in the case of Kenichi Ebina, the winner of 2013 America’s Got Talent (AGT).  Having found out that he won, I went back through his previous performances and agree that they are all amazing.  Unfortunately my curiosity told me to look into his back catalogue of performances online, all the way back to 2001 when he won with the group “BiTriP”, including a presentation at TED in 2007.

Back then, he was a good dancer but compared to what he can do now, he would be considered moderately good.  What captured my attention is his toolbox of ‘tricks’.  He has been building his toolbox since the beginning and not only replacing tools that doesn’t fit in the set but polishing those he use so it is shiny and fancy when it is pulled out.  The moving light tricks as well as the pulling of the clothing forwards/backwards was shown in the TED presentation, the sliding head and interacting with people behind each other was seen in 2001 with BiTriP just to name a few.  The use of video in the background is new in 2013 and that fits in quite well with the DS106 course.

One of his ‘wow’ performance in AGT was his ‘flying’ during his performance, using a strobe light to assist in the viewer’s experience.  There was a lot of gasps and clapping when he executed this move:

KE_FlyingIntoHeaven

In 2011 at a break dancing convention in London, Kenichi was in this performance and the finale was the strobe effect of this Ninja being ‘born’ and in action.  The segment was longer than I am showing but this literally is the last thing the audience sees (he starts to fly around in a circle before this final leap and then all goes dark for the end).

KE_FlyingNinja

The audience (different ones) also gave the same gasps and clapping from amazement.

So what does all of this have to do with product development?  I personally think this is what some good product developers probably have been doing and they may or may not know it:

  • 1) Build your toolkit (e.g. dance moves).  In 3M, the technical employees have access huge toolkit to work with (our Technology Platforms – Click on the technologies menu title to view.) as well as ones being developed at the bench.
  • 2) Test out the technologies in prototypes (e.g. various performances).  Take them out for a spin to see and understand how it works and is it something you can easily work with.  Polish it as you work on it.
  • 3) Build a story on how your product will work for the end-use, using the technologies you incorporate into it (e.g. choreography to tell a story).

I remember my mentor (now retired Carlton winner and Corporate Scientist, Wayne Dunshee) telling me once that I should be building and working with different technologies as well as understand how they can interact with each other then put it on the shelf.  Wait until there is a need for it and you can go back to your shelf, polish it up and there is your product.  Of course there are other steps involved to bring it through commercialisation.

Any product developers (seasoned and new) out there like to comment on these thoughts?  I am still a ‘fresh’ product developer in the 3M community so any comments are welcome.


For those interested, here is the background notes on how I made the two animations without the annoying “flashes” (the flashes is actually what you want).

1) I went to youtube.com and downloaded the mp4 videos containing the clips I am interested in.  There is probably a better way to do it without getting the whole video (which themselves are large in size) but I don’t know yet.

2) Using Windows Movie Maker, I opened up the large files, clipped out the few seconds of interest and saved those clips.

3) Found this program called Super (C).  It supposed to be able to do multiple video format conversions but be very very careful in how you install the program.  The program itself is free, but they have this installer that asks lots of questions if you want to install stuff – but it isn’t for the actual program itself!  I kept saying no (or having to find out how to say now) before it ran out of junk software to install, then the installer disappears and then the proper installer for Super (C) opens up and installed quickly without issues.

4) Ran Super (C), dragged-dropped the .wmv  (saved when I used Movie Maker) clips and selected the output as gif and let it do what it advertised it can do – and it does.

5) Opened GIMP and loaded the animated GIF file and then scrolled through to copy the frames where Kenichi is lit instead of the black background.  I pasted those frames into a new GIF file with a black background.  Set the frame rate appropriately and then saved the animation.  Feel free to download these files and rip them open in GIMP to see the individual frames I took.