With this manipulated photo image I am able to complete two DS106 visual assignments for the price of one. Giving me a final count of 12 stars when all is said and done for week 5 of the DS106 headless 13 open-online session.
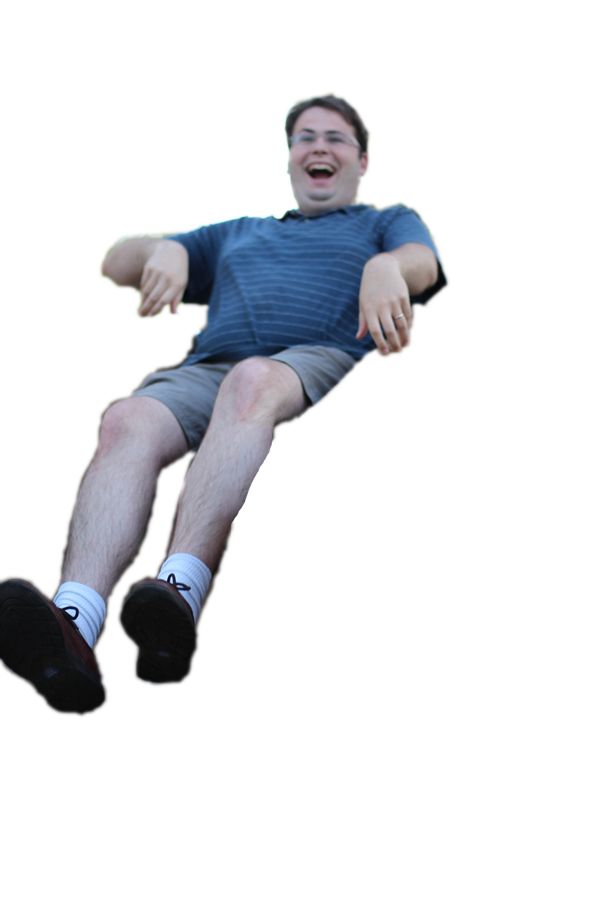
Slide Guy for Visual Assignment 595 (2 stars) where we insert a png image of the “Slide Guy” into a photo.
A Whole New World for Visual Assignment 419 (2 stars) in which we are to take a picture of a subject (grandparents, pet, yourself) and put it into a totally different background in which they appear abnormally too small or too large.
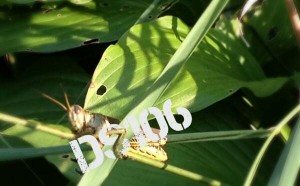
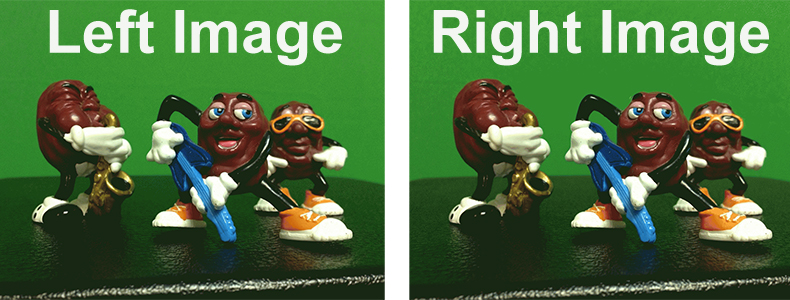
DS106 is so open even the insect world is joining in.
Just fun during visual storytelling week I decided to illustrate how open DS106 could be. As shown here, even the insect world is joining in. The photo was easy to make. There are a total of three layers: The original background image, a transparent PNG image of the DS106 logo, and a magic lassoed image of the grasshoppers leg that is placed over the the DS106.
DS106 Slide Guy
To add the slide guy enjoying his ride, I simply made another layer, sized him appropriately so that his posterior would look like a more “natural” fit as he slid down the blade of grass, and placed him at the top of the stack.
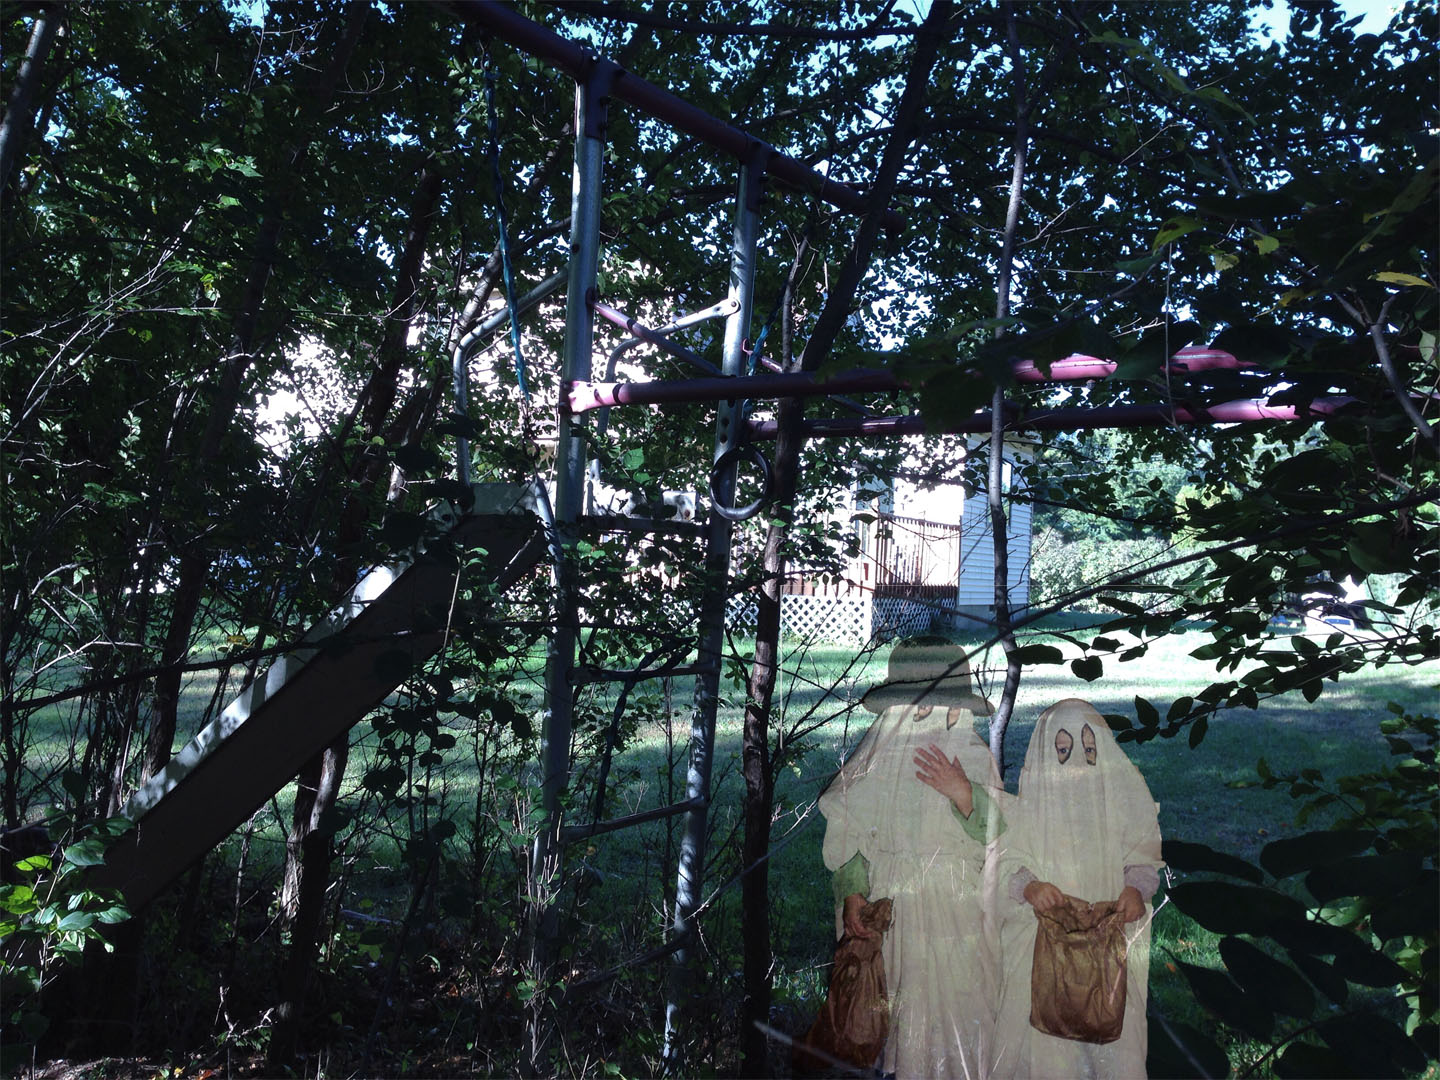
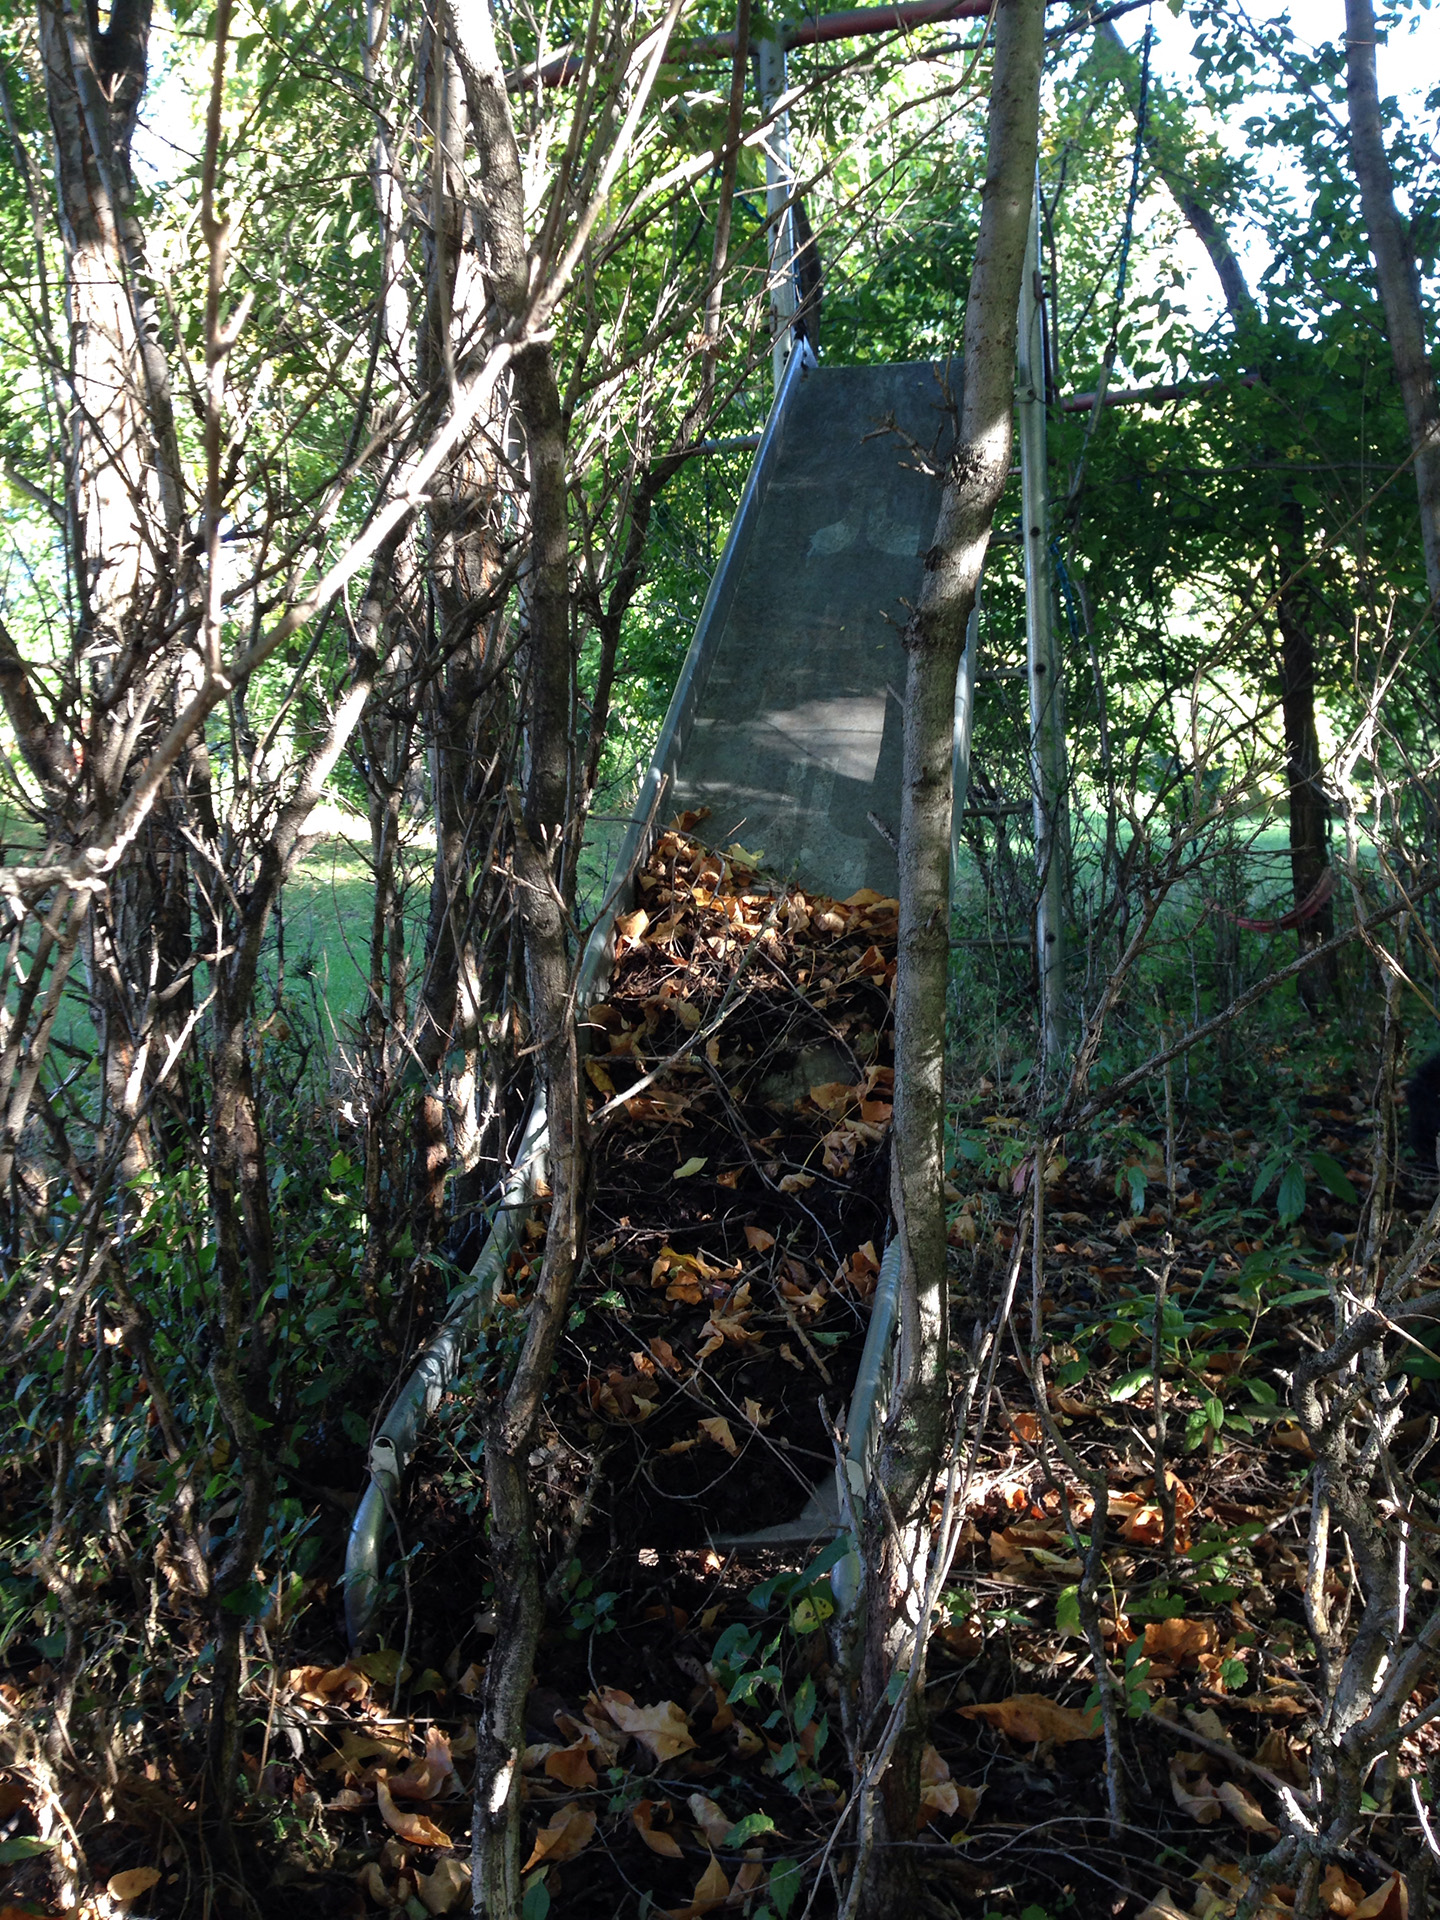
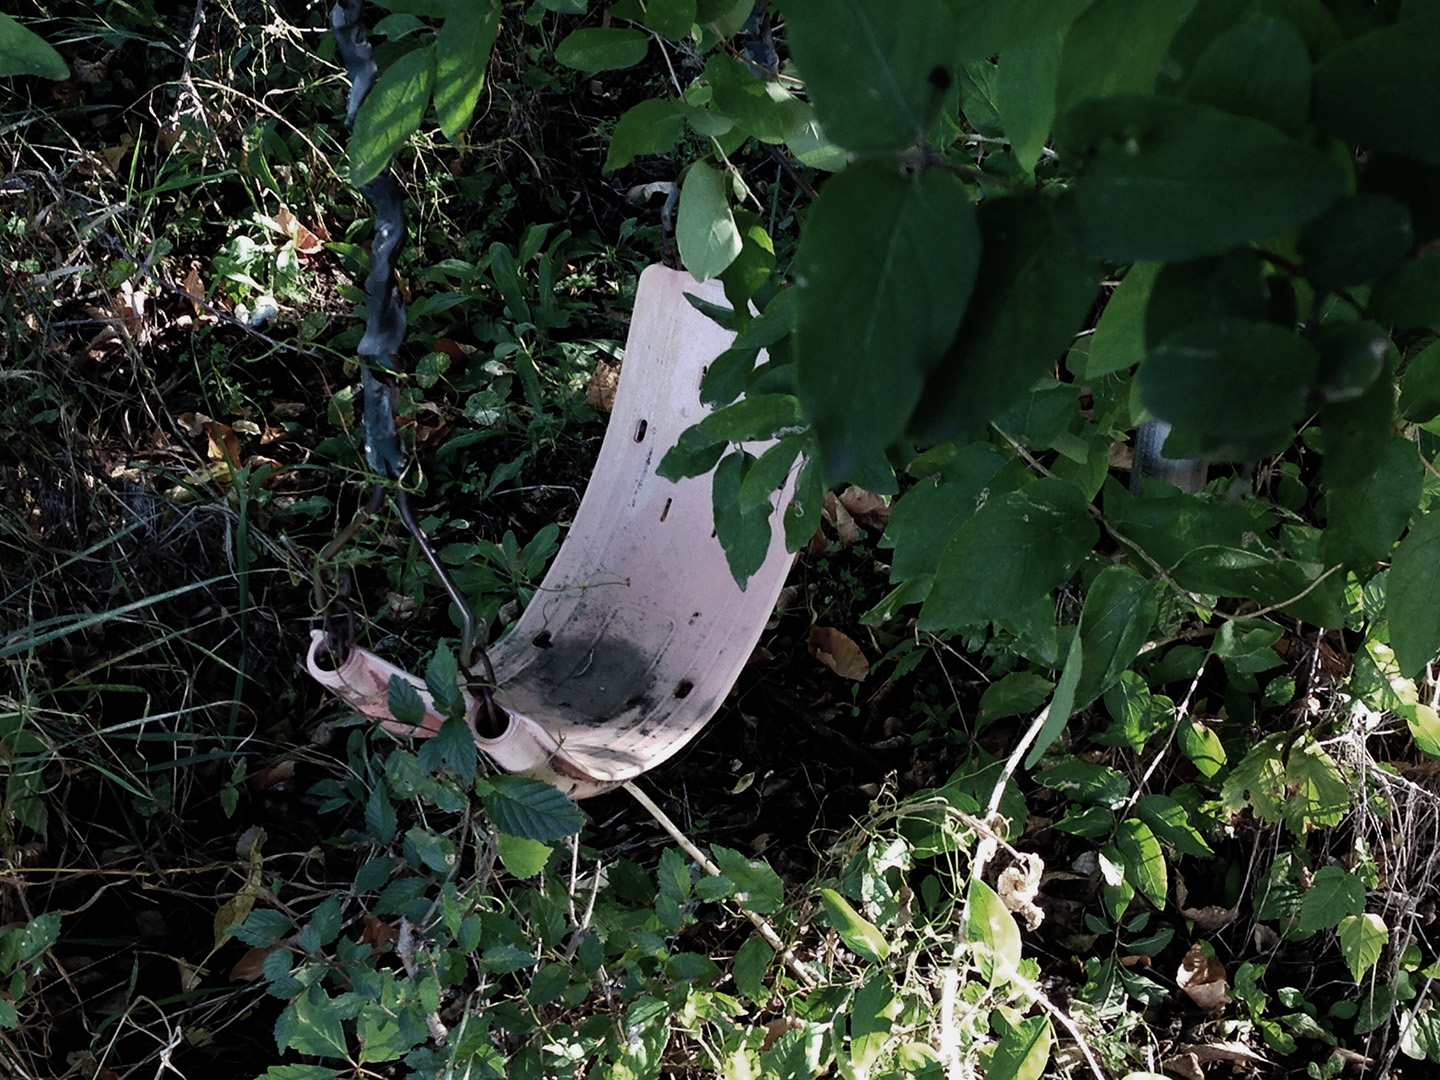
This weekend I took a backyard photo safari. As I assembled the images a story of my past life as a wife and mother of two young daughters revealed itself. For DS106 Visual Assignment 426, Is that a ….GHOST! I decided to use one of the photos of an abandoned swing set to produce a new image of my daughters haunting their old playground equipment.
Little Halloween Ghosts
This was easy to make now that I have more experience with my photo editing software, Adobe Photoshop Elements 12. Using an old family photo I had taken proudly showing off their Halloween costumes, I used the magic lasso tool to select what I didn’t want and deleted it from the scene. I copied the ghosts only picture as a new layer into the swing set photo. I sized the girls appropriately for their ages in relationship to the size of the swing set. Then reduced the opacity of the little ghosts down to 60%. New picture and assignment complete. 3 Stars for me.
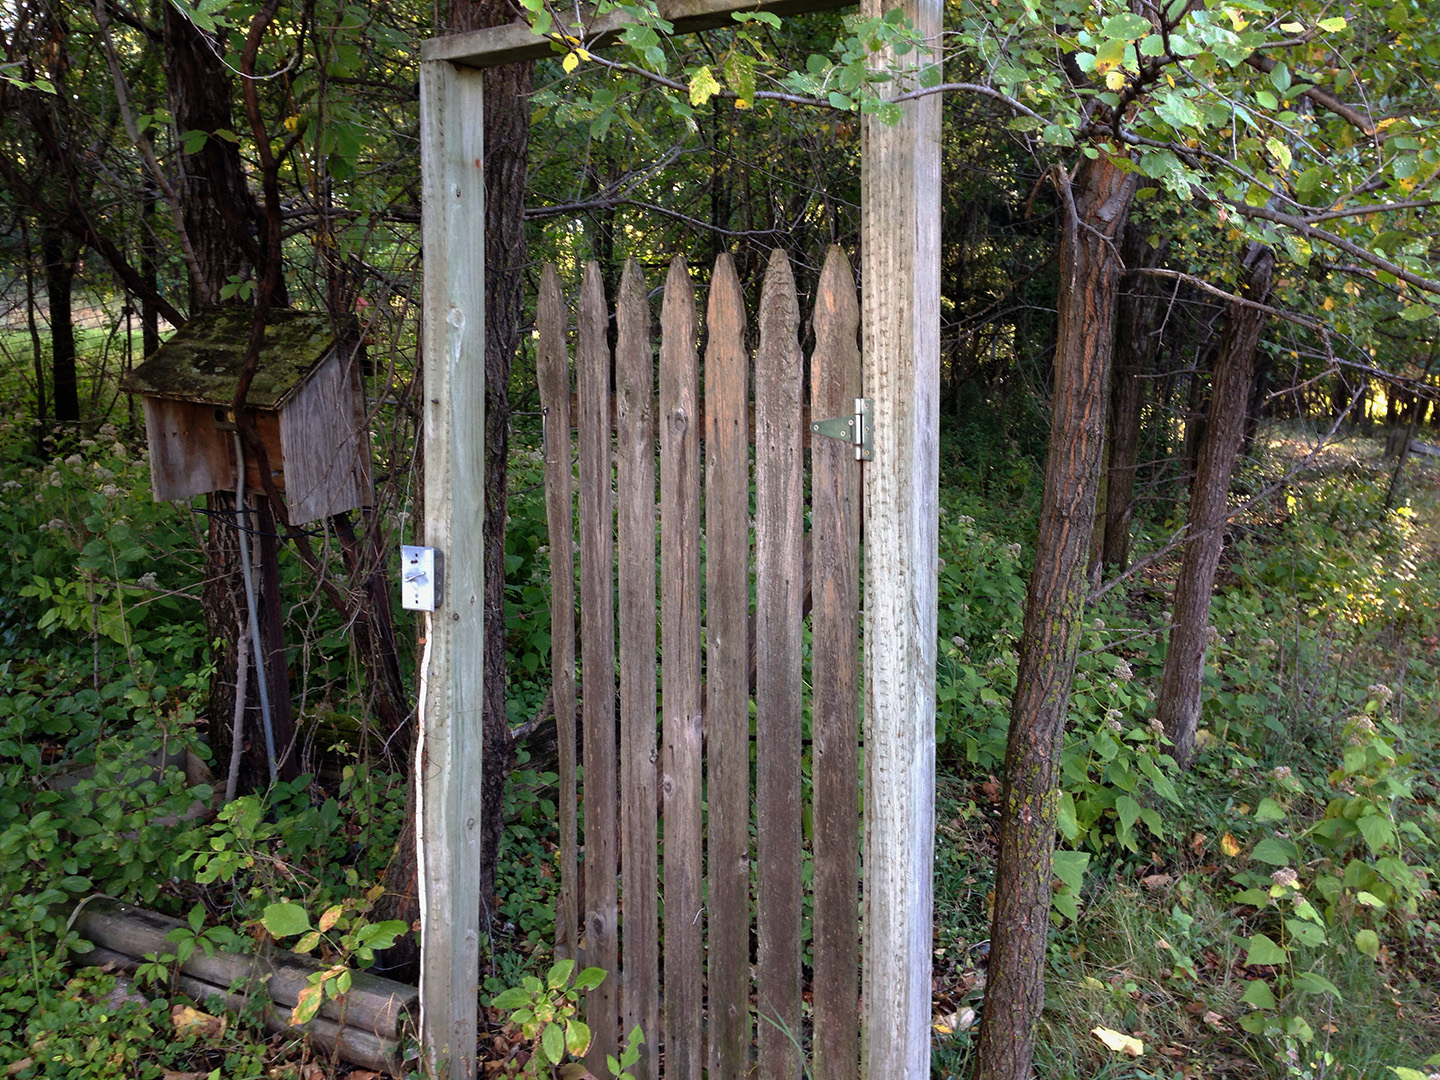
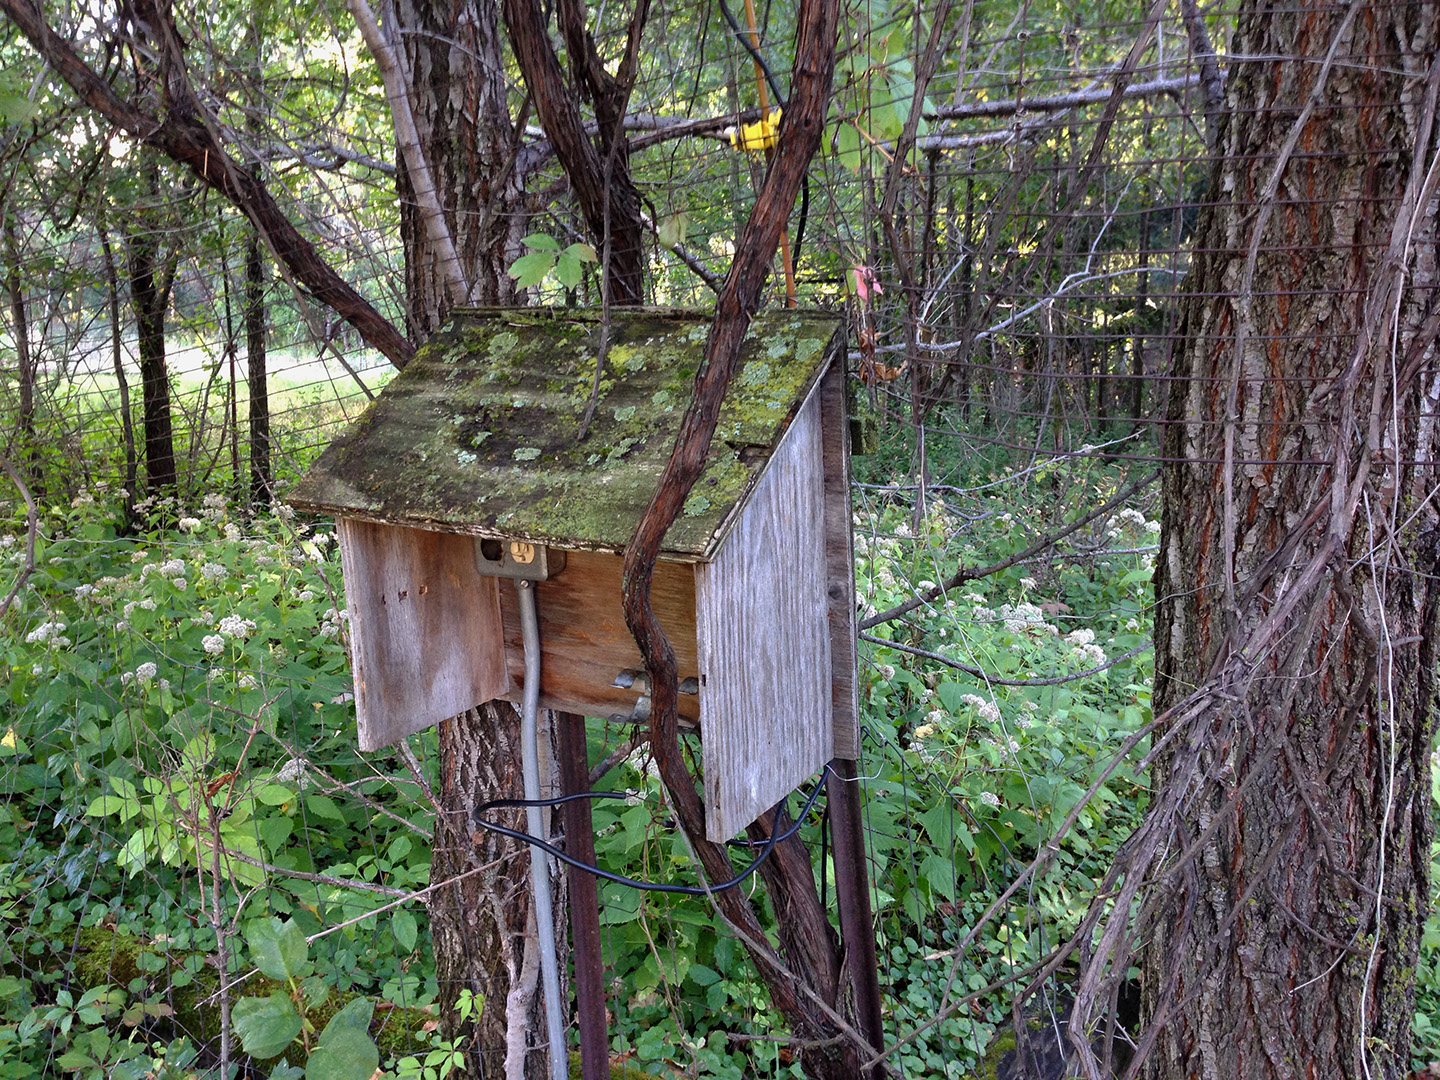
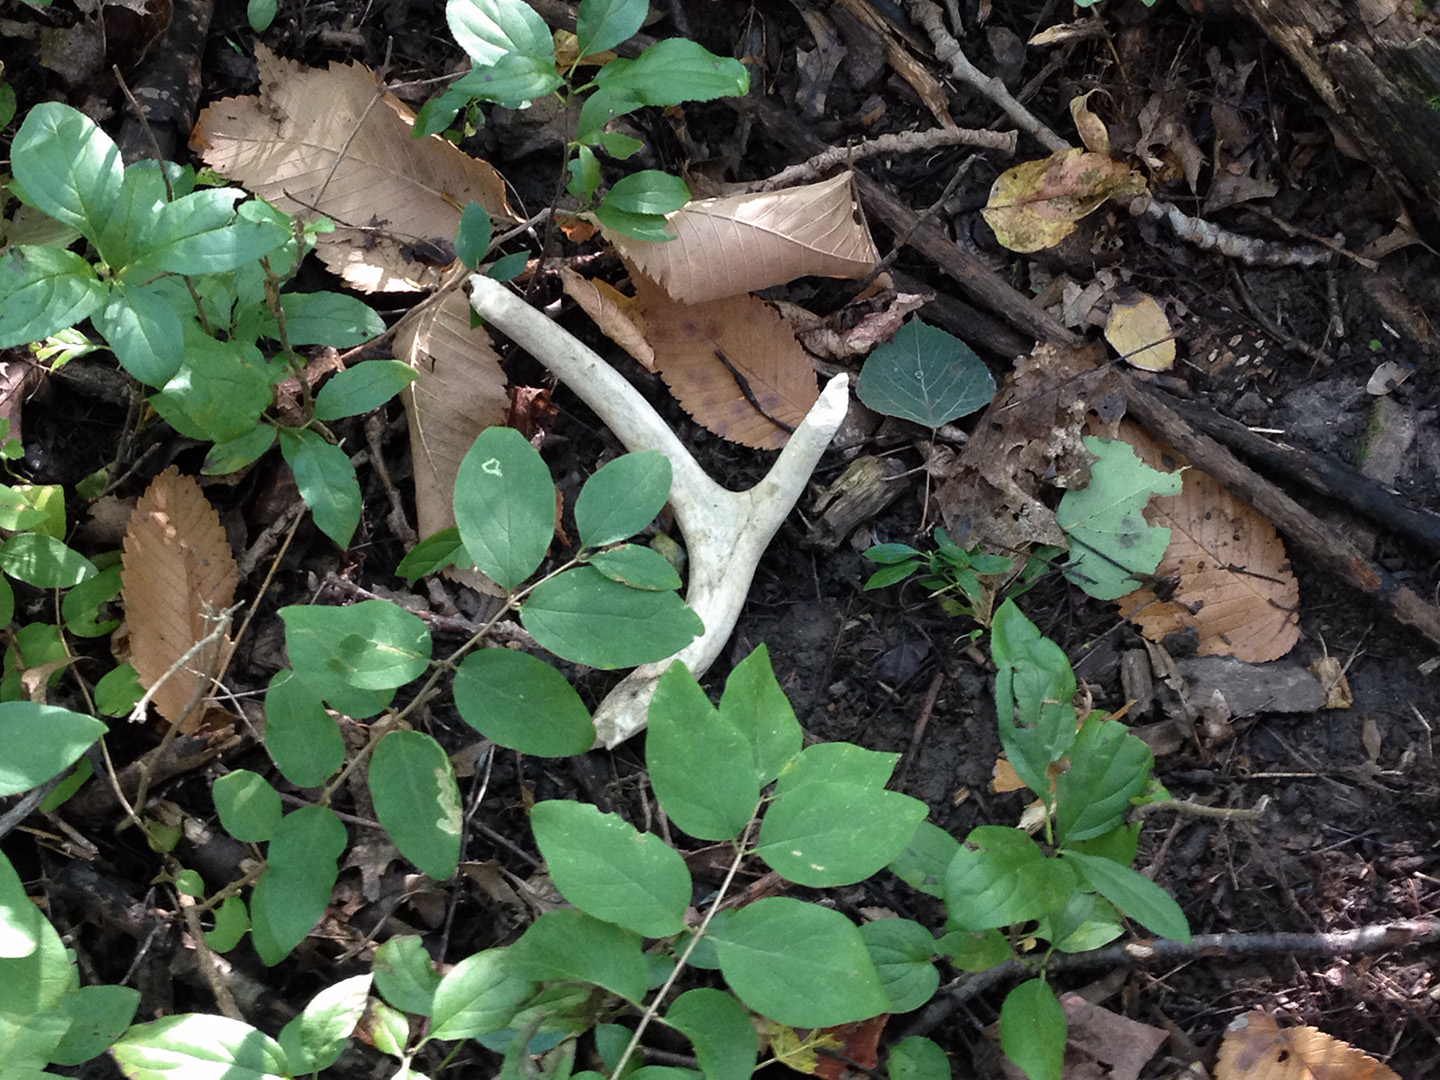
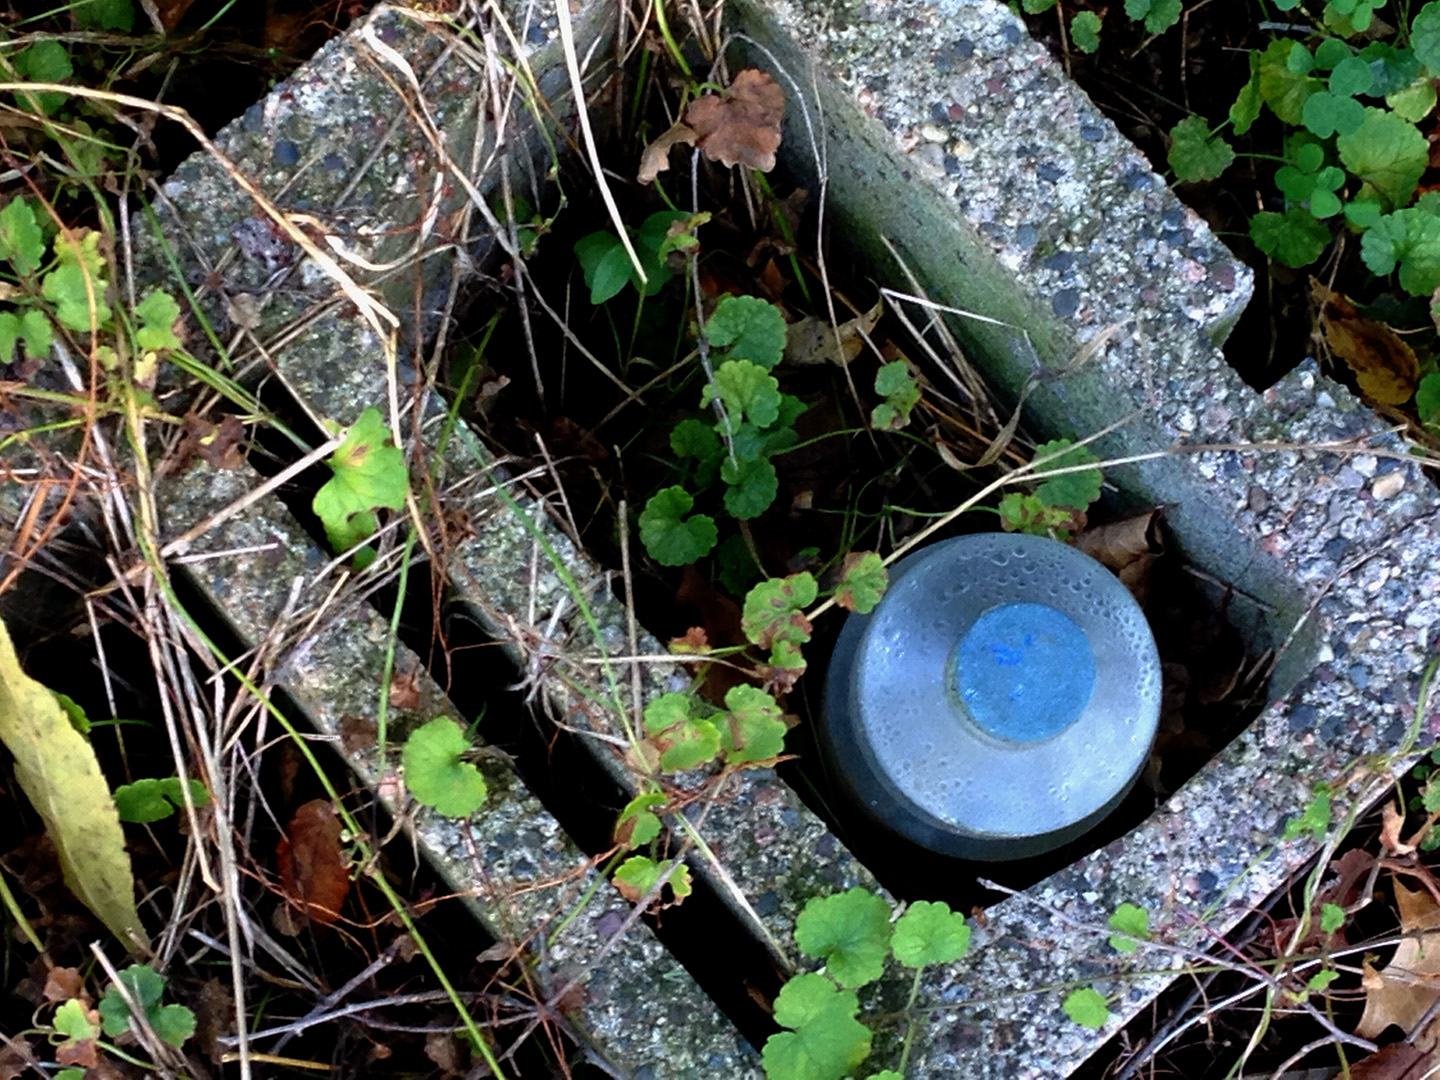
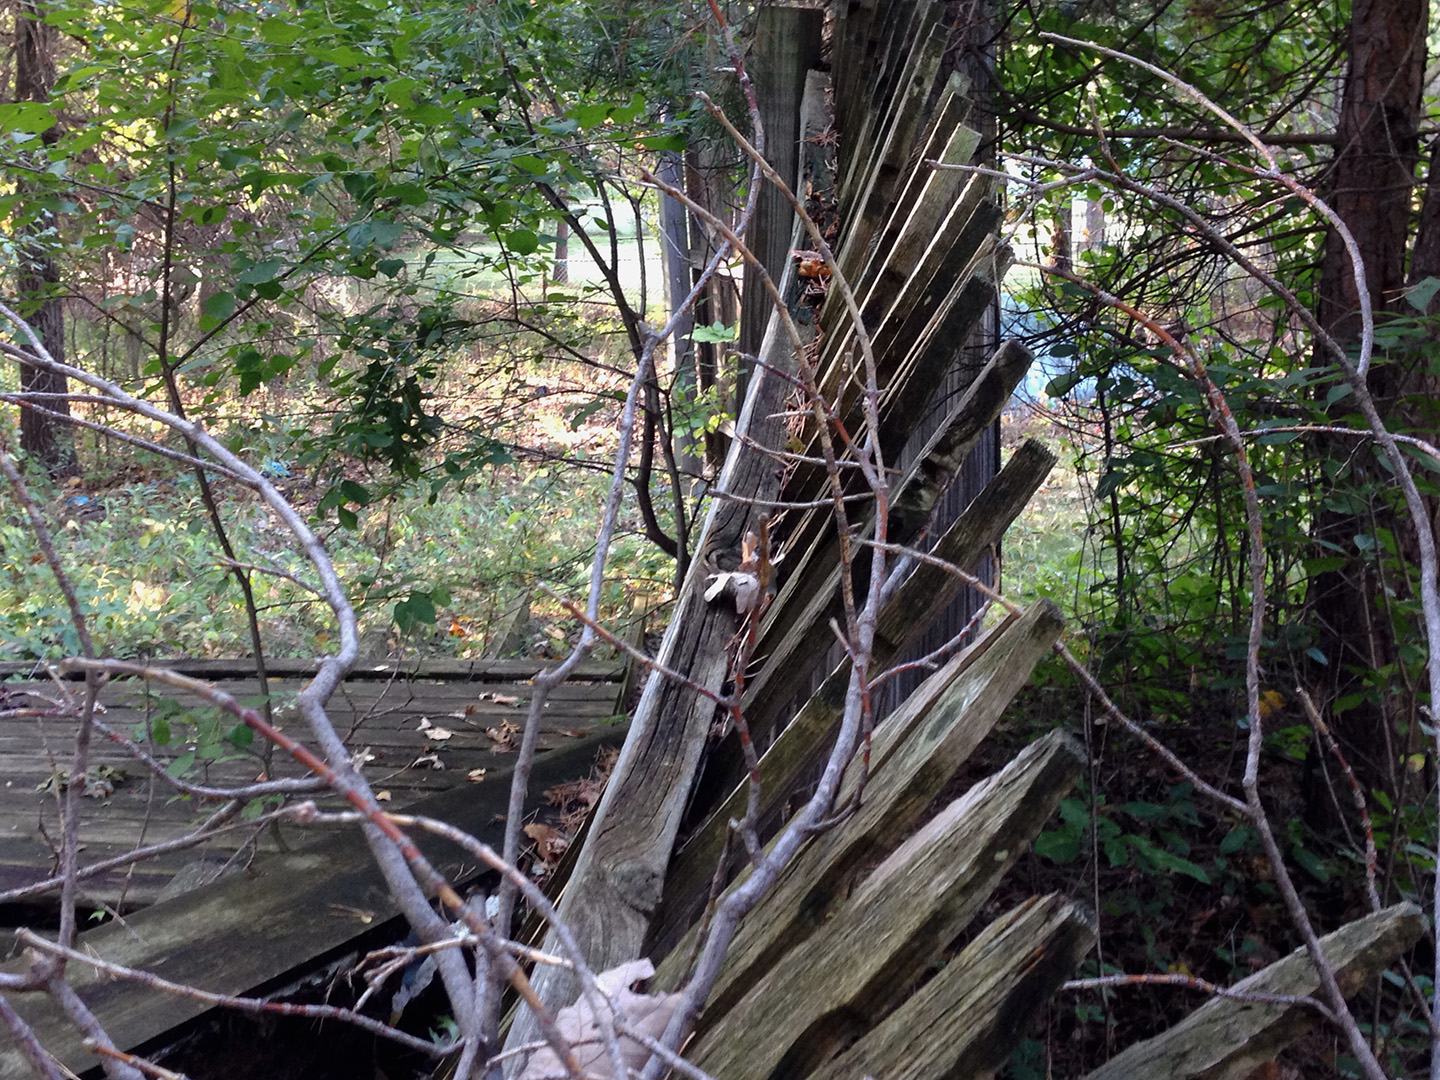
I went out this morning to capture images in my backyard during a time of day I knew would avail interesting shadows and lighting for a DS106 Photo Safari. What I didn’t expect was that through the process of my editing and choosing the photos, a story of my life as the mother of two now grown daughters, and the ex-wife of a gardener would reveal itself. The images tell of a time well past: A child’s swing set neglected and overgrown with weeds and trees, a prolific garden abandoned and no longer tended to, a bleached antler reminding me of the 9 foot electrified fence my ex-husband erected to provide a barrier to free meals for the herd of deer traveling through our backyard, discarded odds and ends left behind when a family dissolved. While this phase of family life has past, a new chapter has begun as an over-joyed “Nana” of a vivacious two-year old grandson. And who knows what stories my backyard will tell 10 years from now.
Bygone Backyard Photo Safari
A backyard of memories revealing their story of a family long past.
Abandoned Childhood
Forgotten Swing
Left Behind Garden Gate
Bygone Box
Bare Bone
Block & Bottle
Ousted Oilcan
THE MAKING OF….
All photos were taken with my iPhone using the Camera+ app. It is a powerful app that can do a lot if you know what you’re doing, which I don’t yet. I experimented with setting the white balance and selecting a focus zone. Neither of which proved to be successful. I think it’s time to read and watch some tutorials. Next, I uploaded the photos to my desktop with the Photo Transfer app. I love this little app. I can very easily upload and download photos and videos over WiFi or bluetooth to any of my Apple devices or even my PC.
Fallen Fence – Photo too cluttered.
I had taken almost 90 photos, and challenged myself to get it down to 5. With a quick look at the images I could see most of them weren’t all that great. The lighting was bad. The images were cluttered and/or blurry. Some just weren’t interesting at all. I then opened them up in Photoshop Elements 12 for a closer look and to do a little photo editing if needed.
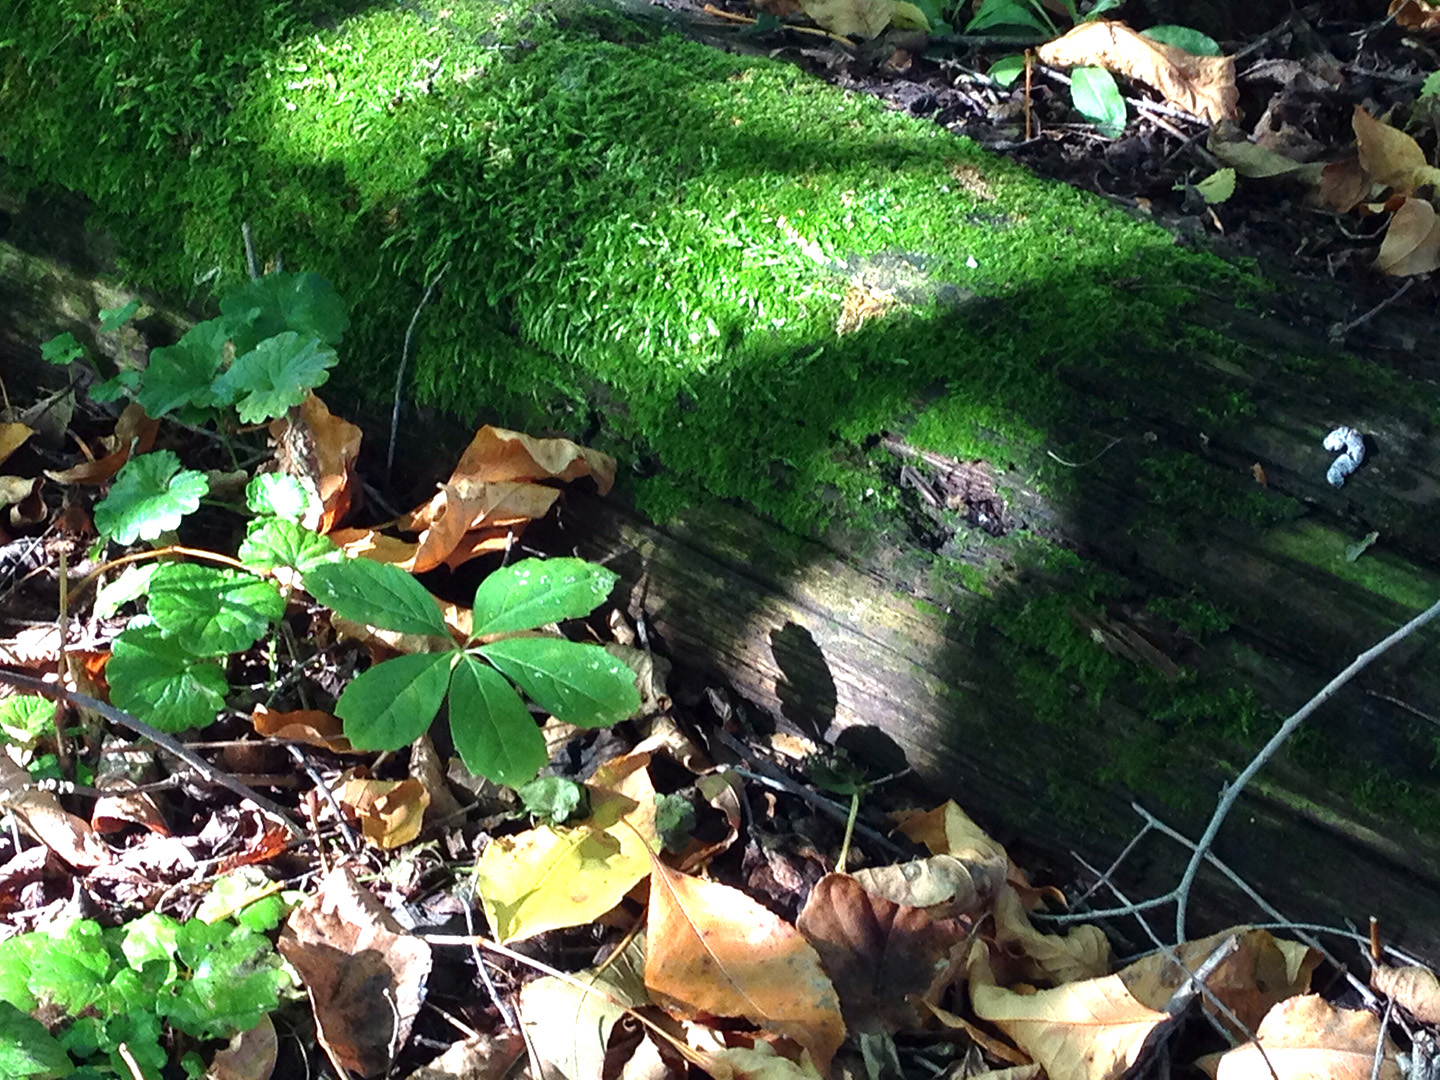
Mossy Log Shadows- interesting to look at, but no story
As I worked I noticed a set of photos emerging with single objects dominating the image. I also had some very interesting natural environment shots with neat shadows and lighting, but they didn’t tell a story. They were just nice to look at like this one of a mossy log that had been used to frame the sand box under the swing set. I’m pleased with the results of reducing my photo safari down to the best seven photos with the single object focus, and leaving out the nature only shots.
Writing the intro paragraph was an additional unexpected challenge. In my head it sounded simple to put my thoughts down on paper, but that wasn’t the case. I struggled for quite awhile as to what and how I would share the memories and stories embedded in the photos.
Finally, I used the WordPress Slideshow plugin to add them to my blog post. Then by editing the HTML code in the text view the borders and shadow effect of the final two images were created. Learn how here.
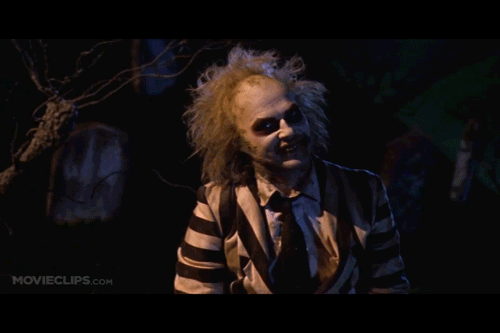
One of my favorite movies of all time and characters is Michael Keaton as Beetlejuice. The ghostest with the mostest. This 1988 comedy horror film directed by Tim Burton is a scream and I’ve always thought quite romantic too. [Wikipedia Post]
And look at that… the official movie poster? Yes. There are indeed headless ghosts running around from time to time. But none of those scenes seemed as appropriate to sum up the movie and capture the essence of a key scene as when Beetlejuice, a self-proclaimed “bio-exorcist”, is being released from his exile in a small model town in the young couples attic. Indeed… It’s Showtime!
Talk about perfect source material for completing the DS106 Headless 13 week two assignment, Visual Assignment 2 “Say It Like The Peanut Butter”Make an animated gif from your favorite/least favorite movie capturing the essence of a key scene.
This is not my first movie GIF, [See Ewww… Brain] so I’m pretty familiar with my GIF making tools now. I’m also getting better and better at choosing the right kind of source material to work with to make things go smoother and faster in the production process.
For the video clip I knew this was a key scene and someone on YouTube would have posted this small segment and I wouldn’t have to search through my own DVD to find it. Yep… there it was, and even better… It was an HD version to boot. I downloaded the clip to my Mac with the DownloadHelper extension in Firefox. I then imported it to Adobe Premiere Elements 11, located the 3 second clip and then exported it as a JPEG sequence at 10 Frames per second.
Publish+Share => Computer => Image (use for exporting still image) => open the advanced menu and choose “export as sequence” under the video heading, then save.
I opened the 36 images in Adobe Photoshop Elements 11 and placed them all into one file as separate layers. The original images were quite large, so I reduced the image size to 500px which is the upper limit to post to Tumblr.
File => Save For Web => Click on Animate => Animation Frame Delay set at 0.1 => Save
That’s it. Simple once you know how to do it. Not so the first few times as I was learning how. [See Hula Hotseat] For those of you just starting out…. hang in there. It gets easier the more you practice. [See Batman & Robin Behind The Scenes for a good photoshop elements GIF tutorial]
And a whole lot more fun is coming your way! Soon YOU’LL be saying, “It’s Showtime!”
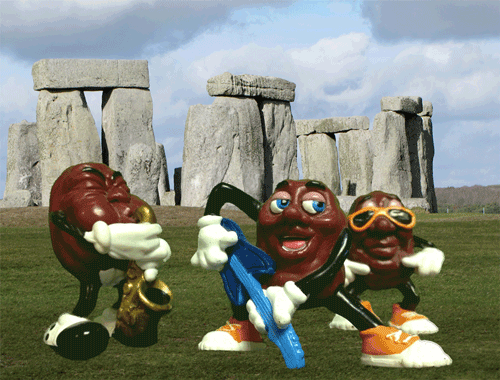
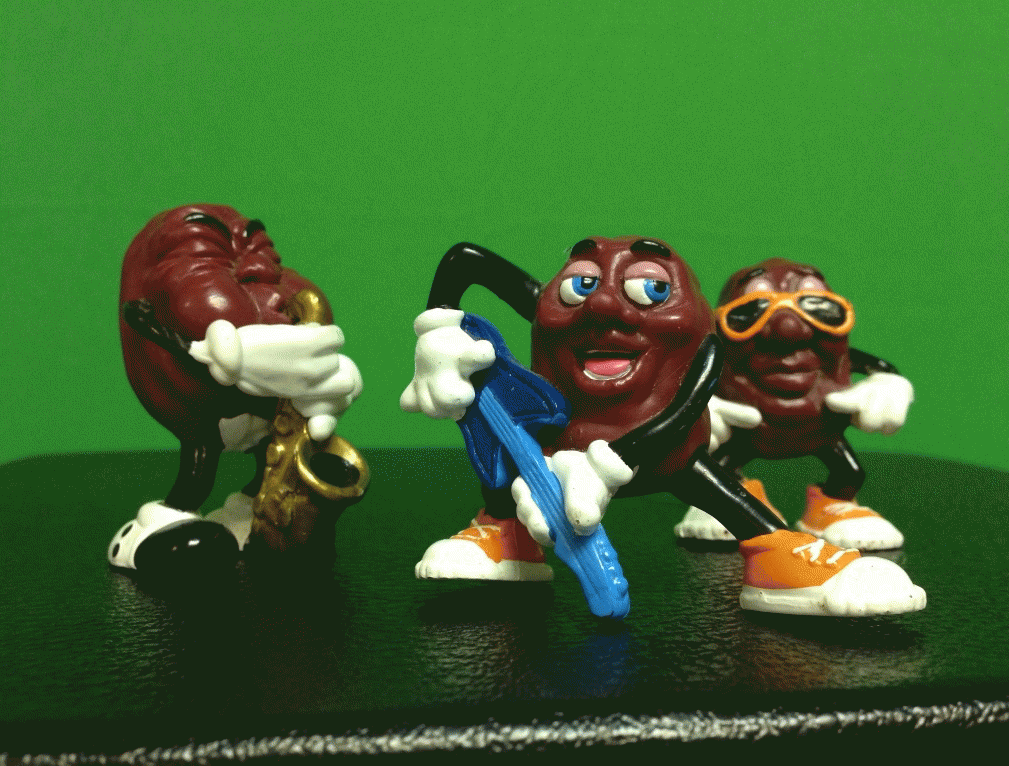
California Raisins Rockin’ the Rocks at Stonehenge- 3D Stereo Wigglegram GIF
Another kind of GIF that you can make is a Stereo Wigglegram GIF. You take two pictures that are almost the same except they are taken from two slightly different angles. When they are viewed your brain puts them together into one picture that has a 3D effect. Talky Tina’s DS106 August 2013 GIF Challenge #11: Get Your Wiggle on, with Friends! had us creating one of these 3D Jiggle GIFS.
Rockin’ The Rocks in 3D
This is one of those projects I’m not going to admit how much time I actually spent on it. Let’s just say I was fascinated with the process and technical issues learning how to make these and I was really into it. The idea of having the California Raisins rocking with the rocks at Stonehenge tickled me tremendously. I’ve had a set of these little guys since the late 80’s, and now they sit proudly on a shelf in Studio B. (My basement where I do most of my DS106 and other digital storytelling projects.) Now that I’ve dusted them off, I’m thinking they might be making another appearance in a future stop motion video.
I created a couple of different versions and used different techniques and software as I was moving through the project. I started out with the Camera+ App on my iPhone 5 and downloading the pictures into Adobe Photoshop to create the GIF. I didn’t know how or how much I was to move the camera for the two shots to get a “slightly different angle”, so my first attempts didn’t quite look right. I then read Talky Tina’s post a little closer and she recommended an app called 3D Camera by Juicy Bits. The iPad version of the app gave me some guidance on how to actually take the photos. You don’t just move the camera slightly by rotating your camera on the tripod like I did, You need to slide the camera in a straight line from left to right to get the two shots.
To create good 3D stereo images SLIDE your camera left to right, don’t rotate it.
Green Screen Stereo Wigglegram GIF. Created with 3D Camera by Juicy Bits
My decision to take the original stereo photos against a green background so that I could “easily” replace it with a background of my choosing from my own photo collection didn’t turn out as I had expected. I had ambitiously started out with the concept of having the band members and Stonehenge remain stationary, while only the guitar player popped out of the image. This was NOT successful! (See problem plagued GIF below and second successful version at the end of the post.) Creating layer masks by using the quick selection tool required a lot of fine tuning to remove the haloed green around my raisins. This was further complicated by the fact that I was doing this process on two different photos and couldn’t select exactly the same areas with each image. Consequently, I had occasional bulges and valleys along the edges that had to be manually erased or rebuilt for each separate image so that your eye remained focused on the 3D effect and not the little anomalies as the photos switched back and forth. Here’s an original unsuccessful version for your amusement that is a fine illustration of these issues: green halos, bumps & valleys, instead of popping out of the screen it moves back and forth.
Unsuccessful first attempt at 3D Stereo Wigglegram. Lots of technical issues!
Ahhh… this is better… a second SUCCESSFUL version of the California Raisin solo guitar rockin’ at Stonehenge.
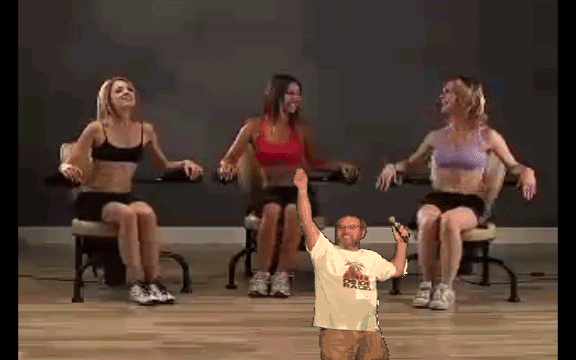
Want to get fit without leaving your chair? According to infomercial star Tamara Henry, the Hawaii Chair is for you. “It takes the work out of your work-out.” by hula-ing your way to fitness.
See update below for V2: “Groom Does The Hula Hot Seat Happy Dance”
DS106 GIF challenge #4 was to create a GIF of a hilarious infomercial moment that illustrates how ridiculous some infomercials can be. I started the project with a YouTube search for Infomercials. Up came Top 10 Ridiculous Infomercial Products. About the 3rd product in I saw the Hawaii Chair. It piqued my interest and seemed like I could have some fun with it. The rest of the commercial snippets didn’t get much of a rise out of me.
I continued my search to find a better resolution or original copy of the video. Unfortunately, the original Hawaii Chair Infomercial was made in 2007, so I didn’t have much choice but to go with a very low 240p resolution version. I like to use a Firefox video downloader add-on that sits right on my tool bar to download videos to my computer. I get to choose the downloaded file type from a list of available formats and sizes. That can often avoid a video converter hassle by not accidentally downloading an .flv or .3gp formatted video.
It’s been a couple of months since I created a GIF from a video clip and that was only once. “Go Daddy… Wheeeee!!” So I went back to my own blog post to read how I did it using my video editing software Adobe Premiere Elements 11 for the Mac. The key was to select a small 2-3 second clip of the original video then:
Publish+Share => Computer => Image (use for exporting still image) => open the advanced menu and choose “export as sequence” under the video heading, then save.
I also vaguely remembered there was something about reducing the output frame rate to 10 instead of the original video frame rate of 29, so that fewer still images in the sequence would be created. Now I moved over to Adobe Photoshop Elements to create the GIF. After importing the 36 JPEG image sequence created from the video file, I culled it down to the first 16 where the Hawaii Chair text flies in. Each of the photos became a layer for the final GIF.
I’ve heard others in the GIF challenge refer to being able to change the length of frame delay for each individual layer. That’s not the case with the elements version of Photoshop. I get a single frame delay option, the default being 0.2 seconds. If I want to increase the time an image stays on the screen, I have to create duplicate layers for that specific image. That was the case here with the beginning and end of the GIF to make for a smoother transition when it looped back again.
Did the Hawaii Chair live up to its claims? I don’t know. I didn’t own one or know someone personally who did. But from the looks of the suggested Youtube videos during my search, it certainly gave a number of comedians fodder for their shows and skits, and one reviewer talked about all they got was a hot butt.
UPDATE: Groom Does the Hula Hot Seat Happy Dance
Mucho thanks to Talky Tina for suggesting…
” …it would be funny with their heads NOT moving and no HAWAII CHAIR words and just the chair parts going and going and going. And they would have silly grins stuck on their heads.”
Now version 2 of my plain infomercial GIF has been DS106ized. I figured while I was merging the stationary heads snippet (simply cut and pasted the top portion of the first image) into new layers in the Photoshop file, why not add Jim Groom dancing his little happy dance with the ladies. Voilà! A funnier GIF and Animated GIF assignment 1001 has another submission from Rockylou.
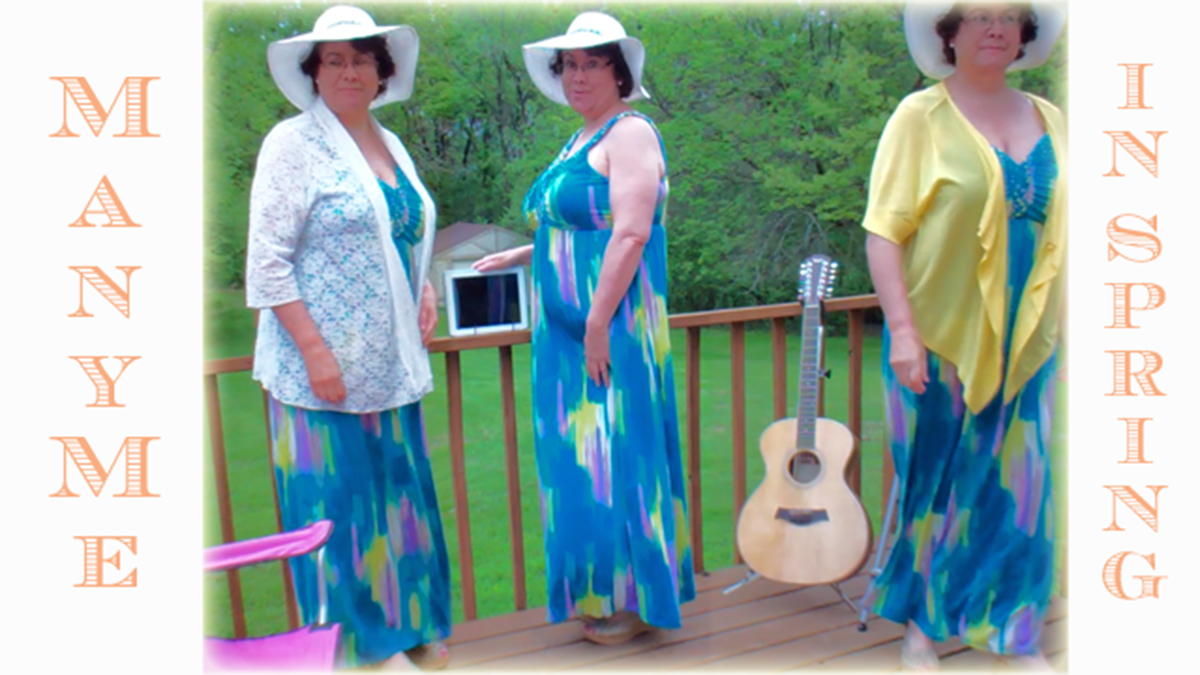
Inspired by my recent DS106 assignments I decided to take two of the projects I had completed this week, ManyMe and Go Daddy_Wheee, and use the skills and final products I created to visually illustrate the evolution of my ManyMe photograph. (Assignments: Multiply Yourself, Animated GIF) The objective of the Multiply Yourself assignment was to take two or more photos of yourself in the same location and combine them into one photo. I’m going to go one step further here and label this GIF project a completion of the “Photo It Like Peanut Butter” visual assignment 347 where we’re instructed to:
Use a GIF to illustrate the generation of a real world object/place by using your own series of photographs as the source material.
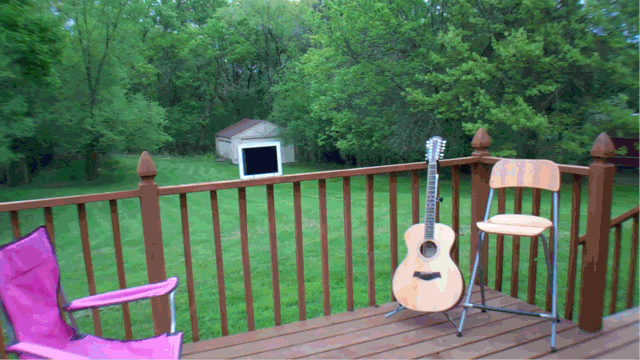
Phase I: The original images to work from were pulled as still frames from a 4min video taken walking in and out of the frame and placing myself at different locations. (See earlier post for more background.) When making one of these photographs it’s important to have your camera on a tripod and that you get your shots as quickly as possible so that the lighting doesn’t change drastically. If you have a controlled lighting environment you don’t have to worry about it. Just make sure your background isn’t changing. )
Phase II: Using Photoshop Elements I cropped the single image shots. I had strategically planned my placement in the photographs so that I could do a simple rectangle crop by making sure I hadn’t crossed over into another shot’s field. The guitar, iPad and chairs were my boundary markers. No messing around with a tedious Lasso Tool.
Phase III: Next came the adjustment and fine-tuning of the cropped images for alignment and lighting. Yes, even though I took the video in under 4min on a very overcast day, the center image of me was brighter than the two outside images. Go figure! I also didn’t like the diminished resolution quality of my images since they were taken from video footage in rather poor lighting. Fiddling around with a few filters I found a combination that brightened and slightly blurred the entire photo that I found appealing. (Although my daughter later confessed she didn’t like the effect. She thought it made me look like an alien and the image had lost its warmth.) As a final touch I cropped the entire merged image (attempting to improve the photo composition) and then created a fuzzy yellow border that complemented the yellow jacket I’m wearing in the right side image.
Phase IV: Creating the GIF… I gathered and organized the needed photoshop layers from earlier in the project into one new file. Again, making sure that the alignment between images was spot on took some fine-tuning. I didn’t need to worry about the lighting this time, since I wanted to show those changes if they were there. Once I had it assembled and previewed the first GIF, I noticed that I wanted it to run a bit slower so the viewer could take in each of the image changes more easily. This was to show an evolving process, not just a quick action clip. I increased the overall frame rate to 0.8 seconds and cloned the initial empty frame and final frame to allow for lingering even a little longer on those shots. The addition of the title text at the end capped it off nicely.
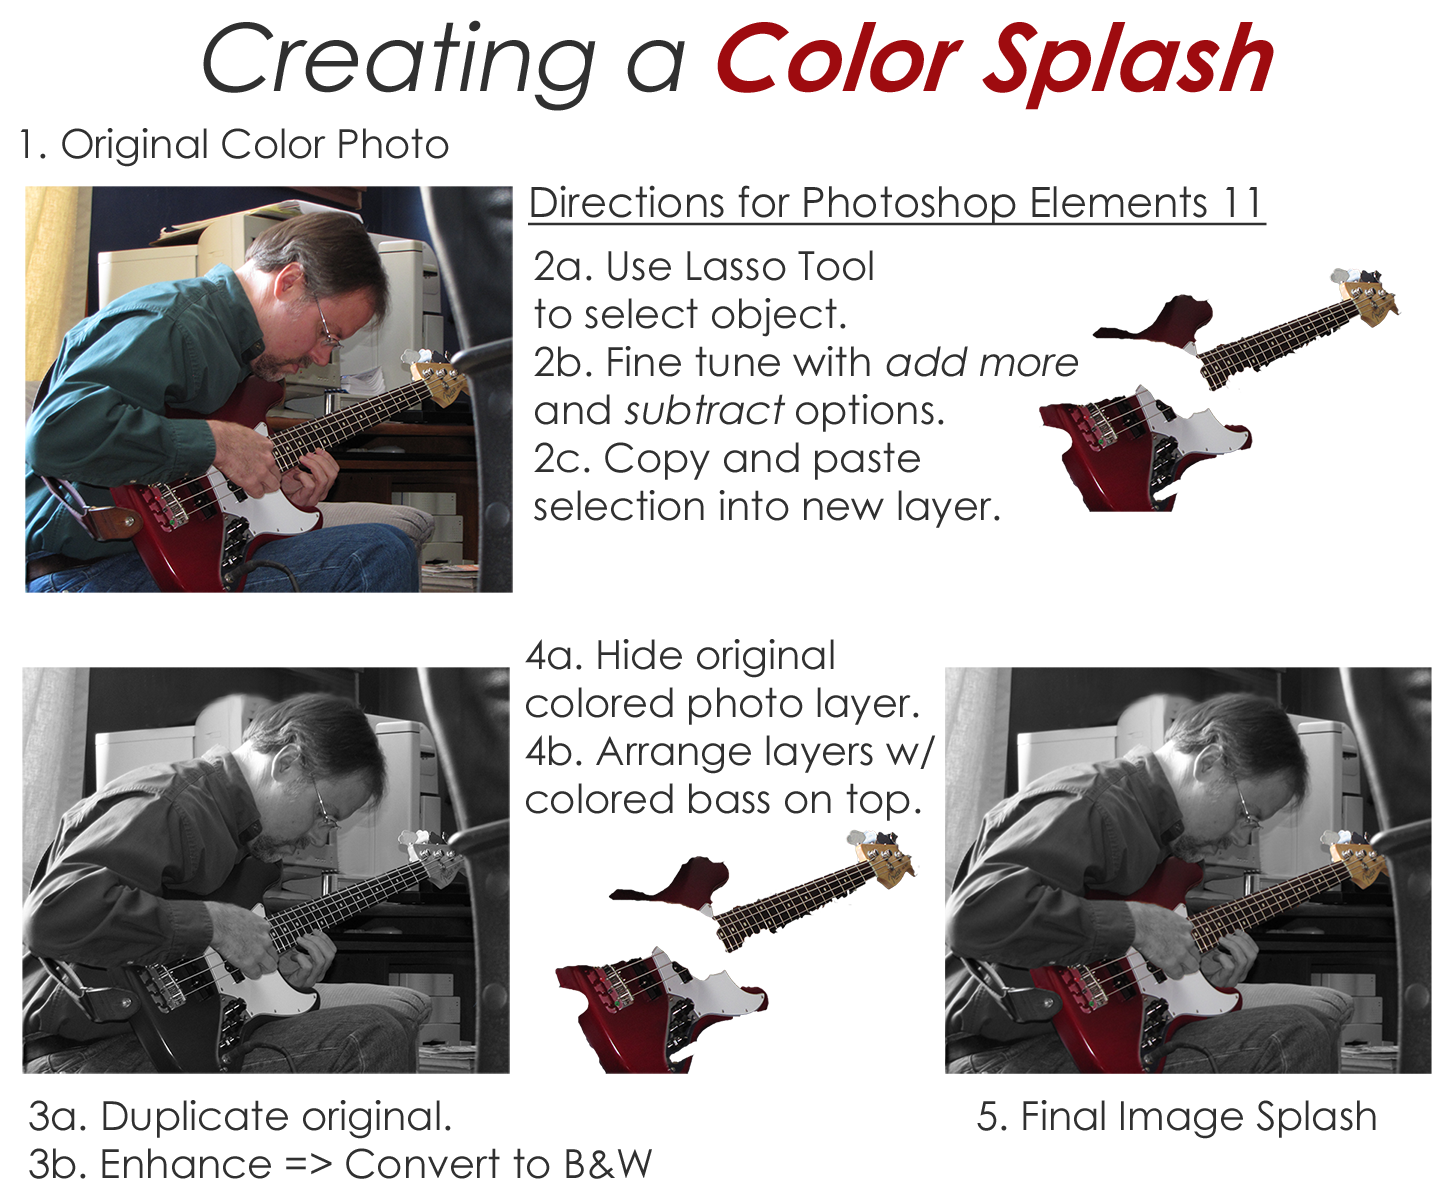
DS106 Visual Assignment 340 asked me to emphasize details- remove all color from a photo, and then restore the original color to a single object. Here’s one of my favorite examples from a project I did a few years back along with a printable 1-page directions handout.
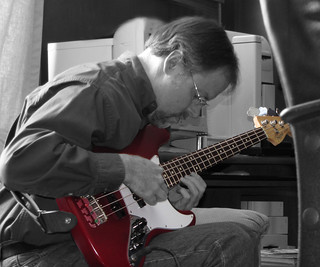
My partner is a singer/songwriter who also plays bass and guitar. He’s been a great sport letting me experiment with new digital story telling tools over the last couple of years. One day while in the recording studio laying down new tracks for his latest CD, he agreed to let me take photos of him in action. The original color image I use in this example is nice enough. It tells a story of a musician hard at work in the studio. But I wanted something that would really grab your attention. I decided to highlight the bass by leaving it in living color and tone done the rest of the photo by making it black & white. This was especially powerful when you see his black & white hands holding the colored bass. Talk about a SPLASH.
The trickiest part to accomplishing this effect using Photoshop Elements 11 is the use of the Lasso Tool. You can pretty easily select the bulk of the object you want to leave in color- or make it a B&W object for another perspective. The hard part to making this look nice is the fine tuning you need to do while using the Lasso Tool. I had to zoom in very close and use the add more and subtract options alternately to select only what I wanted. You then copy and paste the selection into a new layer. As long as you don’t move any of the images in the individual layers themselves they will all align properly.
I was cruising the DS106 visual assignment choices for something that looked fun and challenging – yet would only take a couple of hours to complete. The MULTIPLY YOURSELF assignment (Take two or more photos of yourself in the same location and combine them into one photo.) really jumped out at me. And it was worth 5 stars!
Phase I woke me up in the middle of the night, my mind wouldn’t rest as it started planning how to set-up the shots so that the photo editing phase would be easier to handle. I initially contemplated enlisting the aid of my partner or daughter to snap the shots, but then decided to take on the challenge of doing this all by myself from start to finish. I decided to use my FlipVideo camera on a tripod to take video footage of me in different places in the frame. Then I’d capture still images on my Mac with Adobe Premiere Elements 11 and meld the images together in Photoshop Elements 11.
Phase II was all about setting up the location, shots and shooting the video clips. I tested a few different scenarios before I had something I thought would work. I added interest and personality to the mix by wearing something a little different in each shot. (As an aside, just in case I wanted to use the video later to make a “live” version of the photo, I made sure that I entered the shots from different places in the frame so that I wouldn’t cross over into another shot when I melded them together.) The weather outside cooperated by not being too windy, the overcast morning meant I didn’t have any shadows, but I still needed to work quickly as it looked like rain was on its way.
Phase III was spent putting it all together. I downloaded the video clips into Premiere Elements 11 for the Mac and selected several still images from each of the three “Rochelles”. I was a little dismayed that the resolution of the images wasn’t all that great. My decision to do this assignment without a helper or the need for a timed shot delay function was now suspect. I would have had higher resolution images if I’d used my regular digital camera on the tripod instead of capturing the stills from the FilpVideo. Alas, as I’ve found so many times before, creativity abounds when I’m seemingly “stuck” and need to find another way out. Not wanting to set everything up again, I moved forward with the “sub-optimal” material I had before me. I trusted everything would work out. Besides, I’m one of the online outside participants of the course, and there’s no real grade at stake here. 😉
I diligently went to work cropping and blending my three images into one. It was fairly easy except that the center pose lighting was slightly lighter than the two outside images. Why?? I haven’t a clue. I shot the entire video in one 4 min session and the lighting matches at both ends. Maybe the clouds thinned a little or something half-way through?? Who knows…. To fix this I used Enhance=>Adjust Lighting=>Brightness and Contrast on each of the 3 poses until they matched as best I could get. While playing around I chanced upon a combination of adjustments that slightly blurred the photo even more and suddenly it looked great. As usual I don’t exactly remember what I did to make it happen… it was “Magic”. Finally, I wanted to give the photo a border of some kind. I like to play with all of the dials and sliders to see what shows up. EUREKA! The combination of Edit Layer Style=>Glow Inner=> Yellow was perfect.
I now have a beautiful feathered yellow glow surrounding my ManyMe photo that matches the yellow jacket I am wearing. Yippee!


