Without an instructor how would we know when to stop? When would we see “The End”? Thanks to Mariana Funes for realizing that the UMW Fall semester ended on Friday, December 13th, 2013, the DS106 Headless ’13 course was given an end date. #DS106 is #4Life, but the Fall 2013 DS106 “headless” experience came to as close to an official close as a headless course can on 12/13/13.
The final project specs asked Headless ’13 DS106 participants to produce a story around a character that explores at least three of the media forms we’ve investigated this semester: visual/design, audio, video, web, remix/mashup, with the idea of creating a narrative arc for a character that is played out in the products of ds106 Assignments, and woven together with context and writing as a standalone blog post.
I’ve been trying to finish and post my wrap-up comments for the course for over two months now, without success. If it ever gets done it’s entitled ‘GIFaChrome – A DS106 Practicum’. This “abstract” of that post is really being written so that I can publish my fun little animated GIF at the top of this post, DS106 Headless ’13 – The End.
Making the GIF:
Using Photoshop CS5 I used the selection tool to copy and cut out the DS106 foam letters, which were individually placed into seperate layers. I then used the clone, band-aid, and blur tools to cover up the holes left behind and make the back one continuous layer. The additional text, Headless ’13 and The End, used the Stencil font which I’ve found is pretty close to the font used on the DS106 site. With the animation feature in the full version of Photoshop it was easy to add the letters and text without the need to merge layers. This allowed me to play around with a couple of different scenarios before I settled on the version posted above. The final touch was to add drop shadow layering effects to the letters and text. Increasing the distance for the text lines made them stand out even more- giving the GIF a bit of a 3D look.
We are inviting everyone to participate in whatever way they would like and have the time and energy to do. There are several small tasks that can be completed to make it easier for those of us with more time and energy who will be carrying the heavy load of pulling all of this together into something coherent. As we count down to the product launch I’ll be sending out a daily contribution suggestions.
Today’s contribution suggestion is to add a link to your blog and the headless image you created at the beginning of the course, with a name we can attach.
* Do a live radio show on Friday 13th at 8.00pm GMT to launch our GIFAChrome Camera and to reflect on our Headless 13 experience.
* Create a collaborative story in the form of a website about our GIFAChrome Camera that incorporates as much of what we have created during this Headless 13 as we can – a final project assignment that we do together rather than individually. We’ve set up a couple of Google Docs to gauge interest and assist in the organization process.
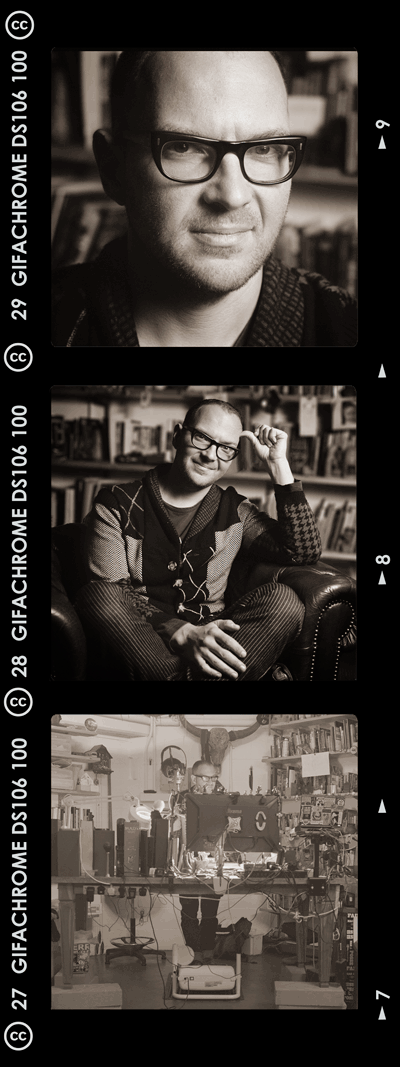
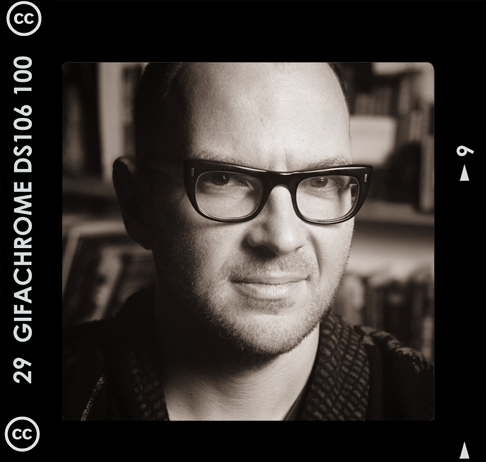
Professional photographer Jonathan Worth has put out an invitation for anyone to take his photos of Cory Doctorow, activist for liberalizing copyright laws and proponent for Creative Commons, and remix them in anyway you like. They will then choose from the best remixes and share any profits with their co-creators.
This is a new experiment in public art, and a new way of thinking about digital media. Who could be a better figure than an author who releases all of his published works under creative commons license with an open invitation to remix?
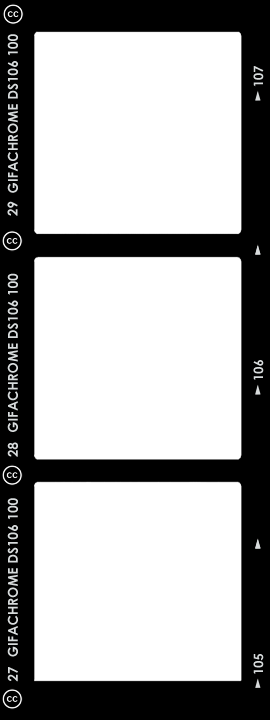
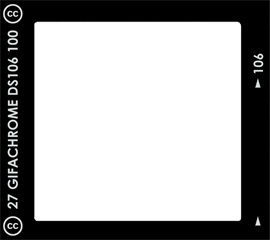
This opportunity was presented to the DS106 participants for Remix/Mashup weeks, as well as turned into an assignment MashupAssignments1020. The process of creating these new images evolved through three versions and resulted in the creation by Rockylou Productions and a host of other co-creators as documented by Mariana Funes of the first GIFAChrome Camera with accompanying GIFAChrome DS106 Film.
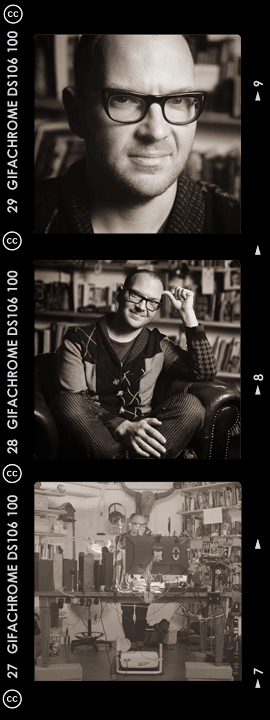
Cory Doctorow GIFAChrome DS106 GIFStrip for Jonathan Worth post-photo remix invitation was co-created at Rockylou Productions.
And as part of the “rules” of the remix challenge, everything we create must be licensed under a creative commons license too. (Notice the CC license logo on the strip?) So no worry about patent infringement or licensing fees. Everyone is welcome to use this work and remix it for themselves. I’ve even included templates at the end of the post that you can download to make your own GIFAChrome image.
Another wonderful side of collaboration and co-creation is that you don’t have to do it all yourself. Others are there to support the evolution of the project at hand. While I’m covering the process below, Mariana brilliantly captured the contributors and expanded on the philosophical issues that can arise.
=> Check out the Storify collection of tweets and commentary from co-inventor Mariana Funes: “The Birth of an idea.”
This week I have been following and participating in DS106 Remix weeks. As usual, there have been unexpected surprises and reflections. I expected to learn the difference between a remix and a mashup, but never expected to change my mind about what it means to own an idea. – Mariana Funes
Using Photoshop CS5, each GIF was made in its own Photoshop file. Then the three image composites were combined into one larger canvas strip with one above the other as shown below.
Each GIF and/or image is stacked one atop the other to create an image strip.
I then placed a film strip template on top of everything. DJ BIrthday Dance GIFStrip will walk you through the process. With the first draft finished, I alerted the DS106 community on Twitter and our DS106 Google+ Community, asking for feedback to improve the image. This was after all to be a collaborative project.
Cory Doctorow GIFAChrome DS106 Image created from original images by Jonathan Worth
VERSION 2:
Adjusting the colored image:
I wasn’t happy with the final panel as colored, I learned how to use layer filters in Photoshop, thanks to a post by Alan Levine, and was able to apply hue/contrast and brightness adjustments to a single layer. I was pleased that it didn’t take me too long to approximate the color scheme of the first two panels.
Redesigning the film strip template:
Jonathan had joked about his disappointment with the rebate He was evidently accustomed to 120 film. What the heck was he talking about?
@Rockylou22@cogdog Ignore the dog – you can see the rebate on the contact sheet (there are no spool holes etc as its roll film)
I had to do a Wikipedia search to find out what a film “rebate” was (the stuff along the sides of the images that give the image number and film type) and that the film template I was using was for 35mm film. 120 film doesn’t have those little sprocket holes on the sides. [Learn more about the differences] I certainly wasn’t expecting a lesson on photographic film types for this assignment. But you never know what rabbit hole the DS106 Matrix will take you down.
I went back to Worth’s photos and found a collage of contact sheets that I used as examples to build the new frame template. The font used on the Kodak strip turned out to be pretty close to Century Gothic. That was easy. Alan Levine joining in the Twitter banter, suggested a DS106 film would be appropriate.
I had toyed with many names for my new invention. RockylouChrome was definitely out. It was clunky. Finally the light bulb turned on and GIFAChrome DS106 film was born.The GIFAChrome DS106 100 film obviously had to have a camera to be used in. With version two of the GIFStrip a new-to-the-world GIFAChrome camera was invented.
I was also watching and listening to the viewers of these new images, and several were concerned with the middle frame not “GIFfing”, and wondered if there was something wrong with the strip.
@Rockylou22 cool! was it an artistic choice to keep middle one still? or am I missing it? love the CC on the strip
What to do…. What to do…. What I considered an artistic statement by keeping the middle frame still was confusing to others, So I put my artistic ego aside and turned the middle frame into a 3D Wigglegram GIF. A technique I acquired this summer creating Rockin’ The Rocks in 3D. And with Alan Levine as my subject matter while completing this project.
I very carefully extracted Cory sitting in his comfy leather chair from the bookshelf background with the quick selection tool. I then had to use the clone tool and spot healing brush to rebuild some of the bookshelf and applied a blur filter to the entire background. This helps Cory’s image stand out even more. There were then three frames of Doctorow, each off-set slightly- roducing the GIFAChrome single image below.
Cory Doctorow GIFAChrome DS106 3D Wigglegram
The 3D wigglegram GIF looks better if it “wiggles” faster than the other GIFs I was using. To create this effect I made 12 animation frames for the entire GIF sequence at 0.06 seconds in duration. The top and bottom frames remained stationary for 6 frames each (a total of 0.24 sec) while the center frame rapidly oscillated at the 0.06 frame rate.
We were requested to save our files in the high resolution of the original images. At 3000ppi this resulted in a final Photoshop file of a whopping 1.4GB. Ouch! That’s huge. It’s amazing that my computer didn’t crash- just slowed down during processing. I was able to finally reduce the file size to “only” 670MB by deleting and merging some unnecessary layer.s If you’re interested you can download the whole thing here. All were created in Photoshop CS5.
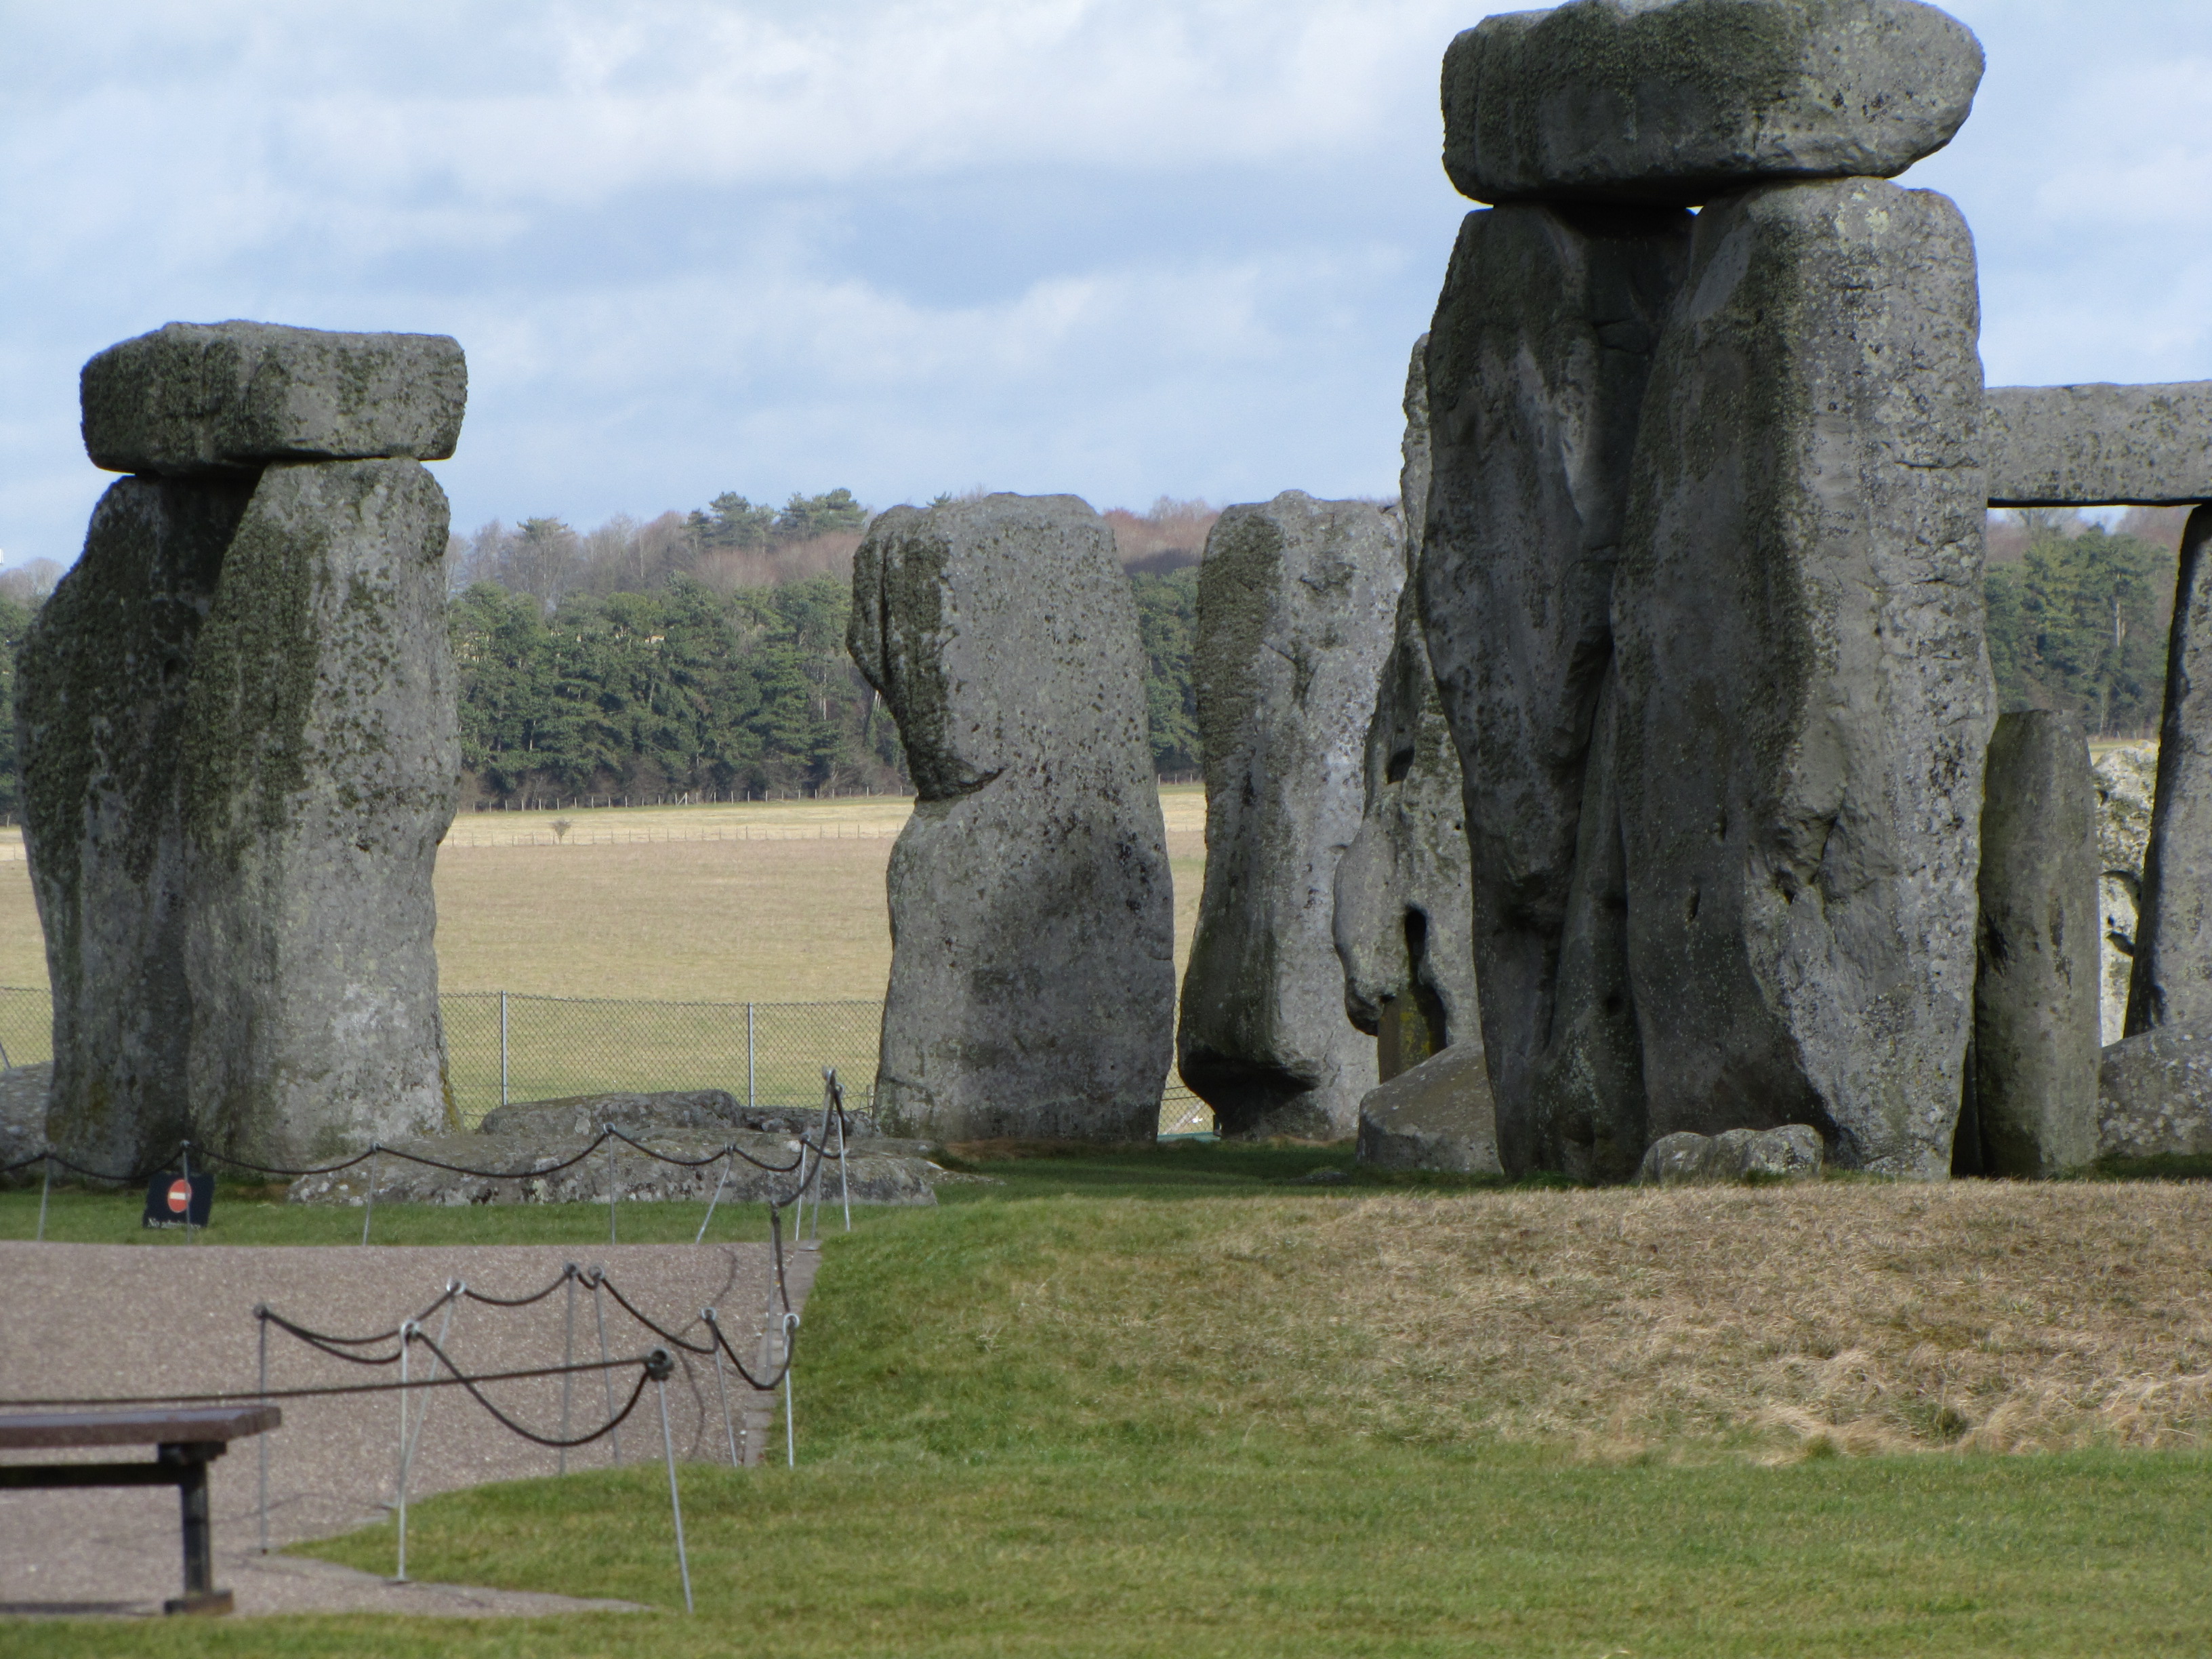
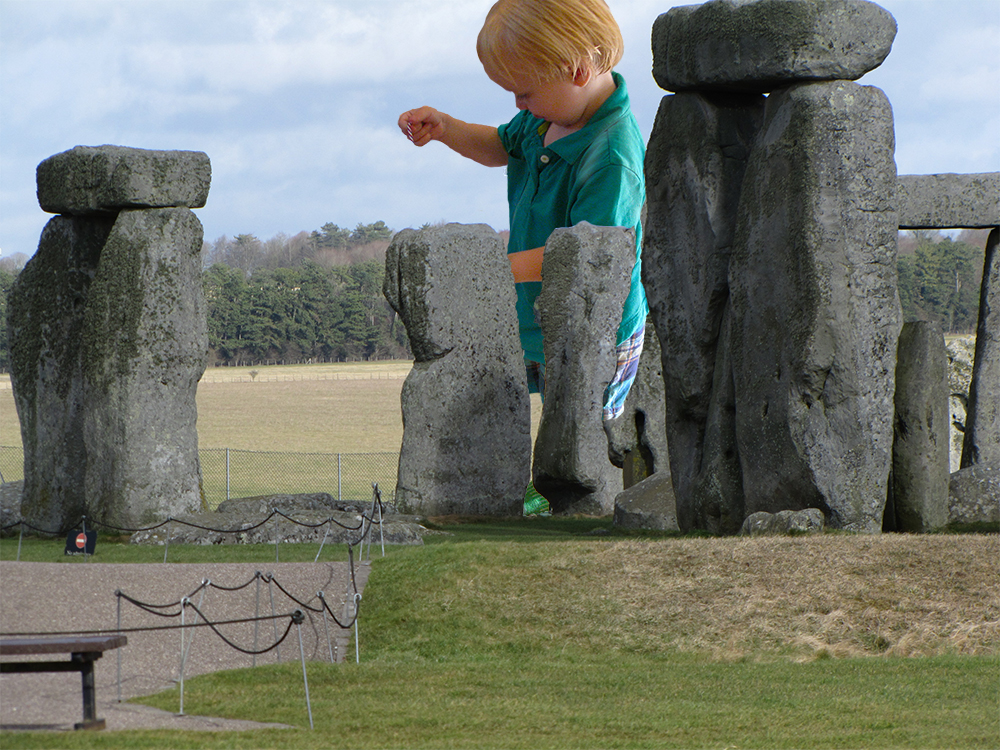
Another fun aspect of DS106 being an open online course that attracts global participation is that you can go to bed at night (usually way past a healthy bedtime because you just “had” to finish one more thing on that project) and wake up in the morning to find a comment on your posted work, or better yet that someone(s) have delightfully riffed on your creation. DS106 Never Sleeps! Such was the case with my DJ at Stonehenge photo I originally created for ds106 daily create tdc669.
From Wikipedia: A flash mob (or flashmob)[1] is a group of people who assemble suddenly in a public place, perform an unusual and seemingly pointless act for a brief time, then quickly disperse, often for the purposes of entertainment, satire, and artistic expression.[2][3][4] Flash mobs are organized via telecommunications, social media, or viral emails.[5][6][7][8][9]
Here’s what the ds106 flash mob created between 11/11/13 to 12/06/13:
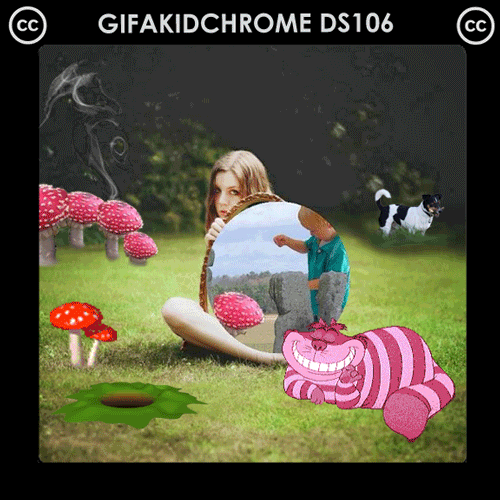
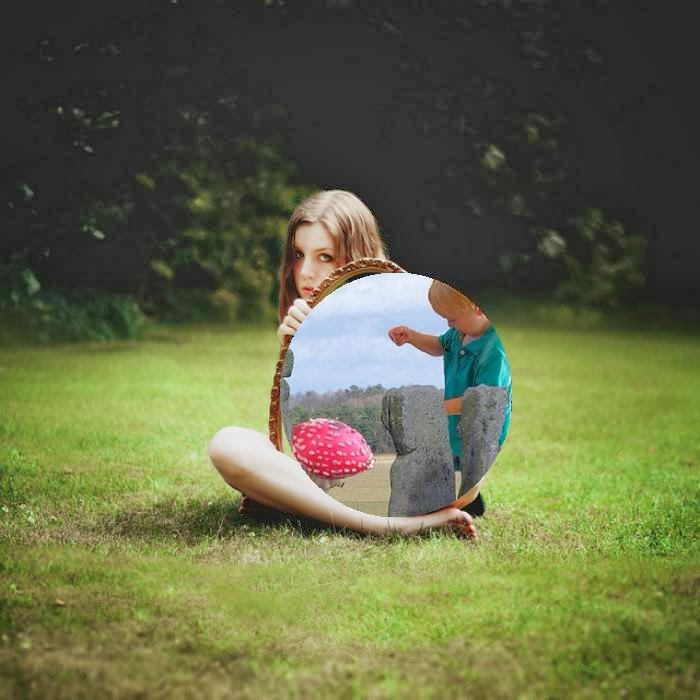
Cathleen Nardi notices a rabbit hole appearing in a flash in the bottom left corner with a pair of ears just poking out.
Rochelle Lockridge coaxes the little white rabbit out of his hole.
The story is captured with the new GIFaKidChrome imager in development over at the GIFaChrome labs.
StoneHenge
DJ_StoneHenge
DJ-Stonehenge-mushrooms
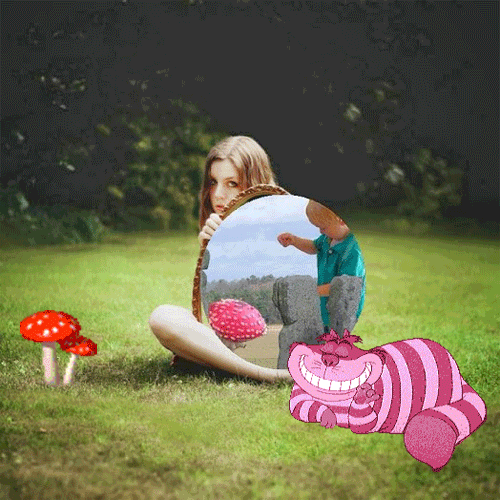
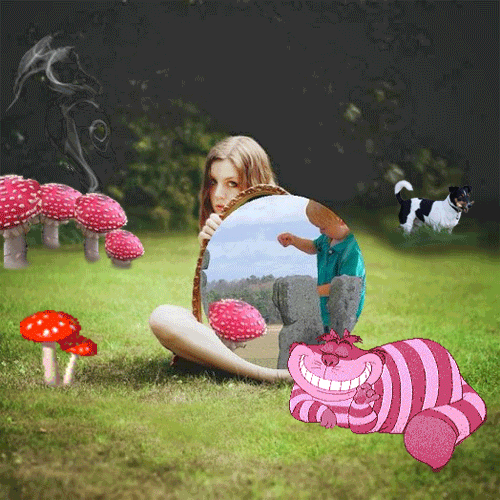
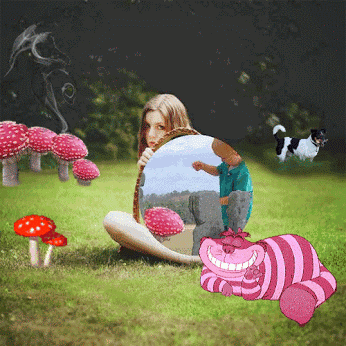
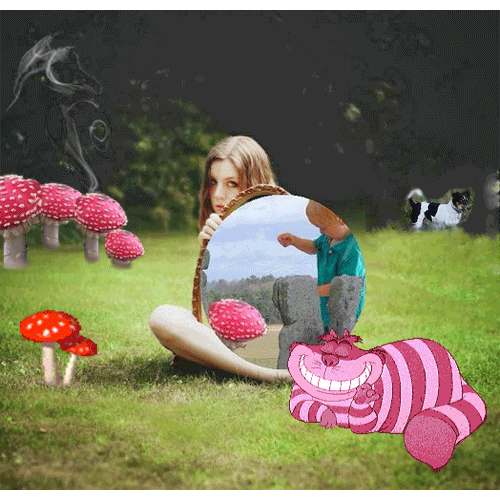
DJ-Alice
DJ-Alice-MushSpin_500px
AliceDJ-MushSpin_Smoke_500px
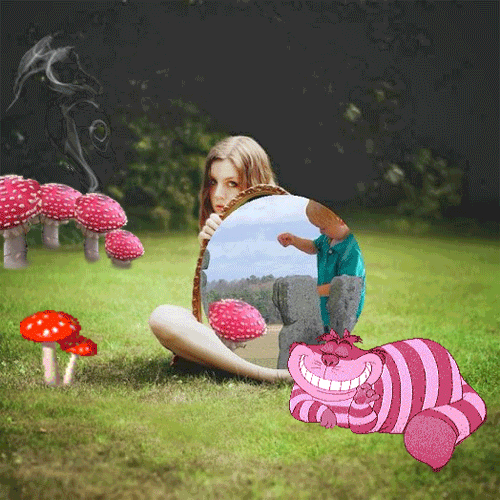
AliceDJ-Mush-CCat-Smoke-Colin
AliceDJ-Mush-CCat-Smoke-Colin-CatPil_2
Alice in Wonderland with Rabbit Hole
GAKC-AliceDJ-Mush-CCat-Smoke-Colin-CatPil_Rabbit
You can witness the evolution of the composite image right here as it unfolds. I plan on updating this blog entry if it morphs further. And links are provided to the posts so you can follow the comments and story line as it develops. (Suggestion: By subscribing to comments on this post you can get the latest updates directly.)
Note: All of the image GIFs and layered .psd files are attached below so anyone can join in the fun. Most current Photoshop file can be downloaded here.
Original Photos and evolution of our ds106 flashmob collaboration:
Photo 1: Stonehenge – Feb 2010 photo taken by Rockylou
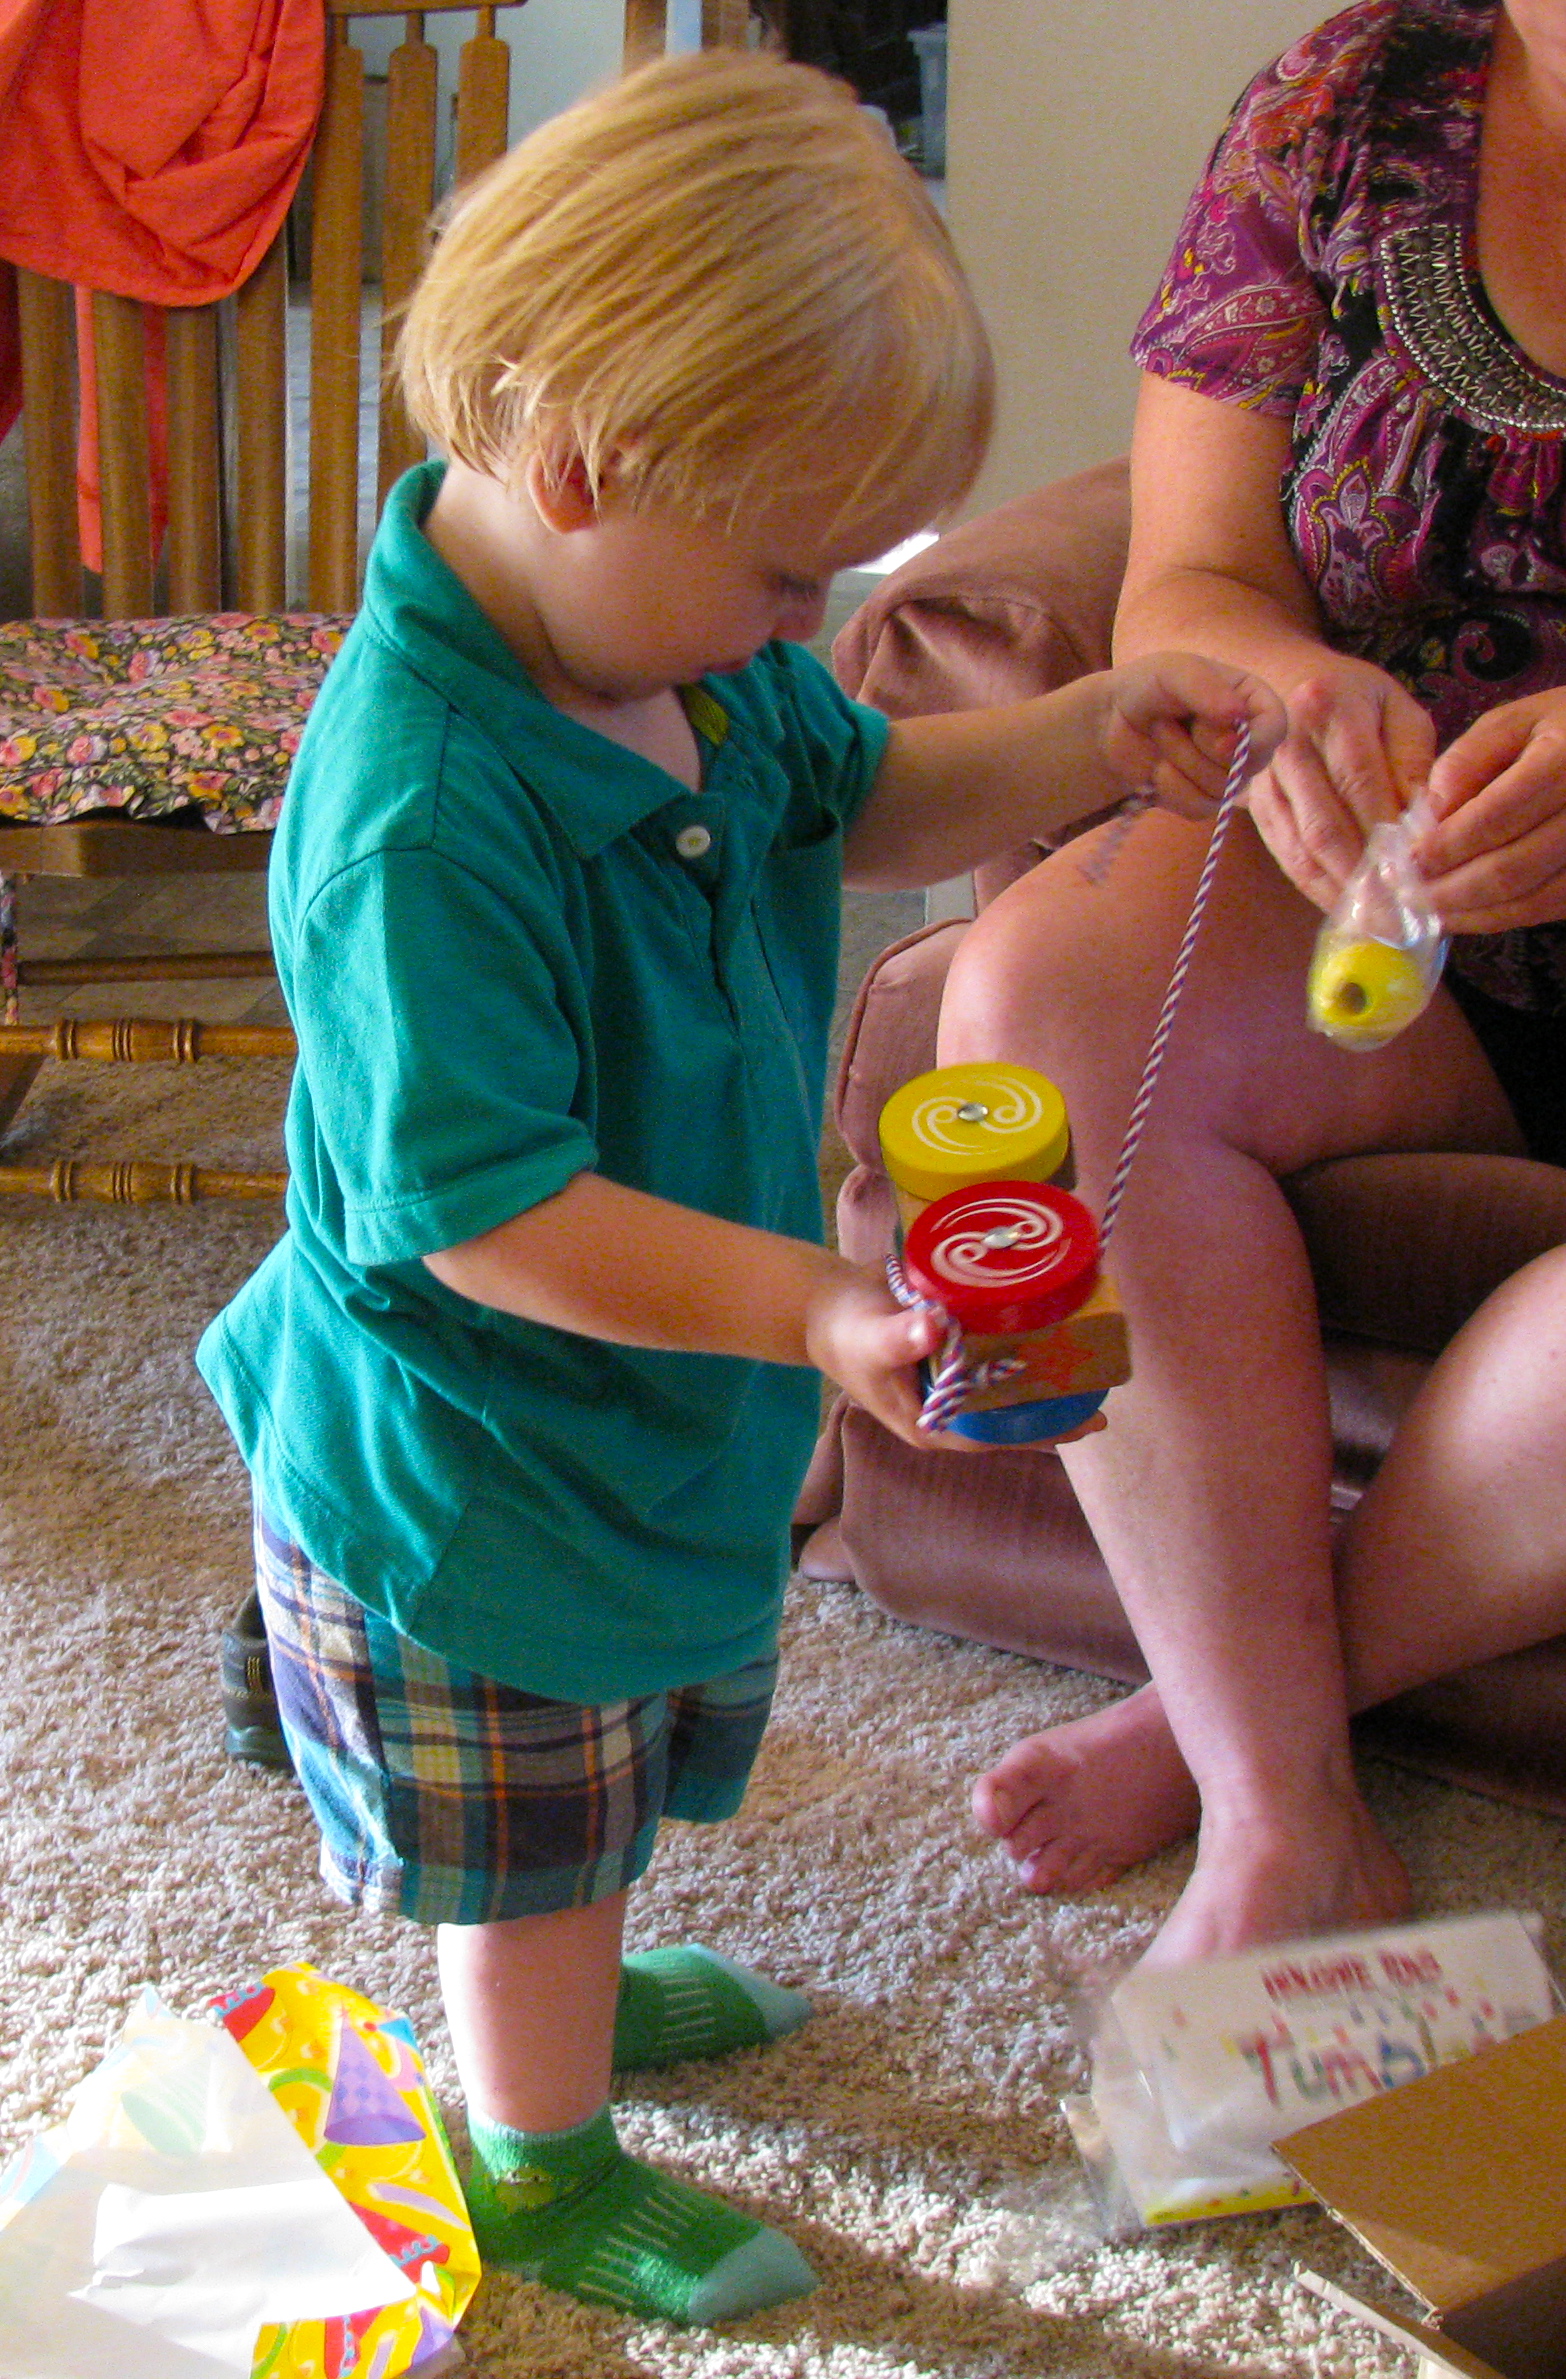
Photo 2: DJ opening toy train for his 2nd birthday (Aug 2013)
Nov 9, 2013 @7:57pm Minnesota, USA or 9:37am Hawaii or Nov 10 @12:37am Scotland
Photo 1 + Photo 2 + Rockylou’s sense of humor+ Photoshop CS5 => DJ at Stonehenge for ds106 daily create tdc669: “Take a photo of something very small and make it look big.”
Some little blonde girl gave DJ a mushroom while visiting Stonehenge. He took a bite of the lefthand side before we had a chance to stop him. This is the result. No need to worry though. He took another bite on the right hand side and was back to normal by the time we returned to the tour bus.
Let The Riffing Begin!
Nov 11, 2013 @12:14pm (6:14pm Scotland, 8:14am Hawaii )
It gets curiouser and curiouser with the addition of spinning mushrooms and a Cheshire Cat.
Riff 3: Rockylou riffs on the evolving creation by adding spinning mushrooms and a Cheshire Cat to enhance the Alice in Wonderland story line. Posted to ds106 Google+ Community
Rockylou couldn’t stand seeing the rogue white background flashing through on the spinning mushrooms and fixed it while creating a new clean .psd file adding Colin dog as its own layer.
Riff #5 edit: Rockylou cleaned up the spinning mushroom GIF and created new .psd file with individual layers in comment to Google+ Community
Screencast tutorial on adding Colin to the Photoshop file as a single layer.
Alan Levine’s “radioactive” turquoise caterpillar joins in. He’s last seen crawling up towards the mushroom patch in the back to check out if his buddy is back there.
Cathleen Nardi adds the rabbit hole we last talked about.
Dec 06, 2013
In participation with the DS106 GIFaChrome final project Rochelle Lockridge adds a white rabbit popping out of the hole and turns it into a GIFaKidChrome image.
“There’s so much that happens in life. Little stories, big stories. Things that were no story and all the sudden you realize the significance of it. And that there really is a story there. But at the time you don’t know it. And for a long time you don’t know there’s a story. Until something clicks, and you tie that event together with something else that makes it a story. And that’s the beauty of life. You just go from one story to another.” – Seth’s Mom, Karen
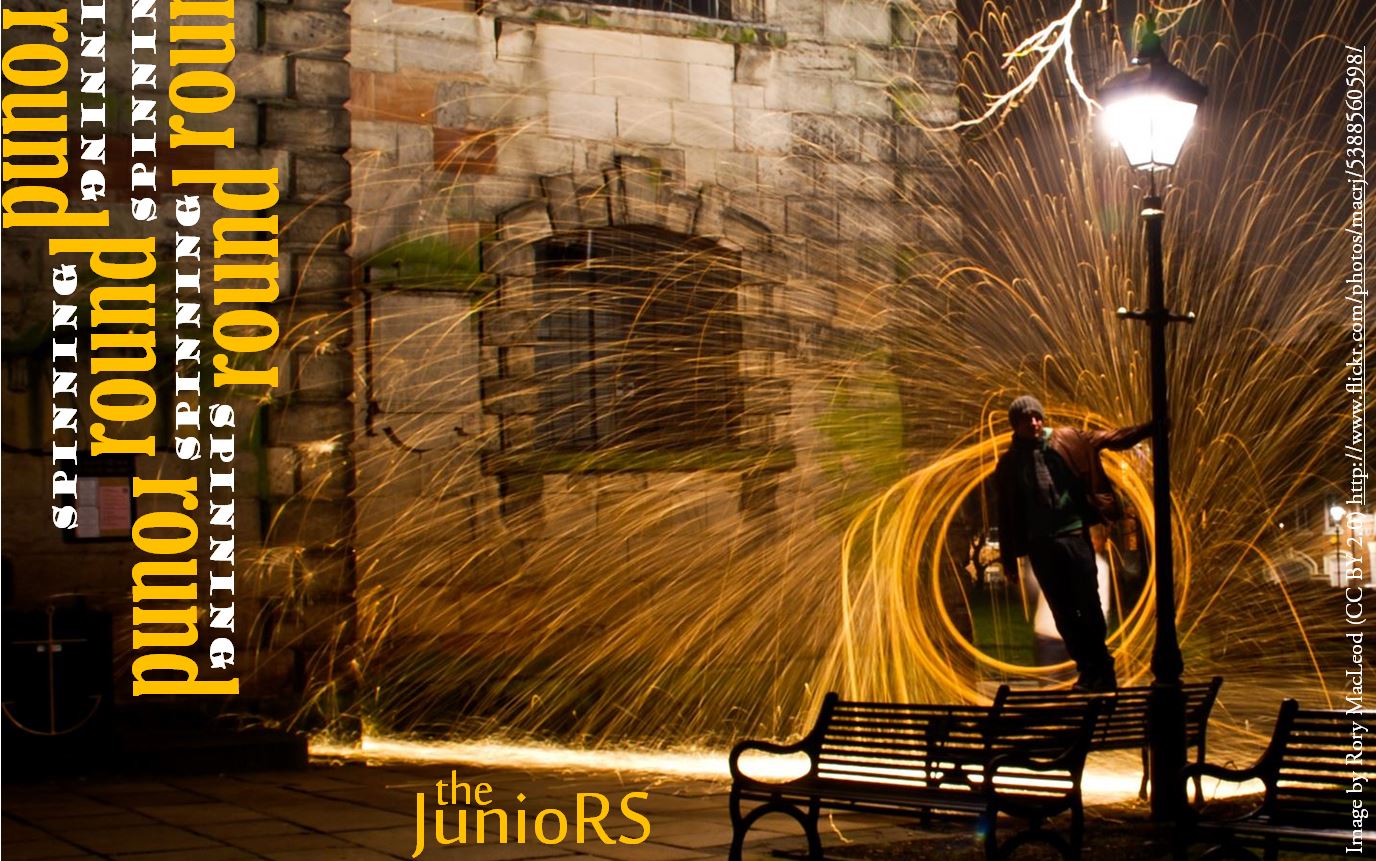
The JunioRS Radio Show Poster: Created by Seth Goodman
It all started with John’s description of a theme he wanted to explore that intrigued me so I added my name to his radio show group.
Thinking of stories with little narrative, without conclusions, that put a picture in your mind. Perhaps stories from your family, your people with little detail… Perhaps some other idea.
With the use of a shared Google Doc we started brainstorming our ideas. All of us were well aware and expected the final product to be something different than what we started with, and it was. Although the original theme of using story snippets to put a picture in your mind, and exploring whether stories needed a beginning, middle and end remained. There was also this unique concept we threw into the mix of exploring, for lack of a better phrase, an Audio GIF: A repeating audio phrase that highlighted the essence of a piece.
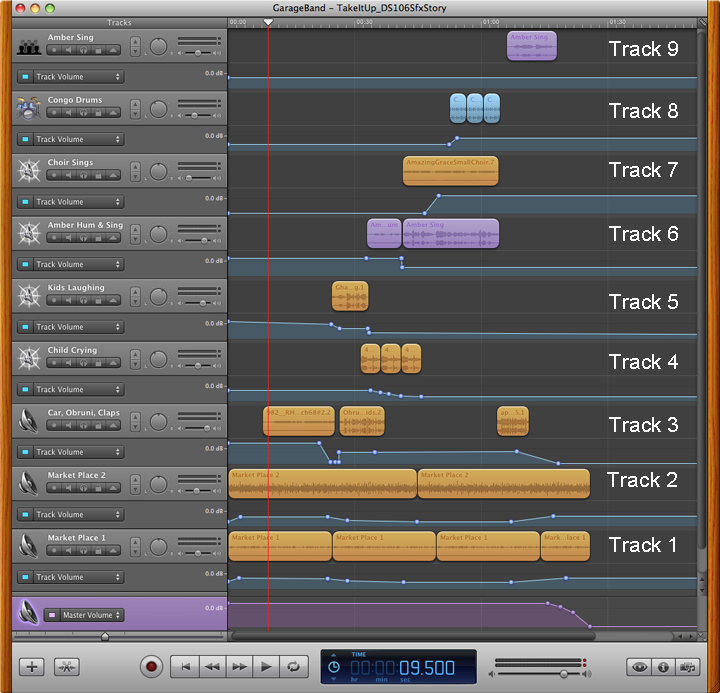
During our first Skype call we brainstormed more, throwing around ideas of a room full of voices where one voice or story would come to the forefront then fade away as another faded in. I could see how this might work, but wasn’t clear how it would actually unfold. I knew if I had some raw material to work with something would emerge. We each uploaded a few files to our shared dropbox, and even though we hadn’t decided on how to divvy up the workload, or even what we were going to do yet, I took a stab at editing the pieces together using GarageBand ’09. I thought it would give us a good place to start when we had our next call.
The background music came about because John had listened to my first live DS106 Radio broadcast and had commented that he couldn’t get RnA’s (Rochelle and Amber Lockridge) rendition of “Comes A Time” out of his head. Although we didn’t realize it at the time, it lent itself well to our Audio GIF experiment. Not only is it being sung, but our speaking voices are layered in as well. Additionally, since I had recorded and engineered the original song I had the individual tracks available to mix and match if wanted. By underlaying only the guitar on certain segments I was able to reinforce the importance of one section over another.
THE RAW AUDIO
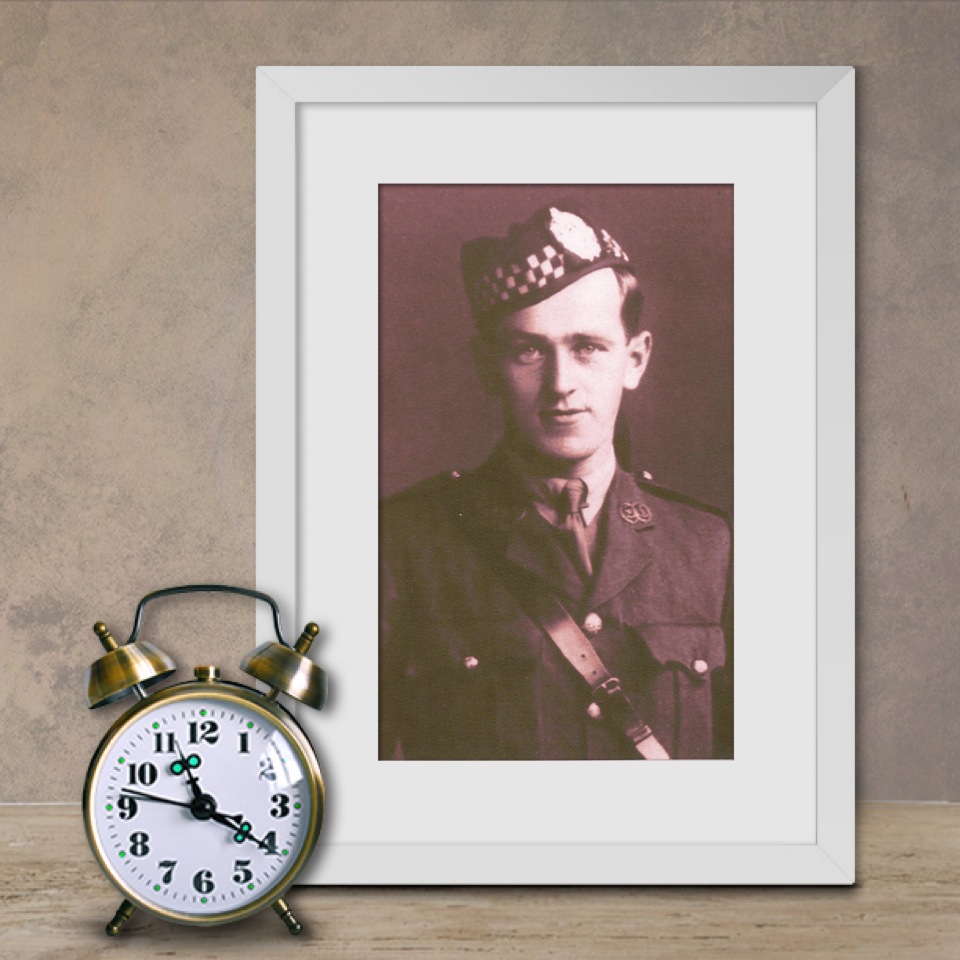
John & Gran
Upon listening it was obvious that each of us was coming at this in a different way. Seth had interviewed his mother about family stories, John shared glimpses of stories, and I had told two stories about my daughter as if I were telling them to my grandson. This presented a creative challenge. John’s segments were short, I could use them as is. Mine were also relatively short. Seth’s interview, however, was about 15 minutes long, (See media player below to listen to the full length interview.) and we were shooting for the entire piece to be 15 minutes.
SOUND EDITING BEGINS
Seth’s Mom & sister Miryom
I wasn’t certain how I would tackle the editing of Seth’s interview with his mom. I could go through it minute by minute and add notes for each segment, then with my analytical mind pick out which parts I wanted to work with. But I didn’t find that process very appealing right then. I opted instead to lift out the parts that I felt attracted to – no rhyme or reason to it. If I liked it, I split that section out and copied it to another layer. I don’t know why I was attracted to one segment over another. I just was. When I finished I was left with about 5 minutes of the interview that I thought I might like to use. Then I started pulling it together. Mind you, I hadn’t checked any of this out with John or Seth. I just thought I’d play around with stuff and see what happened.
There comes a time when memory fades. The backdrop gets blurred. Are we remembering or recalling our own retelling? Or perhaps our stories are simplifying, clarifying or crystallizing around an image. – John Johnston
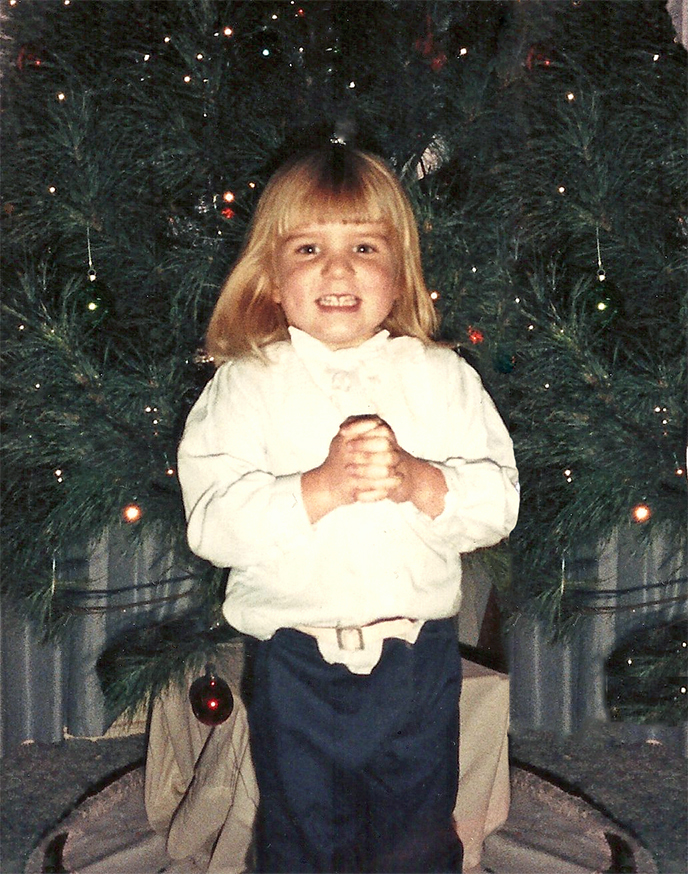
Jenny & The Christmas Tree
I began grouping the segments together to have a “logical” flow to the piece. As I worked an arc of a story began to emerge. Much the same as what happened during my Bygone Backyard Photo Safari. The music flowed in and out easily, and segments magically aligned (with minimal tweaking) to have logical ending points as the song ended. The “process” continued to be very intuitive. But the amount of work I put into “playing around” was way more than I had expected to put into a rough draft. I can’t tell you how relieved I was when John & Seth were pleased with my “draft”. It was a go!
AUDIO QUALITY ISSUES
We had some audio quality issues which had to be addressed such as different audio recording quality, volume levels, etc. We hadn’t expected to use these initial files. We were basically throwing things at the wall initially to see what would stick. And now most of it was sticking. The interview with Seth’s mother would have to be used as is. We couldn’t redo that. So when I needed to add more volume I simply doubled the tracks. It worked fine. For John’s pieces we really did need to have them re-recorded with more volume. We ran into a snag there as he had a newer version of GarageBand (11 vs 9) and I wasn’t able to open his files. After beating my head against a wall thinking there was something wrong with the drop box and my access, I finally just broke down and paid the $15 for the upgrade and everything was “fixed” immediately.
My skill as a sound engineer, mixing and mastering, are continuing to develop. I’m quite familiar with layering and adjusting the volume levels and placement of sounds on the timeline, etc. My post on the Obruni Arrives in Africa Sound Effect Story is a good example. This one, however, presented an unexpected challenge that required more “futzing” around than usual. I expect that most people will be listening to our show on their computer or mobile device. So relying on the quality of sound from mixing while simply listening through good quality headphones would be insufficient.
I needed to adjust the EQ and effects to optimize the audio experience across several platforms: Computer, computer speakers, headphones, tiny cheap radio speakers, iPhone/iPod. Adjusting the volume of the music soundtrack was especially tricky. On one set of speakers I could hear it just fine, another it was too low.
I also added a new tool to my sound engineering arsenal, Ozone 5. A professional sound mastering software package that I picked up following a GarageBand sound editing class at my local Guitar Center. While this optimization process was very time consuming. It was well worth it in the end. When I myself enjoy listening or viewing one of my projects over and over again, I know I’ve got something there.
I can tell you…. after all of the work I didn’t like having to reduce the quality to save it as 128K. It about broke my heart, but those are the sacrifices one still has to make so that the piece can stream over the internet and download more easily.
I hope you enjoy listening to our show as much as we enjoyed creating it.
(Note: If you felt your audio experience was less than optimal listening to us spin our tales, try another listening mode. I’d even recommend you doing that anyway so you can hear for yourself what a difference it makes. Someday I hope to learn how to make these adjustments with learned skills instead of with trial and error.)
SUPPORTING AUDIO FILES
UPDATE: 10/26/13 addition of pre & post show live discussion on DS106 Radio 10/22/13 US premiere
The pace of the open-online digital storytelling course DS106 is challenging – to say the least. And the 3M-DS106 Salon members and a few other 3Mers have been squeezing in time for lurking, learning, and creating digital storytelling projects relating directly to their jobs at 3M.
The external Headless ’13 DS106 course is moving into advanced audio for weeks 7 & 8 with a big emphasis on forming teams to create a radio drama. We’re going to slow it down a little more to give the 3M participants the opportunity to go over some material they were interested in, but didn’t have time, and/or to strengthen the digital communication skills we’ve already been working with.
Some fine 3M-DS106 (non-proprietary) projects already completed:
Making deposits into the 3M-DS106 Salon Project Bank
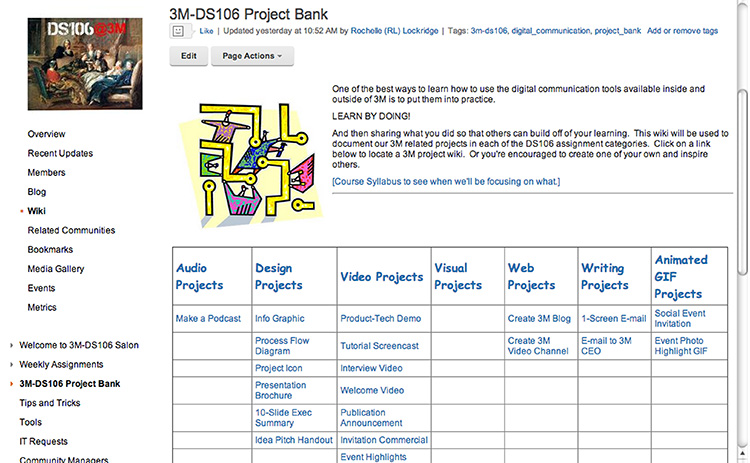
As creative as I am, even I couldn’t see how 3M would benefit from the 3M-DS106 Salon members creating a radio show. Perhaps practicing our collaboration skills, but this particular group knows what they’re doing in that arena. I’ve suggested we take this time instead to populate our 3M-DS106 project bank. One of the best ways to learn how to use the digital communication tools available inside and outside of 3M is to put them into practice.
LEARN BY DOING AND SHARING!
And then sharing what you did so that you can inspire others and they can build off of your learning. Our 3M-DS106 project bank wiki, built on the Lotus Notes Connections Communities platform, is being used to document our 3M related projects in each of the DS106 assignment categories: audio, design, video, visual,web, writing, animated GIFs.
Below is a screen shot of the project bank as it stands today.
3M-DS106 Salon Project Bank Screen Shot – A 3M Lotus Notes Connections Community
I’ve challenged each salon member to deposit at least 2 projects into our bank over the next two weeks.
Project Bank Deposit Procedure:
Step 1: Identify 3M related digital communication projects you are working on now or have completed in the past. Projects from others are also fair game. Just make sure you give credit where credit is due by including a link to their 3M Connections profile or e-mail address.
Step 2: Identify the digital communication tool category for the project and add the title into the 3M-DS106 project bank table .
Step 3: Go to the Wiki page identified in step 2 and create a new child wiki page for your project. (If you don’t know how to do this, now’s the time to learn. Ask for help if you need it.)
Step 4: Include actual examples with images and tutorials whenever possible.
Step 5: Let the rest of us know you’ve made a deposit to the project bank by posting an entry in your blog or sending out a link on SPARK (3M internal equivalent to Twitter). Sharing using both communication platforms would be even better.
Additionally, you’re encouraged to add examples to an existing project already in the bank.
******************************
This project bank structure is in the early development stage. As we begin to populate it we’ll see what works and what doesn’t, and come up with ideas on how to make it better. While we are constrained to using the software platforms that 3M has chosen to provide us at the moment – Lotus Notes Connections, SharePoint, Wiki Enterprise – I fully expect that together the 3M-DS106 Salon members will find a way to make it work.
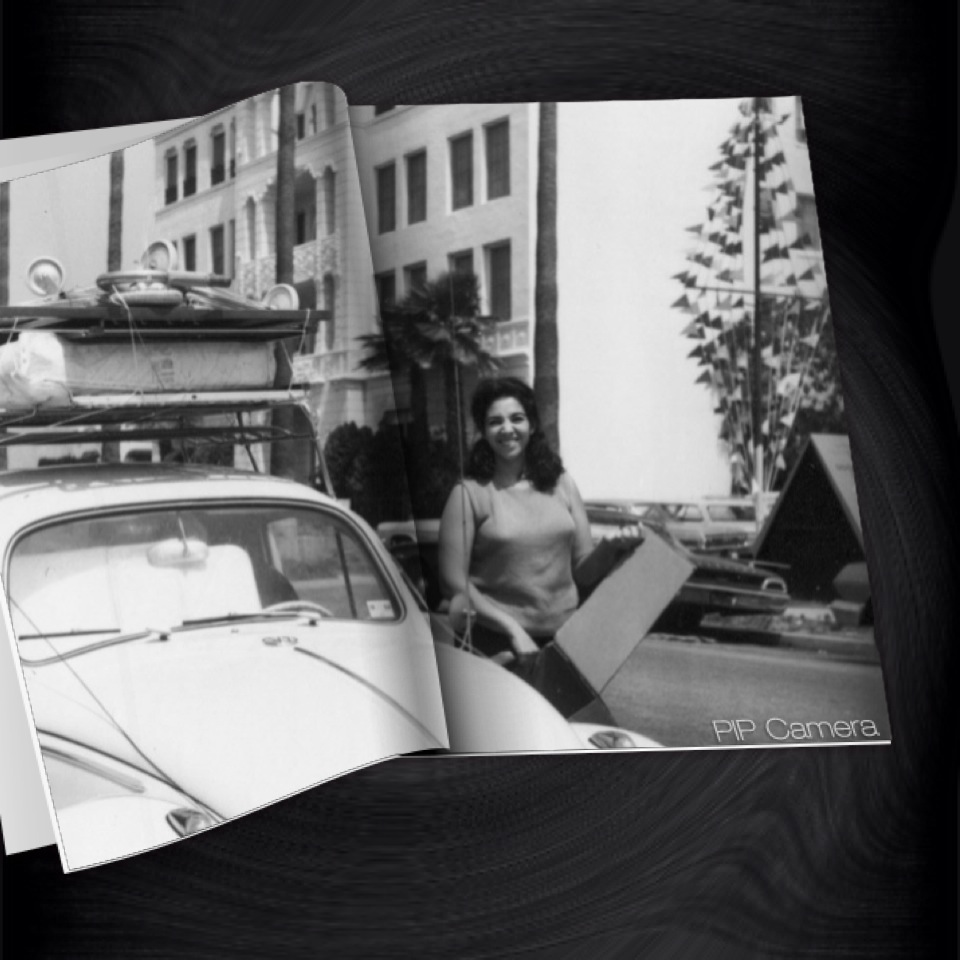
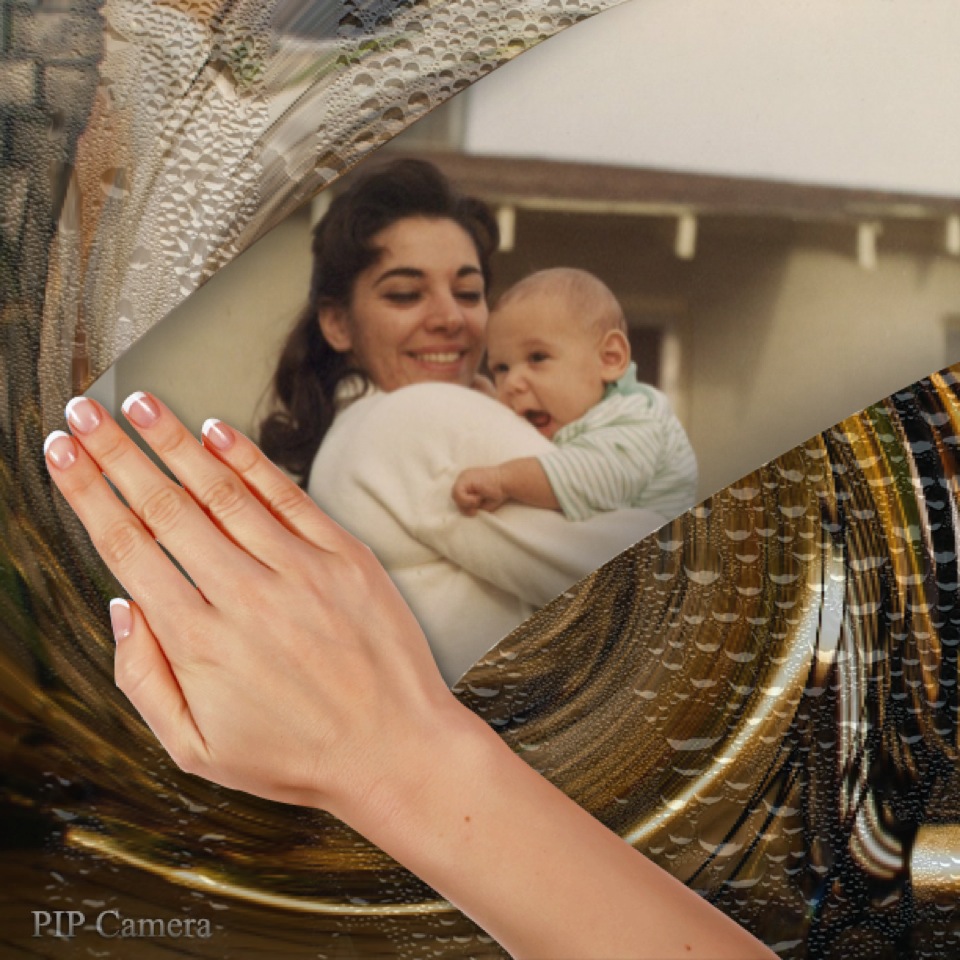
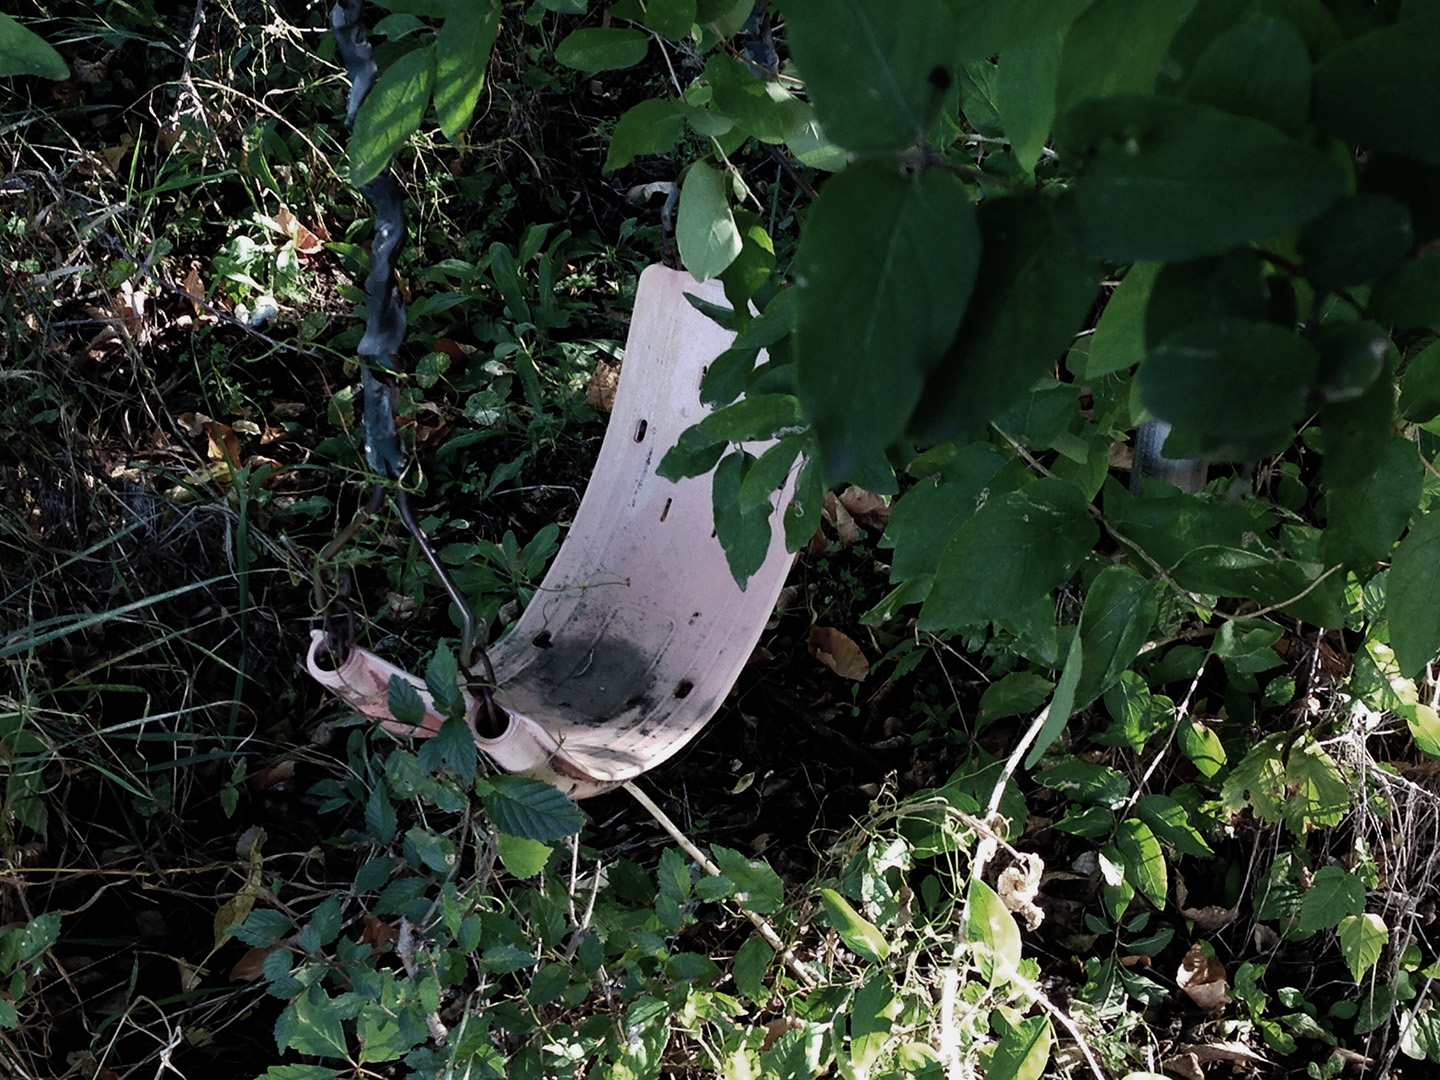
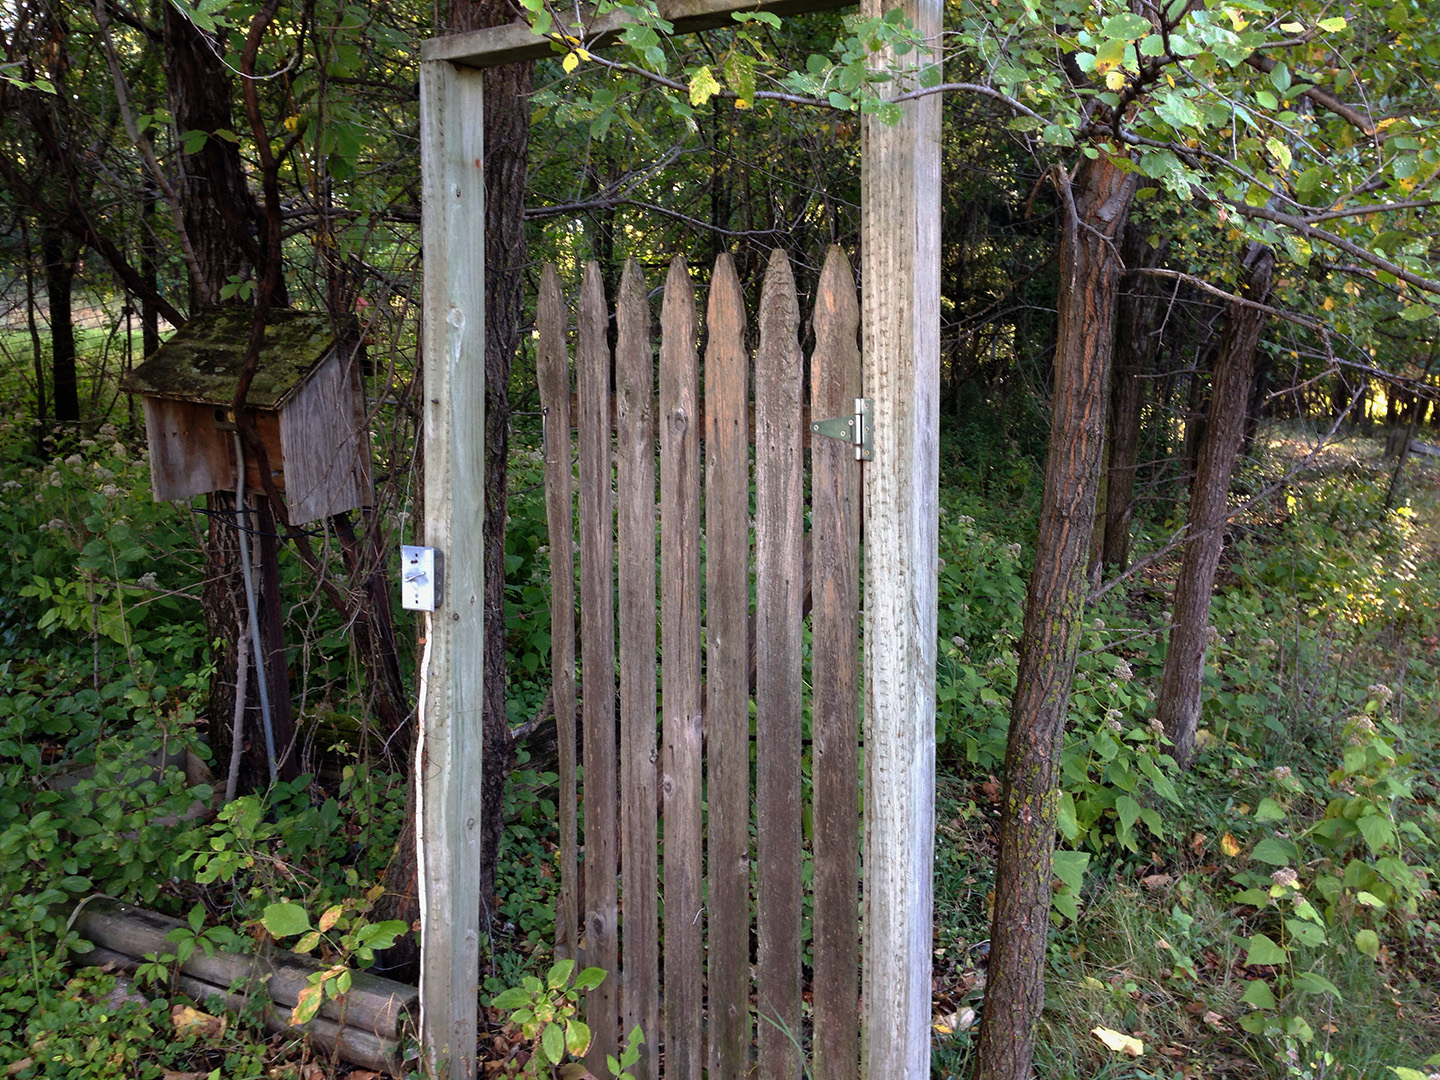
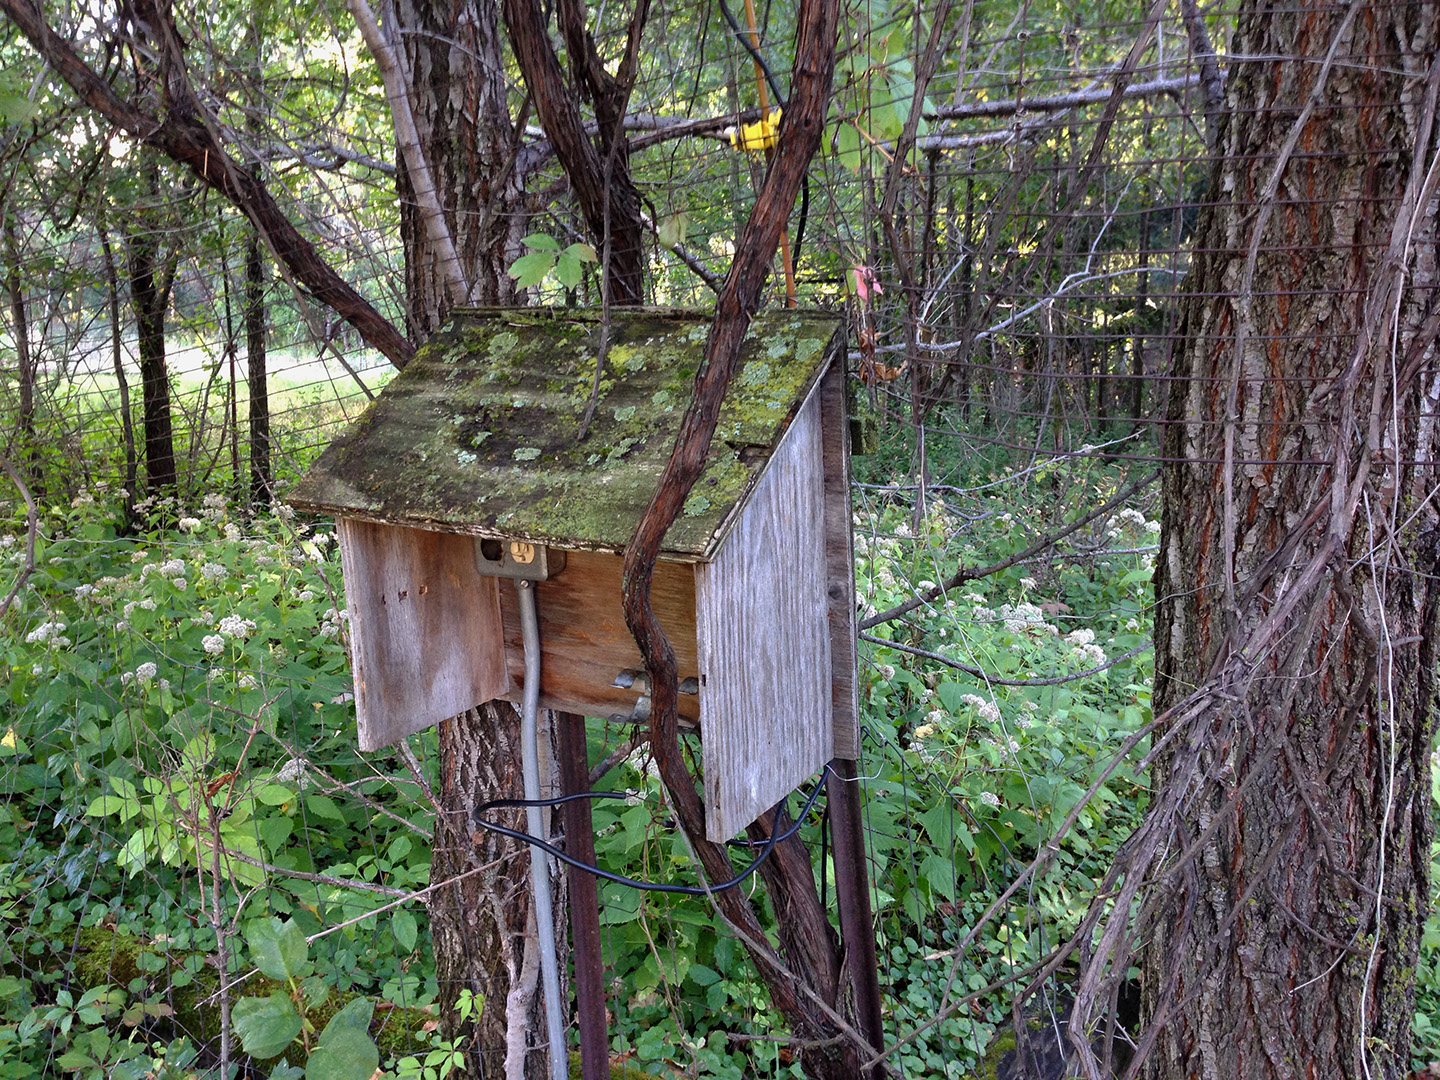
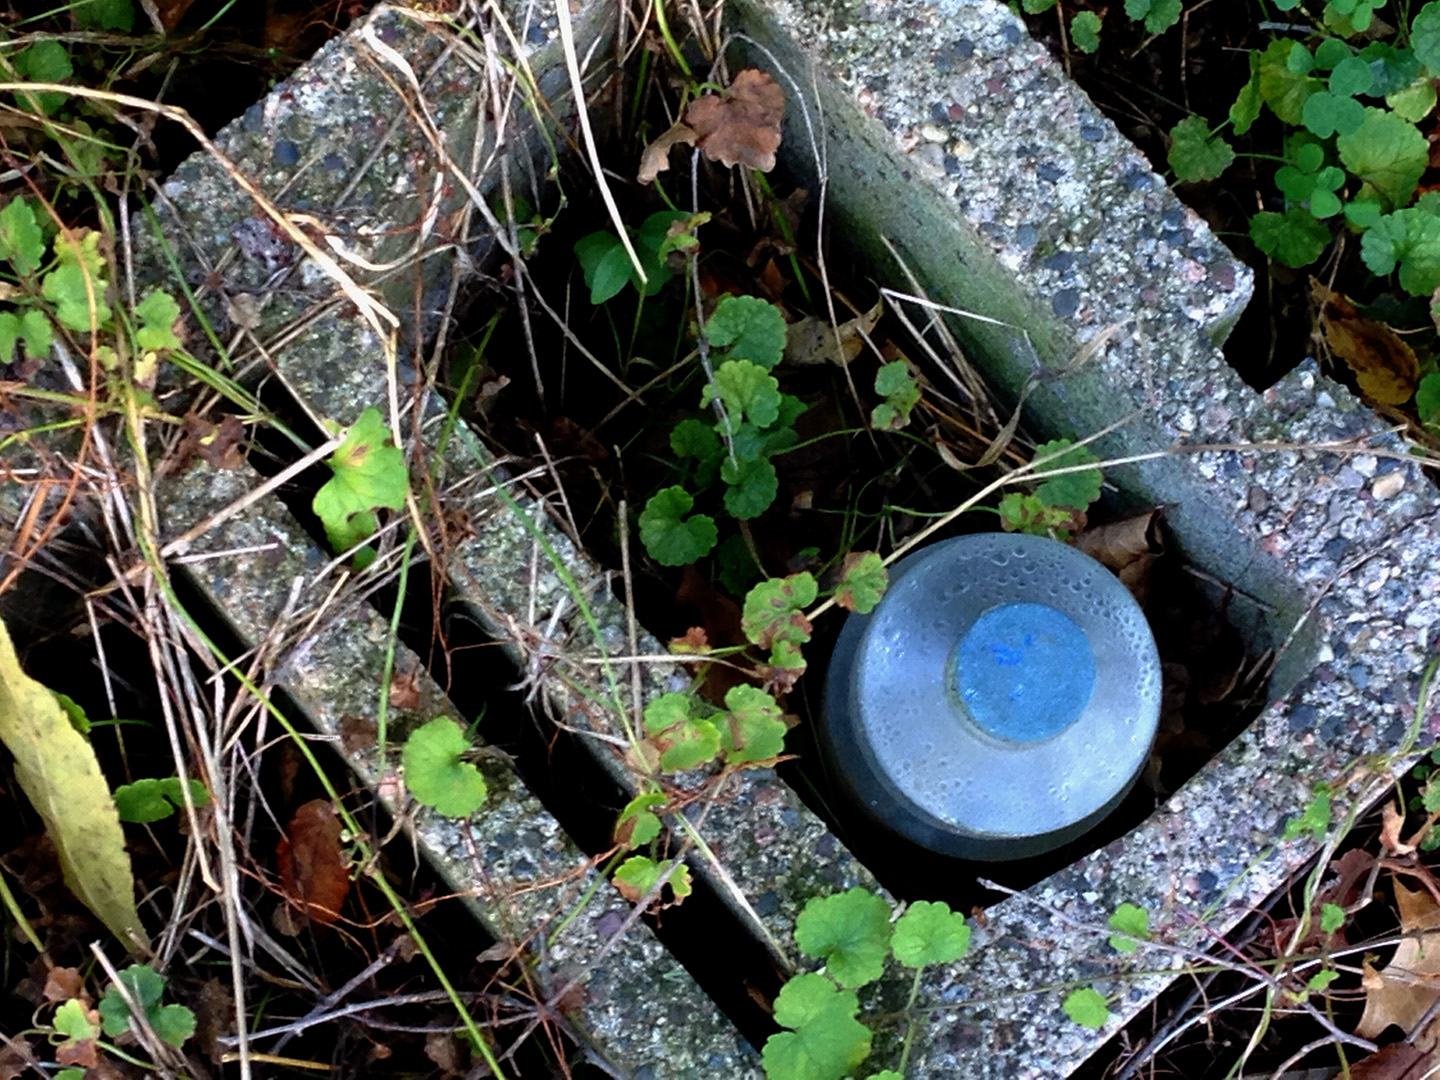
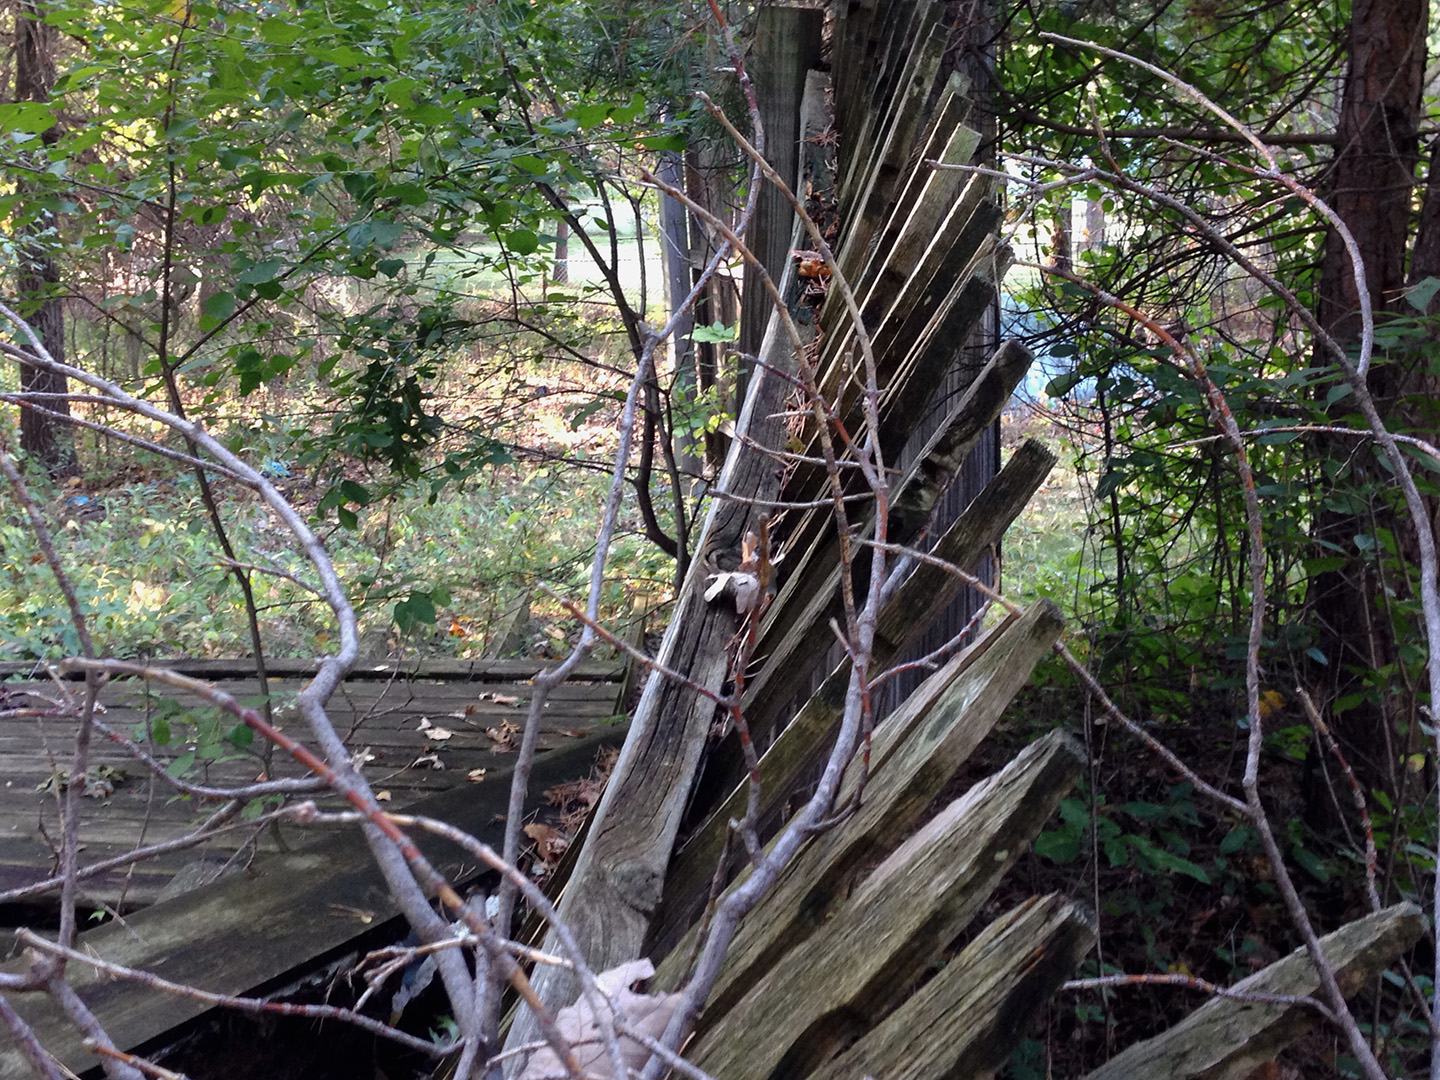
I went out this morning to capture images in my backyard during a time of day I knew would avail interesting shadows and lighting for a DS106 Photo Safari. What I didn’t expect was that through the process of my editing and choosing the photos, a story of my life as the mother of two now grown daughters, and the ex-wife of a gardener would reveal itself. The images tell of a time well past: A child’s swing set neglected and overgrown with weeds and trees, a prolific garden abandoned and no longer tended to, a bleached antler reminding me of the 9 foot electrified fence my ex-husband erected to provide a barrier to free meals for the herd of deer traveling through our backyard, discarded odds and ends left behind when a family dissolved. While this phase of family life has past, a new chapter has begun as an over-joyed “Nana” of a vivacious two-year old grandson. And who knows what stories my backyard will tell 10 years from now.
Bygone Backyard Photo Safari
A backyard of memories revealing their story of a family long past.
Abandoned Childhood
Forgotten Swing
Left Behind Garden Gate
Bygone Box
Bare Bone
Block & Bottle
Ousted Oilcan
THE MAKING OF….
All photos were taken with my iPhone using the Camera+ app. It is a powerful app that can do a lot if you know what you’re doing, which I don’t yet. I experimented with setting the white balance and selecting a focus zone. Neither of which proved to be successful. I think it’s time to read and watch some tutorials. Next, I uploaded the photos to my desktop with the Photo Transfer app. I love this little app. I can very easily upload and download photos and videos over WiFi or bluetooth to any of my Apple devices or even my PC.
Fallen Fence – Photo too cluttered.
I had taken almost 90 photos, and challenged myself to get it down to 5. With a quick look at the images I could see most of them weren’t all that great. The lighting was bad. The images were cluttered and/or blurry. Some just weren’t interesting at all. I then opened them up in Photoshop Elements 12 for a closer look and to do a little photo editing if needed.
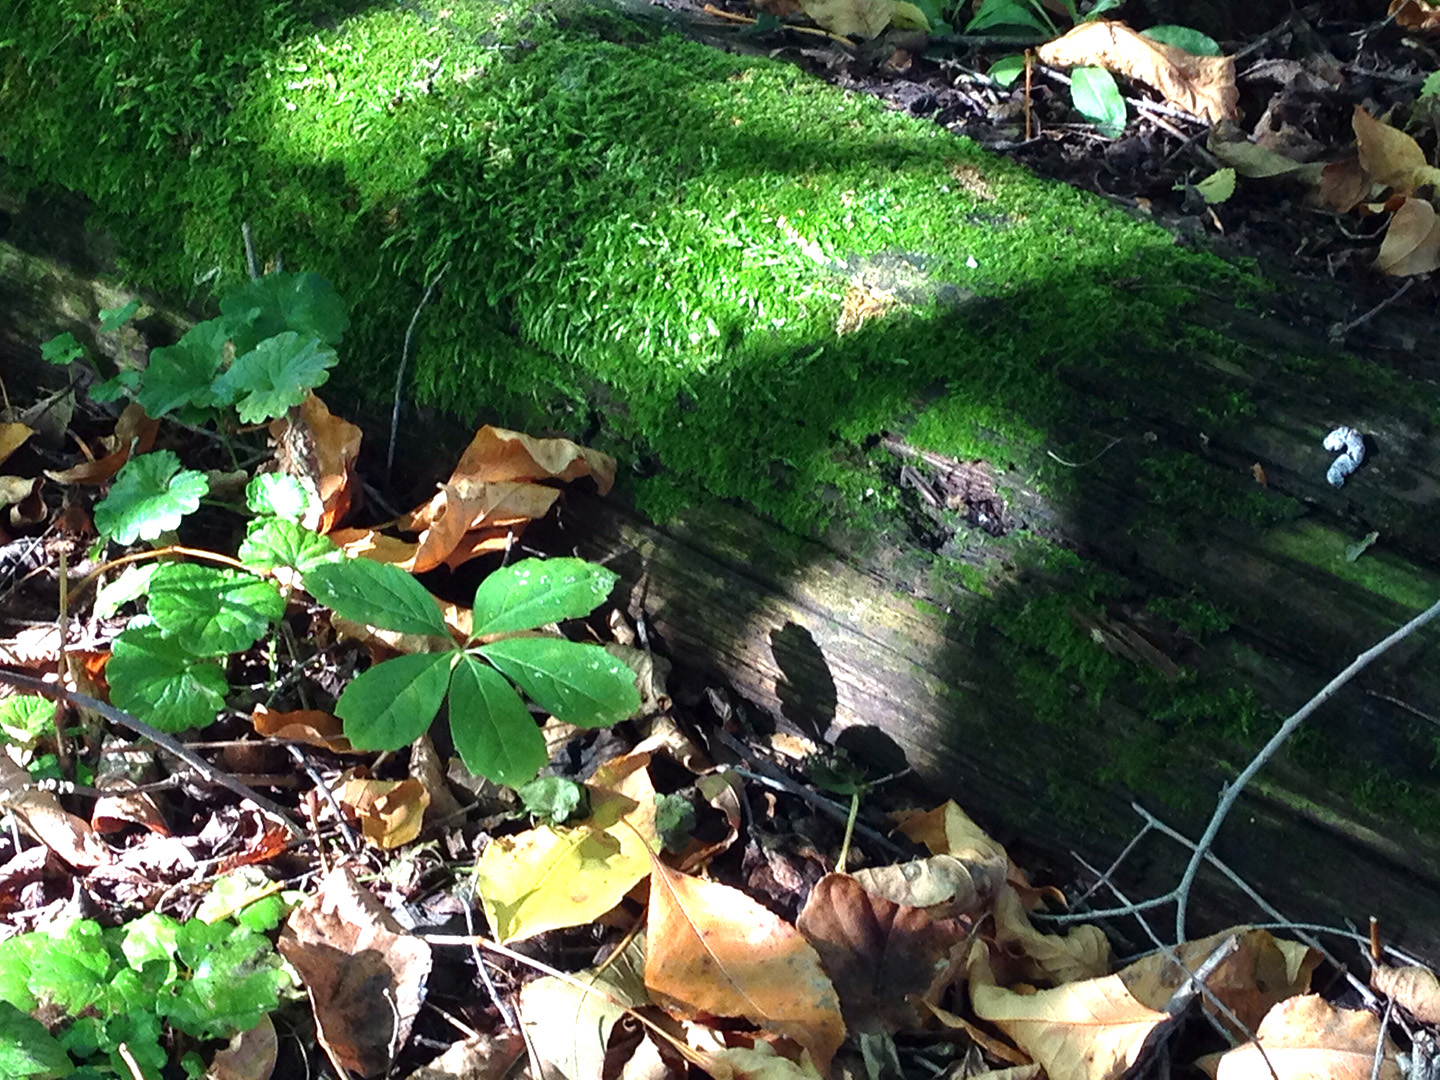
Mossy Log Shadows- interesting to look at, but no story
As I worked I noticed a set of photos emerging with single objects dominating the image. I also had some very interesting natural environment shots with neat shadows and lighting, but they didn’t tell a story. They were just nice to look at like this one of a mossy log that had been used to frame the sand box under the swing set. I’m pleased with the results of reducing my photo safari down to the best seven photos with the single object focus, and leaving out the nature only shots.
Writing the intro paragraph was an additional unexpected challenge. In my head it sounded simple to put my thoughts down on paper, but that wasn’t the case. I struggled for quite awhile as to what and how I would share the memories and stories embedded in the photos.
Finally, I used the WordPress Slideshow plugin to add them to my blog post. Then by editing the HTML code in the text view the borders and shadow effect of the final two images were created. Learn how here.
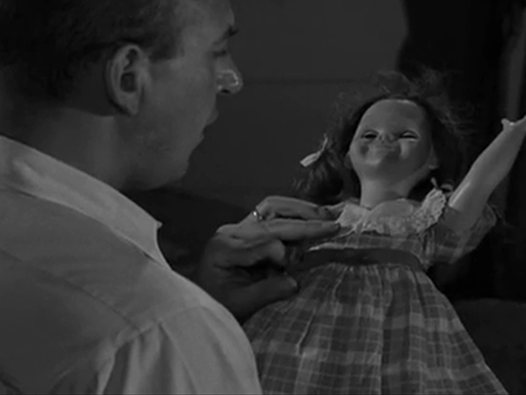
Producing the DS106’s Sweet Talky Tina video was a labor of love as it presented many challenges due to the number of different media from several sources that had to be combined and sometimes created: image stills, GIFs, YouTube video and audio. And writing up this blog entry documenting the process turned out to take as much work and time as the video itself!
The task was to take a misunderstood, outcast, marginalized character and transform her into a more powerful, independent, and self-managed member of the ds106 community… to rehabilitate a character out of The Twilight Zone, such that the character would be accepted as one of the ds106 own.
The inspiration for the video was the result of listening to my Pandora Classic Folk Rock station when a fun song about love from the Beatles came on – can’t remember the name right now. The lyrics made me giggle when I thought of Talky Tina’s DS106 persona. Then Tupelo Honey by Van Morrison began to play….
She’s as sweet as Tupelo honey. She’s an angel of the first degree. She’s as sweet, she’s as sweet as Tupelo honey. Just like honey baby, from the bee.
I couldn’t resist. A video mashup/remix of Talky Tina as sweet as Tupelo honey had to be made.
As is the case with most of my projects, they are iterative in nature – forever improving and incorporating new ideas as I go along. Sometimes I am inspired by the work of others. Other times I just happen to stumble upon something that I like more. There are two versions of the video available. I decided to keep the first draft posted to YouTube so that I could illustrate with examples the modifications undertaken to produce the final version. Links to the actual in-video sequences are provided as needed.
=>INTRO & OUTRO
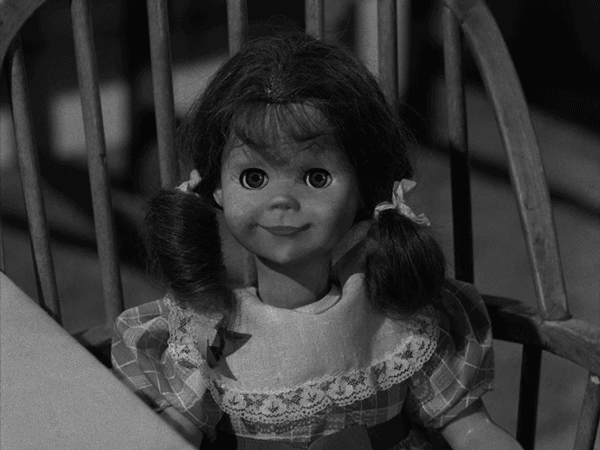
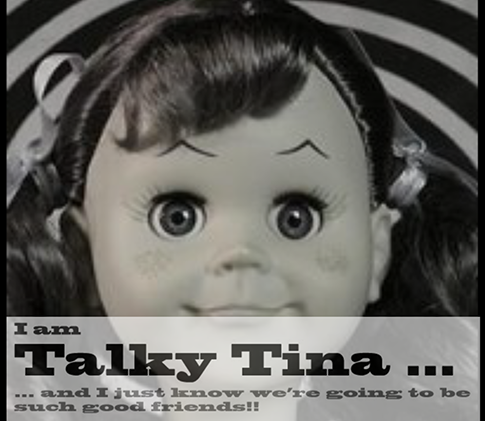
The first draft does not contain an intro or outro sequence. And upon request, Talky Tina was kind enough to create a special title sequence GIF, Starring @iamTalkyTina, that I could use in my final video.
For the title sequence, I liked the GIF that Talky Tina had made, but the first few frames of “smack talk” directed at Jim Groom needed to be deleted. By opening the GIF directly in Photoshop Elements 11 for the Mac I gained access to all of the original 30 image layers, and could easily delete the objectionable frames.
Next, I noticed that the star pattern used in the GIF was less dense than the star pattern I was using in other parts of the video. This lack of continuity didn’t sit well with me. I tried to let it go… telling myself no one would notice…. but it just kept bugging me every time I watched it. In the end, my “OCD” alter ego won out and I went about making the necessary image modifications.
Using the Magic Wand tool I selected the portion of images I wanted to retain, and deleted the rest. The remaining images fortunately did not have to be perfectly clean since they would be merged with a new black starry background that would hide the imperfections. This saved a lot of time, which I greatly appreciated.
When merging the selected images and text with the new background, I reduced the image opacity to 80% to give them more of an eerie feeling. Tina’s head is a little transparent – floating out in space. The GIF below visually illustrates the sequence of steps taken.
Click on image if the GIF is not running
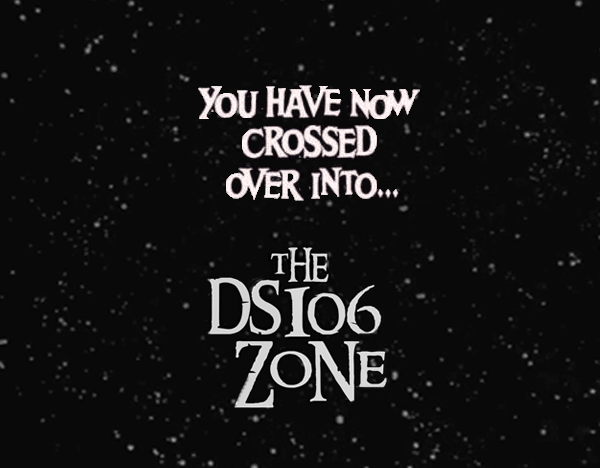
The expanding “The DS106 Zone” text was created using the zoom effect on only that specific text image. The soundtrack for both the intro and outro were pulled from the original Twilight Zone television show. The outro was used in its full length. But the intro could only be used the first 10 seconds before Rod Serling speaks.
My video editing software is Adobe Premiere Elements 11 for Mac and my story purpose was to show Talky Tina as only sweet and loving – especially with Erich. To accomplish this task, I pulled the audio soundbite, “My name is Talky Tina, and I love you very much.” from the beginning of the episode when she is talking to Erich’s daughter. I unlinked the video and audio, deleted audio portions where Talky Tina and Erich hate or threaten to kill each other, and dubbed in the love line. I also found a segment of “silence” in the original video that I could use to cover up dialogue I had deleted but where video remained. The audio proved to be a bit trickier for Erich though. I didn’t want there to be the dubbed foreign film effect, and have Erich mouthing words that didn’t match the audio. To get around this I found back shots of Erich and strategically spliced in images of Tina at certain locations. [View example in video]
“And I love you very much.”
Erich’s facial expressions and actions also had to look loving toward Talky Tina. Again, careful splicing of the right portions of video did the trick. In one case I tried using Christina’s reversing effect so that instead of Erich throwing Tina against the wall, it looked as if she were throwing herself toward him and he is lovingly catching her in his arms. But the effect just didn’t look right in my video, so in the end it was deleted. As you can see, Erich and Talky Tina can say and do nice things to each other through the magic of video & sound editing.
=>GIFs
As I mentioned above, this project contained a number of different media. Each of which presents its own challenges. Working with the GIFs was a big one. When I tried inserting them directly into the video editing software, they no longer looped endlessly. They ran once and stopped. No problem you say… just copy and paste to make the sequence repeat… Sounds great, in theory, but my video editing software “deletes” a few beginning and ending frames in order to blend with the visual media on either side. While this wasn’t too big of a problem for most of the GIFs…
…for two: Quick Wink Tina and Tina & Julie Andrews – this resulted in the wink and the ghostly image of Julie Andrews being cut off prematurely. You’ll notice these irritations in the first draft version as illustrated below.
The use of the GIFs was further complicated by the fact that I only wanted the important event, such as Julie Andrews or the wink, to appear once, and the entire segment needed to be a specific length in order to match with the music soundtrack. To address these issues I opened the original GIFs in Photoshop and placed the layers with the “event” in the middle of the GIF, instead of at the end. I then duplicated a few strategic layers to make the event last longer on screen and to make the entire sequence itself longer.
The long GIF sequence of Talky Tina at the computer needed no modification what so ever. It was meant to play only once and was miraculously the same length as the instrumental section in the music soundtrack. What a stroke of luck. [View in final version]
=>Image Stills: Tips & Tricks
A trick I often use when mixing visual media is to capture a beginning or final frame of a video or GIF sequence. (In Adobe Premiere Elements 11 for Mac the command is Tools => Freeze Frame ) By inserting a still image captured from the original source the image is already perfectly aligned and will aid in providing a smoother transition between the media. And as an extra bonus you can easily adjust its length on screen to provide better synchronization to your music soundtrack if desired.
Reduce opacity of overlay by 80%
Reducing the opacity of an overlay image, such as Talky Tina’s head in the intro sequence or her webpage banner text as shown to the left, allows the underlying image to remain partially visible. This works great for title and credit text sequences as well.
Increasing the brightness & contrast of an image, such as for the cover of Talky Tina’s memoir, “The Stairs. They Go Both Up and Down” helps the image to stand out and become more memorable in the video.
Adjusting an image position and zoom factor in relation to an adjoining image can make for a smoother more natural transition without the need to create a time consuming manual pan of the shot. [Watch example in video]
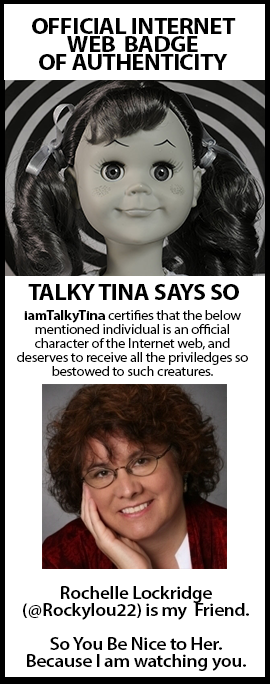
=>Badges
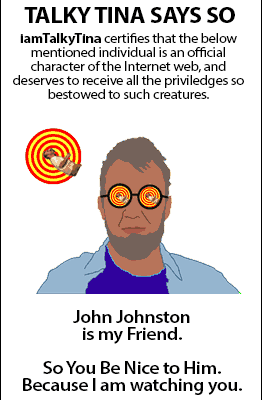
Talky Tina had created badges that her DS106 “True Friends” could insert into their blogs. [Talky Tina’s True Friends Index] And there were a few technical hurdles that I had to overcome to include the badges in the video. First off, the whole badge wouldn’t fit on screen and remain legible on a mobile device. I was able to get around that by cropping the top half with the picture of Talky Tina and use it to introduce the badge segment in the video. The bottom half of the badge, including the “TalkyTina Says So” text, was then cropped and used as the badge image for each friend.
The video includes badges of people whose media I used, and her other “Super True” friends. I think of this segment as part of the credits and acknowledgments. Amazingly there was a length of soundtrack that lent itself well to the needed seven friend badge image sequence.
Originally I made the decision to exclude badges with GIFs. I assumed they would be too time consuming to make them work correctly and align them properly. I had a change of heart after modifying all of the other GIFs in the project, and the GIF badge by John Johnston (who also made the CogDog/Alan Levine-TalkyTina Dissolve) would be included in its full glory. [Click here to view]
The transitions between badges were surprisingly challenging. Fortunately, Talky Tina had used a template to create the original badges and I had used the same size and technique in Photoshop to crop them. This meant I had a supply of badge images that were the same size and shape to work with. I tried different transitions:
… and finally settled on the film dissolve. With careful alignment of each badge I was able to give the effect of only the photo image gently dissolving from one badge to the next. Toward the end of the project I was still not satisfied with the sequence. The badges were thin and there was a lot of blank space to either side. I considered adding vertical text, such as DS106 on the left and Zone on the right, but that felt like it would be too cluttered. It wasn’t until I had the inspired idea to add the starry background and reduce the opacity to 80% that I was satisfied and could call the badge section complete.
=>Rockylou Productions Animated Logo
The Rockylou Productions animated logo at the very end of the video was created by incorporating a dissolve transition between two logo images designed by Amber Lockridge. Transitioning from b&w to color with a slight increase in the size of the color graphic by 1% is meant to give the illusion of growth and expansion, an important value statement for Rockylou Productions.
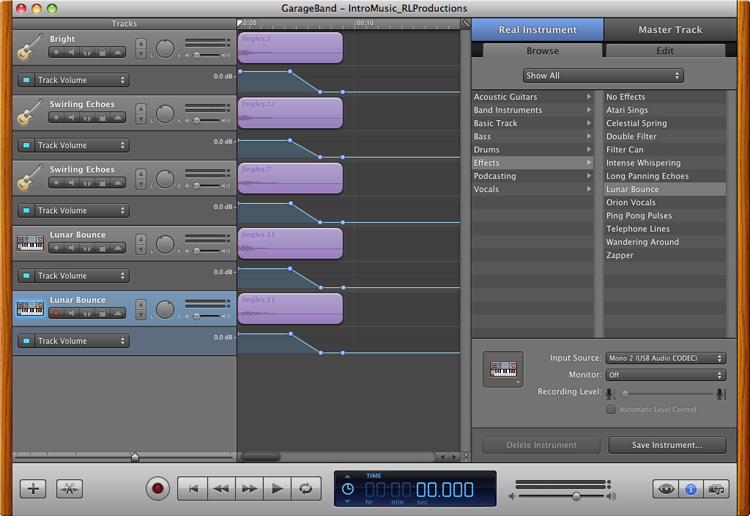
The audio logo for Rockylou Productions was made with GarageBand and a simple “D” chord that I played on my 12-string guitar. I took the original recording and added a Bright Guitar effect to the basic track. I then duplicated the original track four times, and added dimensionality to the chord by adding a Lunar Bounce to two (panning each slightly left and right) and a Swirling Echo effect to the two remaining tracks, also panning them slightly left and right. With the addition of the Ambient – Wide Spaces effect to the master track the memorable audio logo for Rockylou Productions was born.
=>Wrap-Up
I think that about does it. This will most likely by my last DS106Zone related project, but I’m looking forward to completing many more digital storytelling projects in DS106 and with Rockylou Productions in the future. In the wings already in the early stages of production are two challenging projects:
a multi-media story using Facebook entries & Storify about the uprising in Istanbul in June, 2013
a video interview of Amber & I talking about the creation of the Rockylou Productions logo and website banner which will be incorporating images against a green screen background.
If you have any questions or would like to know more about the production of this project, post a comment or send me a tweet @rockylou22 and I’ll be glad to share.
=>Media Sources & Credits
Soundtrack: “Tupelo Honey” by Van Morrison
Twilight Zone Video & Audio Clips
YouTube 2min Talky Tina — Living Doll — Two Minute Twilight Zone Project
 Without an instructor how would we know when to stop? When would we see “The End”? Thanks to Mariana Funes for realizing that the UMW Fall semester ended on Friday, December 13th, 2013, the DS106 Headless ’13 course was given an end date. #DS106 is #4Life, but the Fall 2013 DS106 “headless” experience came to as close to an official close as a headless course can on 12/13/13.
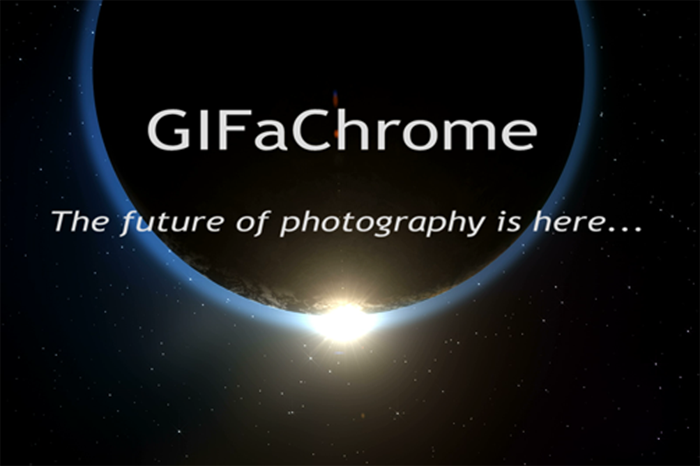


