Category Archives: Mashup/Remix

GIFAChrome Camera GIFs Cory Doctorow

Professional photographer Jonathan Worth has put out an invitation for anyone to take his photos of Cory Doctorow, activist for liberalizing copyright laws and proponent for Creative Commons, and remix them in anyway you like. They will then choose from the best remixes and share any profits with their co-creators.

A series of photographs taken by Jonathan Worth of author Cory Doctorow are now available for you to remix, regenerate, and to make new art, especially in light of the themes and topics of his books. Your challenge is to make something new out of the photos.

This is a new experiment in public art, and a new way of thinking about digital media. Who could be a better figure than an author who releases all of his published works under creative commons license with an open invitation to remix?

This opportunity was presented to the DS106 participants for Remix/Mashup weeks, as well as turned into an assignment MashupAssignments1020. The process of creating these new images evolved through three versions and resulted in the creation by Rockylou Productions and a host of other co-creators as documented by Mariana Funes of the first GIFAChrome Camera with accompanying GIFAChrome DS106 Film.

Cory_GIFStrip_4-3DWig_300px

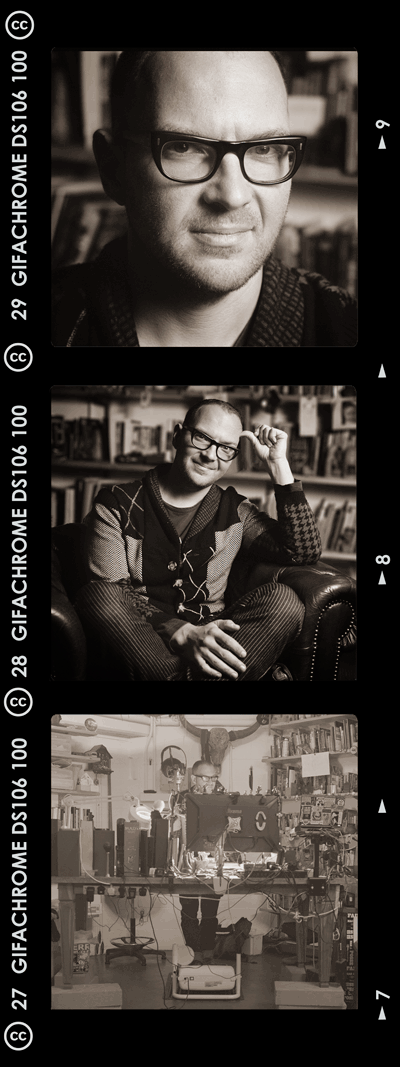
Cory Doctorow GIFAChrome DS106 GIFStrip for Jonathan Worth post-photo remix invitation was co-created at Rockylou Productions.

And as part of the “rules” of the remix challenge, everything we create must be licensed under a creative commons license too. (Notice the CC license logo on the strip?) So no worry about patent infringement or licensing fees. Everyone is welcome to use this work and remix it for themselves. I’ve even included templates at the end of the post that you can download to make your own GIFAChrome image.

Another wonderful side of collaboration and co-creation is that you don’t have to do it all yourself. Others are there to support the evolution of the project at hand.  While I’m covering the process below, Mariana brilliantly captured the contributors and expanded on the philosophical issues that can arise.

=> Check out the Storify collection of tweets and commentary from co-inventor Mariana Funes:  “The Birth of an idea.”

This week I have been following and participating in DS106 Remix weeks. As usual, there have been unexpected surprises and reflections. I expected to learn the difference between a remix and a mashup, but never expected to change my mind about what it means to own an idea. – Mariana Funes


The Manufacturing Process of a GIFAChrome GIFStrip

After perusing the photos of Doctorow, and the remixes already submitted, my creativity kicked into high gear. I happily discovered  two versions of the Doctorow head shot that could be turned into a GIF. [Head shot 1  and Head shot 2] How about making one of my GIF strips? [DJ BIrthday Dance GIFStrip] Yep… I found two more images from Jonathan of Cory working at his computer that could work. [Working 1 and Working 2]. The third would be the shot of him sitting in his chair in front of the bookcase.

DRAFT 1:

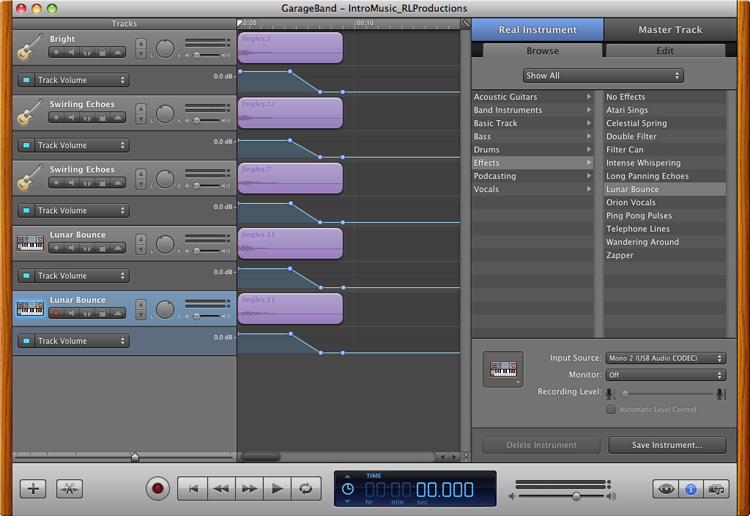
Using Photoshop CS5, each GIF was made in its own Photoshop file.  Then the three image composites were combined into one larger canvas strip with one above the other as shown below.

Cory_GIFStrip_PicsDraft

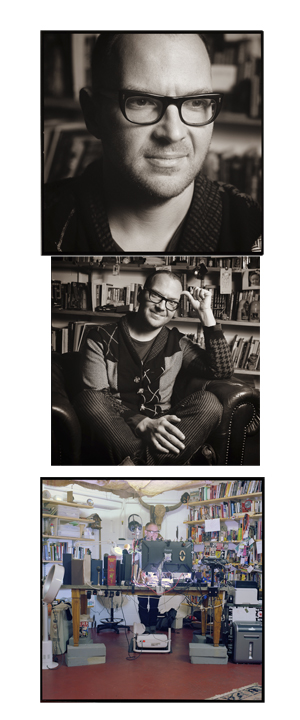
Each GIF and/or image is stacked one atop the other to create an image strip.

I then placed a film strip template on top of everything.  DJ BIrthday Dance GIFStrip will walk you through the process. With the first draft finished, I alerted the DS106 community on Twitter and our DS106 Google+ Community, asking for feedback to improve the image. This was after all to be a collaborative project.

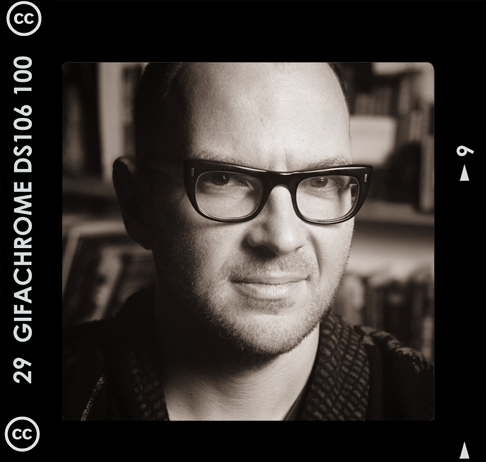
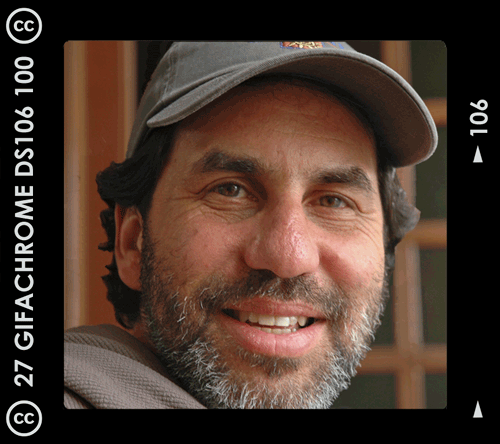
There were comments from several that the head shot image was a favorite. So I turned it into a single GIFAChrome image.


Cory_GIFAChrome_Head

Cory Doctorow GIFAChrome DS106 Image created from original images by Jonathan Worth

VERSION 2:

Adjusting the colored image:

I wasn’t happy with the final panel as colored, I learned how to use layer filters in Photoshop, thanks to a post by Alan Levine, and was able to apply hue/contrast and brightness adjustments to a single layer. I was pleased that it didn’t take me too long to approximate the color scheme of the first two panels.

Redesigning the film strip template:

Jonathan had joked about his disappointment with the rebate  He was evidently accustomed to 120 film. What the heck was he talking about?

I had to do a Wikipedia search to find out what a film “rebate” was (the stuff along the sides of the images that give the image number and film type) and that the film template I was using was for 35mm film. 120 film doesn’t have those little sprocket holes on the sides. [Learn more about the differences]  I certainly wasn’t expecting a lesson on photographic film types for this assignment. But you never know what rabbit hole the DS106 Matrix will take you down.

I went back to Worth’s photos and found a collage of contact sheets that I used as examples to build the new frame template. The font used on the Kodak strip turned out to be pretty close to Century Gothic. That was easy. Alan Levine joining in the Twitter banter, suggested a DS106 film would be appropriate.

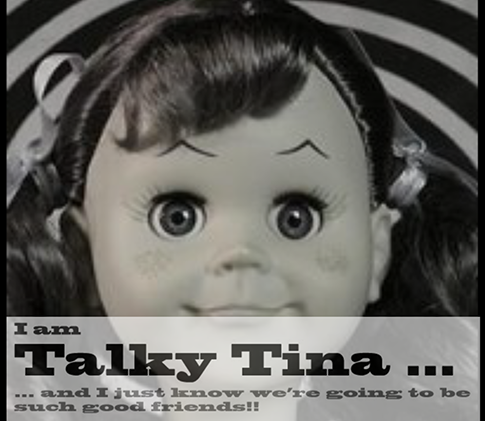
I had toyed with many names for my new invention. RockylouChrome was definitely out. It was clunky. Finally the light bulb turned on and GIFAChrome DS106 film was born.The GIFAChrome DS106 100 film obviously had to have a camera to be used in. With version two of the GIFStrip a new-to-the-world GIFAChrome camera was invented.

I was also watching and listening to the viewers of these new images, and several were concerned with the middle frame not “GIFfing”, and wondered if there was something wrong with the strip.

Back to the photoshop for…

VERSION 3:

AlanLevine_GIFAChrome-3D-5

Alan Levine GIFAChrome DS106 3D Wigglegram

What to do…. What to do…. What I considered an artistic statement by keeping the middle frame still was confusing to others, So I put my artistic ego aside and turned the middle frame into a 3D Wigglegram GIF.  A technique I acquired this summer creating Rockin’ The Rocks in 3D. And with Alan Levine as my subject matter while completing this project.


I very carefully extracted Cory sitting in his comfy leather chair from the bookshelf background with the quick selection tool. I then had to use the clone tool and spot healing brush to rebuild some of the bookshelf and applied a blur filter to the entire background. This helps Cory’s image stand out even more. There were then three frames of Doctorow, each off-set slightly- roducing the GIFAChrome single image below.

Cory-GIFAChromeDS106-Chair-3DWiggle

Cory Doctorow GIFAChrome DS106 3D Wigglegram

The 3D wigglegram GIF looks better if it “wiggles” faster than the other GIFs I was using.  To create this effect I made 12 animation frames for the entire GIF sequence at 0.06 seconds in duration.  The top and bottom frames remained stationary for 6 frames each (a total of 0.24 sec) while the center frame rapidly oscillated at the 0.06 frame rate.

Cory Doctorow GIFAChrome DS106 GIF Strip- DOWNLOAD at  100ppi GIF  or  300ppi GIF

We were requested to save our files in the high resolution of the original images. At 3000ppi this resulted in a final Photoshop file of a whopping 1.4GB. Ouch! That’s huge. It’s amazing that my computer didn’t crash- just slowed down during processing. I was able to finally reduce the file size to “only” 670MB by deleting and merging some unnecessary layer.s  If you’re interested you can download the whole thing here. All were created in Photoshop CS5.

TEMPLATES:

GIFAChrome Templates are in the .png format so you can easily insert your own GIF images within a transparent center frame.

GIFAChrome-StripTemplate_100px

GIFAChrome DS106 GIFStrip template DOWNLOAD

GIFAChrome-Single_100px

GIFAChrome DS106 Single Frame Template DOWNLOAD

The DS106 Matrix

 “Do you want to know what IT is?….Unfortunately, no one can be told what DS106 is.  You have to see it for yourself.” – Morpheus from The Matrix

I’ve been working this week in Headless ’13 ds106 learning how to read movies.  The initial part of the week 10 assignment to analyze a scene from a movie will be posted soon.  I had decided on using the lobby shoot out scene from The Matrix.  A portion of the assignment asked us…

To get practice in basic video sequencing, locate at least two smaller portions within these clips that demonstrate the points you made in your analysis above.  We want you to put these scenes together in a short montage, sequencing them together so that you get some basic experience with video editing.

MatrixRemixThumbRemixing of video and other digital media is a skill I’m familiar with already.  [See Talky Tina – Sweet as Tupelo Honey].  So I modified the assignment to give me a bit more of a challenge.  I remixed the clips to create a montage/trailer for the DS106 course experience rather than demonstrating the points made in my video clip analysis.  I tried to find a DS106 video assignment or mashup assignment for something like this, but didn’t see one.  Did I miss it?  If not, I think I’ll create one for us.  I created one for us: VideoAssignments1232

Production Notes

I downloaded 3 clips from The Matrix with the Firefox add-on Video Downloader.

I was drawn to snippets of the dialogue that I felt I could string together to have them talking about the chaos we experience and the perplexing situation we have trying to tell someone else what DS106 is all about.

For my video editing software I used Adobe Premiere Elements 12.  Making the clip transitions cleanly from one to the other took a bit of fiddling around by shortening and lengthening the clips so that I didn’t have massive jumps between shots that looked out of place.  At about 20 sec in there’s one cut that didn’t quite work right.  The rest I’m pretty satisfied with. I really had a chance to see and understand how the cuts from one character to another or one scene to another are made as I put this together.

The audio went pretty smoothly.  There were two spots where I wanted to dub in “DS106” – one with Neo and one for Morpheus.  It helped that my voice at the moment is pretty low due to a cold, but I’m not really satisfied with the quality of the dubbing job.  I opted to let it go since I didn’t want to work that hard to make it “perfect”.  I know I could’ve taken the audio into GarageBand and played around with effects and stuff,  but it was good enough this time around.  Personally I think it’s funnier that it stands out as being dubbed anyway.

The DS106 logo overlay onto the elevator was created with the addition of a .png formatted still image onto a new layer above the video track. Reducing the opacity down to 70% made it look more realistic. Finding the location to place the logo was the hardest part. I had to look for a somewhat logical spot in the video that had a stationary image for at least 5 seconds.  Above the elevator worked fine.  The logo had to be resized initially, but no zooming or tracking was required.  Both a white and a black version of the logo are attached below for others to download and use in their projects.

Source Videos:

http://youtu.be/oUBdyntL2Ag

http://youtu.be/Es2uYtSJh-Y

DS106 Logos in .png format for download

They’ll have a transparent background.

ds106_Black

ds106

Star Spangled… WHAT?!

Star Spangled What?! video link

Today’s DS106 Daily Create tdc597 was to “edit an existing video clip to include an unexpected object in the story.”

StarSpangled_WHATVideo is my “thing”.  Not so the case for many of the DS106ers.  And I didn’t realize until I read a couple of comments in the DS106 Google + community today that some of you have felt intimidated to try your hand at the animated GIFs and videos from previous daily creates once you’d seen submitted projects.  A tip for maximizing the value from this course? Don’t compare your art contributions to anyone else’s.  Do what works for you. Do what you enjoy. Don’t worry about your level of expertise with the tools.  We are all beginners in some areas and there are those with more experience we can learn from. The DS106 community is a supportive group of individuals who hold a space and offer encouragement for us to take risks and move outside of our comfort zone.  It’s okay to be vulnerable here.

For me today that took the form of not pulling myself back.  But I also decided to take on the challenge of seeing how quickly I could produce the video.  (I really need to get some sleep tonight. Too many late nights working on DS106 stuff!)

chicken_2

B&W Chicken GIF  courtesy of John Johnston

My first creative inspiration was to use John Johnston’s chicken GIFs: Red ‘Chicken Talking  and his B&W Chicken (He would be considered one of our ds106 experts in the GIF arena.) Based on my personal experience this summer with a previous project [Talky Tina – Sweet as Tupelo Honey] I knew if I used the original GIF files in my Adobe Premiere Elements 11 video editor, I’d have to string together multiple copies of the still images to have continuous movement over several seconds. This would not be conducive to going to bed early.  Ding! I could use my screen capture software, Camtasia, to actually capture the GIF in action over several seconds. It would already be in video format and could easily be inserted into any video I wanted.

chick-01

Chicken Talking  from John Johnston

Next, I started looking at YouTube videos made by other DS106ers.  I downloaded a few of them to my computer with the Firefox Video DownloadHelper extension. Nothing was working.  I then remembered an earlier daily create of my own, Speedy Star Spangled Banner.  I thought it would be really funny to have John’s  red ‘Chicken Talking’ GIF  do the singing, but it took me a little trial and error to make a “logical” substitution of the B&W GIF.

My video editing software allows me to have several layers, and all I had to do was to put the video versions of the GIFs onto a layer above my original video. I then spliced out a segment at the beginning that referred to the previous daily create, added a video title image that comes with the program, personalized the text, rendered the video, and published it to YouTube.

In John’s podcast today, Evidently Not ChickenTown, he talked about how we can have a flurry of ideas after seeing other DS106 projects.  Here’s proof.

Original Video:

Etude de la Musique

A study of music….

Music is a powerful force that can change the mood and even the meaning of a video. I’ve been wanting to illustrate this concept for awhile and when I saw the tweet and original video created by Brian Bennett I knew this was my opportunity.  Because of the video’s simplicity with one on-going activity (Brian painting a room) as the viewer moves through different styles of music one can feel the effects of each piece as it relates to how the video is experienced emotionally.

Watch & listen to the original video by Brian Bennett & read his blog post here.

Painting_Music_Title

“A Study of Music” illustrating the power of audio.

Brian  and I talked about the power of music and we both thought there was/should be a ds106 audio assignment that did this, but we didn’t find one.  I tweeted Brian (@bennettscience) that I had wanted do this sort of video and put up an assignment, but didn’t have a good illustrative video to use as an example yet.  I asked if he’d mind me using his.  It was no problem. Now one of us just needs to write up and submit the assignment.[UPDATE: AudioAssignments1193 has been created and ready for you to try.]

This music video was very simple to make. I knew that I wanted a variety of music styles: soundeffectish, comedic, dramatic, simple, complex, ect.  Figuring out how to search on the freemusicarchive.org site took a little time, since this was only my second time visiting.  But once I had my key words down I was able to locate about 15 songs that I thought might work and downloaded them.  I was able to keep track of the artists names and songs for later attribution from their file names.  That was a nice bonus, as properly siting my sources can be a real headache and time hog as I try to rekindle my search logic when I found them the first time around.  HINT: To keep track of sources pulled from the internet, create a new post, keep it in draft mode, and copy & paste all of your links with a summary of what they are into the awaiting post.  When it comes time to write up your post you already have a big chunk completed, and no retracing your steps.

Painting_Music_WindowInside

B. Bennett painting room time lapse video

Once I had the songs it was a matter of placing them onto the timeline and seeing what fit where. (I used Adobe Premiere 11 as my video editing software.)  Making effective transitions between the pieces of video and music are important so that the viewer is not distracted or irritated, but instead able to easily go with the flow.  Fortunately, I didn’t have to resort to my first plans of chopping into the video and adding fade to black transitions with each change of music. As I worked with the media I noticed there were natural transition points that I could use instead.  That made it an even more powerful illustration because there was a continuos visual flow.

Having Brian’s original music, My One True Love by Ben Saretan remaining at the beginning, middle, and end of the video was important to me. As with many of my projects, I continue to be amazed at how things can miraculously fall into place.  And that was certainly the case here as I noticed and worked with the natural transitions. Brian’s music remained in the locations I had intended and the music selections on either side “made sense”.  There is a nice flow both from a visual and auditory perspective.

Did you experience the video segments differently as I had intended? What emotions did they bring up? Which music selection(s) did you enjoy more? [Start time links provided below.] Did you feel that one song was more suited to Brian’s video throughout? Why? I’d be very interested to hear your reactions and comments to the piece.

All music licensed under Creative Commons from freemusicarchive.org

Painting_TitleCardIntro

Talky Tina – Sweet as Tupelo Honey

Producing the DS106’s Sweet Talky Tina video was a labor of love as it presented many challenges due to the number of different media from several sources that had to be combined and sometimes created: image stills, GIFs, YouTube video and audio. And writing up this blog entry documenting the process turned out to take as much work and time as the video itself!

=> Story Context

Before I launch into my production notes, let me add some Talky Tina context for those of you not participating in DS106, the digital storytelling open online course at University Mary Washington in Virginia.  This is an excerpt taken from the @iamTalkyTina blog written by her “handler”.

The task was to take a misunderstood, outcast, marginalized character and transform her into a more powerful, independent, and self-managed member of the ds106 community… to rehabilitate a character out of The Twilight Zone, such that the character would be accepted as one of the ds106 own.

It was not easy work. The character selected, [Talky Tina from the 1963 Twilight Zone episode “Living Doll”] had a lot of very negative press — often derogatory comments flowed easily off the lips of various members of the ds106 crew…

New image for Talky Tina.  80% positive can overshadow the 30% negative.

New image for Talky Tina.

We started with a new image — working to overlay the existing perceptions with new, friendly ones, building up a preponderance of positive digital identity — a new, Friendly identity for the 21st Century. We built up a network of Friends — and Tina worked with them to gain their acceptance and trust. Yes — there were still naysayers, but we worked on a plan for them, too, and things culminated on the last day of the course , in grand style, and with great success!

=>Video Inspiration

The inspiration for the video was the result of listening to my Pandora Classic Folk Rock station when a fun song about love from the Beatles came on – can’t remember the name right now.  The lyrics made me giggle when I thought of Talky Tina’s DS106 persona.  Then Tupelo Honey by Van Morrison began to play….

She’s as sweet as Tupelo honey.
She’s an angel of the first degree.
She’s as sweet, she’s as sweet as Tupelo honey.
Just like honey baby, from the bee.

I couldn’t resist.  A video mashup/remix of Talky Tina as sweet as Tupelo honey had to be made.

As is the case with most of my projects, they are iterative in nature – forever improving and incorporating new ideas as I go along.  Sometimes I am inspired by the work of others. Other times I just happen to stumble upon something that I like more. There are two versions of the video available. I decided to keep the first draft posted to YouTube so that I could illustrate with examples the modifications undertaken to produce the final version.  Links to the actual in-video sequences are provided as needed.

=>INTRO & OUTRO

DS106ZoneTall_CrossedOverThe first draft does not contain an intro or outro sequence.  And upon request, Talky Tina was kind enough to create a special title sequence GIF, Starring @iamTalkyTina, that I could use in my final video.

For the title sequence, I liked the GIF that Talky Tina had made, but the first few frames of “smack talk” directed at Jim Groom needed to be deleted.  By opening the GIF directly in Photoshop Elements 11 for the Mac I gained access to all of the original 30 image layers, and could easily delete the objectionable frames.

Next, I noticed that the star pattern used in the GIF was less dense than the star pattern I was using in other parts of the video.  This lack of continuity didn’t sit well with me.  I tried to let it go… telling myself no one would notice…. but it just kept bugging me every time I watched it.  In the end, my “OCD” alter ego won out and I went about making the necessary image modifications.

Using the Magic Wand tool I selected the portion of images I wanted to retain, and deleted the rest.  The remaining images fortunately did not have to be perfectly clean since they would be merged with a new black starry background that would hide the imperfections. This saved a lot of time, which I greatly appreciated.

When merging the selected images and text with the new background, I reduced the image opacity to 80% to give them more of an eerie feeling.  Tina’s head is a little transparent – floating out in space. The GIF below visually illustrates the sequence of steps taken.

Talky Tina Title Sequence Production

Click on image if the GIF is not running

The expanding “The DS106 Zone” text was created using the zoom effect on only that specific text image. The soundtrack for both the intro and outro were pulled from the original Twilight Zone television show.  The outro was used in its full length. But the intro could only be used the first 10 seconds before Rod Serling speaks.

=>Twilight Zone Video Mashup/Remix

I had enjoyed and wanted to use the scene reversing effect that Christina Hendricks incorporated into, Tina and Telly: A story of true friends, her video response to Brian Short’s, Tina & Erich a Love Story. However, using clips from those videos themselves were problematic, due to their own story editing and sub-optimal resolution.  I searched YouTube and found a short 2 min video highlights of the original episode which had excellent resolution and enough material for me to work with in my own way.

"And her name is Talky Tina"

“She’s alive Daddy and her name is Talky Tina.”

My video editing software is Adobe Premiere Elements 11 for Mac and my story purpose was to show Talky Tina as only sweet and loving – especially with Erich.  To accomplish this task, I pulled the audio soundbite, “My name is Talky Tina, and I love you very much.” from the beginning of the episode when she is talking to Erich’s daughter.  I unlinked the video and audio, deleted audio portions where Talky Tina and Erich hate or threaten to kill each other, and dubbed in the love line.  I also found a segment of “silence” in the original video that I could use to cover up dialogue I had deleted but where video remained. The audio proved to be a bit trickier for Erich though.  I didn’t want there to be the dubbed foreign film effect, and have Erich mouthing words that didn’t match the audio.  To get around this I found back shots of Erich and strategically spliced in images of Tina at certain locations. [View example in video]

Talky Tina and Erich

“And I love you very much.”

Erich’s facial expressions and actions also had to look loving toward Talky Tina. Again, careful splicing of the right portions of video did the trick. In one case I tried using Christina’s reversing effect so that instead of Erich throwing Tina against the wall, it looked as if she were throwing herself toward him and he is lovingly catching her in his arms.  But the effect just didn’t look right in my video, so in the end it was deleted.   As you can see, Erich and Talky Tina can say and do nice things to each other through the magic of video & sound editing.

=>GIFs

As I mentioned above, this project contained a number of different media.  Each of which presents its own challenges. Working with the GIFs was a big one.  When I tried inserting them directly into the video editing software, they no longer looped endlessly.  They ran once and stopped.  No problem you say… just copy and paste to make the sequence repeat… Sounds great, in theory, but my video editing software “deletes” a few beginning and ending frames in order to blend with the visual media on either side.  While this wasn’t too big of a problem for most of the GIFs…Jinxed-by-Julie

…for two: Quick Wink Tina and Tina & Julie Andrews  – this resulted in the wink and the ghostly image of Julie Andrews being cut off prematurely.  You’ll notice these irritations in the first draft version as illustrated below.

The use of the GIFs was further complicated by the fact that I only wanted the important event, such as Julie Andrews or the wink, to appear once, and the entire segment needed to be a specific length in order to match with the music soundtrack. To address these issues I opened the original GIFs in Photoshop and placed the layers with the “event” in the middle of the GIF, instead of at the end. I then duplicated a few strategic layers to make the event last longer on screen and to make the entire sequence itself longer.

The long GIF sequence of Talky Tina at the computer needed no modification what so ever.  It was meant to play only once and was miraculously the same length as the instrumental section in the music soundtrack. What a stroke of luck.  [View in final version]

=>Image Stills: Tips & Tricks

  • A trick I often use when mixing visual media is to capture a beginning or final frame of a video or GIF sequence.  (In Adobe Premiere Elements 11 for Mac the command is Tools => Freeze Frame ) By inserting a still image captured from the original source the image is already perfectly aligned and will aid in providing a smoother transition between the media. And as an extra bonus you can easily adjust its length on screen to provide better synchronization to your music soundtrack if desired. 
TalkyTina_Webheader_Opaque

Reduce opacity of overlay by 80%

Reducing the opacity of an overlay image, such as Talky Tina’s head in the intro sequence or her webpage banner text as shown to the left, allows the underlying image to remain partially visible.  This works great for title and credit text sequences as well. 

Increasing the brightness & contrast of an image, such as for the cover of Talky Tina’s memoir, “The Stairs. They Go Both Up and Down” helps the image to stand out and become more memorable in the video.

Adjusting an image position and zoom factor in relation to an adjoining image can make for a smoother more natural transition without the need to create a time consuming manual pan of the shot. [Watch example in video]

=>Badges  

iamTalkyTinaSaysSoRockyLou22Talky Tina had created badges that her DS106 “True Friends” could insert into their blogs. [Talky Tina’s True Friends Index] And there were a few technical hurdles that I had to overcome to include the badges in the video.  First off, the whole badge wouldn’t fit on screen and remain legible on a mobile device. I was able to get around that by cropping the top half with the picture of Talky Tina and use it to introduce the badge segment in the video.  The bottom half of the badge, including the “TalkyTina Says So” text, was then cropped and used as the badge image for each friend.

The video includes badges of people whose media I used, and her other “Super True” friends. I think of this segment as part of the credits and acknowledgments. Amazingly there was a length of soundtrack that lent itself well to the needed seven friend badge image sequence.

Originally I made the decision to exclude badges with GIFs. I assumed they would be too time consuming to make them work correctly and align them properly.  I had a change of heart after modifying all of the other GIFs in the project, and the GIF badge by John Johnston (who also made the CogDog/Alan Levine-TalkyTina Dissolve) would be included in its full glory. [Click here to view]

The transitions between badges were surprisingly challenging. Fortunately, Talky Tina had used a template to create the original badges and I had used the same size and technique in Photoshop to crop them. This meant I had a supply of badge images that were the same size and shape to work with. I tried different transitions:

  • no transition – just a cut to the next badge
  • fade to black (as seen in draft video)
  • cross dissolve
  • film dissolve

… and finally settled on the film dissolve.  With careful alignment of each badge I was able to give the effect of only the photo image gently dissolving from one badge to the next.  Toward the end of the project I was still not satisfied with the sequence.  The badges were thin and there was a lot of blank space to either side.  I considered adding vertical text, such as DS106 on the left and Zone on the right, but that felt like it would be too cluttered.  It wasn’t until I had the inspired idea to add the starry background and reduce the opacity to 80% that I was satisfied and could call the badge section complete.

=>Rockylou Productions Animated Logo

RLP_Logo_27lvs_Bw-Col

The Rockylou Productions animated logo at the very end of the video was created by incorporating a dissolve transition between two logo images designed by Amber Lockridge.  Transitioning from b&w to color with a slight increase in the size of the color graphic by 1%  is meant to give the illusion of growth and expansion, an important value statement for Rockylou Productions.

The audio logo for Rockylou Productions was made with GarageBand and a simple “D” chord that I played on my 12-string guitar.  I took the original recording and added a Bright Guitar effect to the basic track.  I then duplicated the original track four times, and added dimensionality to the chord by adding a Lunar Bounce to two (panning each slightly left and right) and a Swirling Echo effect to the two remaining tracks, also panning them slightly left and right. With the addition of the Ambient – Wide Spaces effect to the master track the memorable audio logo for Rockylou Productions was born. 

RLPChord_GB

=>Wrap-Up

      I think that about does it.  This will most likely by my last DS106Zone related project, but I’m looking forward to completing many more digital storytelling projects in DS106 and with Rockylou Productions in the future.  In the wings already in the early stages of production are two challenging projects:

      • a multi-media story using Facebook entries & Storify about the uprising in Istanbul in June, 2013
      • a video interview of Amber & I talking about the creation of the Rockylou Productions logo and website banner which will be incorporating images against a green screen background.  

If you have any questions or would like to know more about the production of this project, post a comment or send me a tweet @rockylou22 and I’ll be glad to share.

=>Media Sources & Credits

Soundtrack: “Tupelo Honey” by Van Morrison

Twilight Zone Video & Audio Clips

Media links (GIFs & Stills) in order of appearance:

Created and used with permission by @iamTalkyTina unless otherwise noted

DS106zone Reflections – LouDown EP33

LouDown_RockylouHey there!  Rockylou is back home and hosting what is most likely her last DS106zone LoDown – or the LouDown as I’m calling it now 😉 – since she took over the duties from ScottLo last week. I’ve enjoyed my time in this whirlwind 5 weeks of the DS106 Summer 2013 session. I’ve met a number of creative people and seen a lot of great projects that have inspired me to take my own projects to another level. Thank you everyone for playing with me.

In the spirit of sharing and collaboration that is so prevalent in DS106, this 33rd episode of the LoDown features highlights from the audio self-reflections of two UMW students, Claire Patrick and Kelli Wisbauer, and one open-onliner from Virgina Beach, Virgina, Bill Smith.  The background music was all my doing. I hope they don’t mind the ramblin’ feel to it all. It worked for me…

So what brought them here? What have they encountered? Why are they still here? Claire admits that her first week was a complete and utter failure. But she pulled herself together and Prof. Groom even congratulated her on being the come-back kid of DS106. Kelli had to get through a lot of hurdles and maybe even shed a tear or two. Her advice? Get help as soon as you can and start the work on Monday! Channeling the spirit of ScottLo – he really can’t leave us for good – Bill Smith recorded a “drive-by” for his introduction. What keeps him in DS106? The community that’s formed, the ability to experiment, and having a forum that’s open and supportive.

Unfortunately, two UMW students posted their self-reflection assignments too late for me to include in this episode #33 of the LoDown. (I do need to get some sleep, afterall.)  I want to highlight them just the same.

I’d also hoped to include a parody by Sean Placchetti who didn’t think he could stomach all the anticipated mushy stuff about DS106.  As a matter of fact, I created the parody assignment just for him.  Sean’s Parody – Chet Shamus

It’s been a blast. I hope to create and collaborate with some of you again in the future. This is Rockylou signing off from the DS106zone LouDown. #4life

CREDITS:

DS106Zone Audio Self-Reflections

Music:

 The How And Why Of Creating EP33

construction,under-128On EP32 of the DS106zone LoDown, Alan Levine talked about how it was just as meaningful to him to know why we chose to do something as well as how we did it. Since I’m not formally trained in this area, I do a lot of my work by intuition and trial & error. This project was no different. Here’s what went through my head producing this podcast.

Mashing a DS106 Radio Bumper

Thanks to my fellow DS106 students who made sure they clicked on the “Allow Downloads” button in SoundCloud, I was able to mash this DS106 Radio bumper.  It’s short and sweet, just like this post. AudioAssignments36

Big kudos to my unsuspecting contributors….

Dylan Gott – Brooke Parker –  Kristen Lamb – Jennifer  – Rapt’nRent

ds106.ioAnimatedNewOldFriend_290