Originally posted 10/2/13 on an internal 3M blog by “JS” a 3M-DS106 Salon member
 I decided to go with the less creative title “Gifs, Gimp and Me” instead of what I originally thought of, which was “I ain’t no Gimp!” Which struck me as funny and worked on several levels but was a little unprofessional.
I am not a Gimp-ophile. Not by a long shot. I have learned several things, though, and I was able to create my own gifs! Thanks to the internet and what sounds like a preteen girl and a teenage boy. See videos below.
I downloaded Gimp and checked it out to see what I could intuit from it. The answer: NOTHING. I literally could not understand what any of the buttons meant besides the basic: line, fill, lasso. Very humbling. I felt very stupid.
So I Googled: “How to make a gif using Gimp” and got the Gimp website’s tutorial, a girl who explained how to make a gif of Jennifer Lawrence (Katniss Everdeen) shooting an arrow over and over and the boy who drew a stick figure walking. The Gimp website was less than helpful. I could not understand what they meant by “Gaussian blur” or “alpha to selection”. The girl and boy were much better. I learned about layers and timing and playback. (Which is located under Filters -> Animation -> Playback, by the way. Who knew? Talk about a steep learning curve).
I have a presentation coming up in which I will describe how a Flame Ionization Detector (FID) works. Just the basics. Of course, I get the brilliant idea that I will animate the FID diagram to literally illustrate my point. Because what could go wrong?
Have I mentioned that I like to tackle big projects instead of working through little ones first? I do that with baking all the time. Why start small and boring when you can do a BIG EXTRAVAGANZA with FROSTING and FLAVORS and COLORS! Except that it is often more difficult and frustrating than if you would have started small. But the emotional payoff potential is really big. Cost-effective? You decide.
There really is no stopping me – short of dismemberment – once I start so here I go….
The FID diagram by itself:
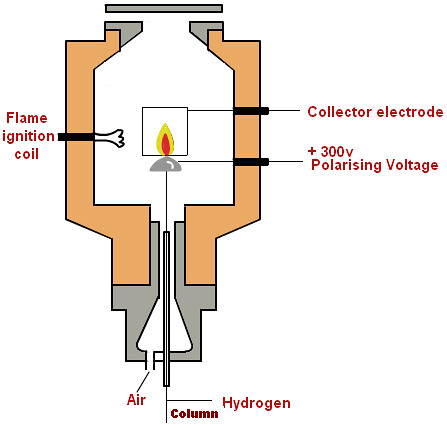
Now, I need to show that the separated gas coming from the column in the gas chromatograph hits the flame and is ionized. The resulting electrical charge creates a peak on the chromatograph which we can use to identify how much of that particular analyte is present. So easy even a caveman can do it!
My attempts to do this in Gimp resulted in disaster. I do not like how once you create a shape in Gimp it becomes part of the picture. You cannot move the shape without taking the background with it. I’m not used to this. When I create shapes in Excel they are independent until I group them together. I can move them alllllll over the place. It’s great. Not so in Gimp. You better get your placement right the first time otherwise you’re screwed. This is incredibly difficult to do when you are trying to precisely animate a section of gas moving through a column.
Also, each of the layers I created just compounded on each other so instead of the gas moving up through the column; it was just one long line of gas building on top of each other. I tried several things and Googled a lot. Nothing helped so I looked for an easier program. I downloaded Paint.net. Bad idea. Not any easier. So I switched to Paint. Still the problem with the whole placement thing but I figured out a way to get around it.
I am familiar with animation in the traditional, drawing sense so I knew that I needed a frame for each move and I needed the background to always be the diagram. I know that animators use transparent paper to see their changes and then add the background later but I couldn’t figure this out in Gimp. What I did instead was I created a single file for each of the frames that I would need. Starting from one frame, I copied the rectangle shape that I needed and noted it’s location on that previous frame. Then I pasted it in the next frame, same location, and moved it up two pixels by hand. Super tedious. But it worked.
I used that method of noting location and movement for the entire animation. The result: 95 frames cut down to 50 frames for a shorter overall animation time. Then, – thank you Katniss Everdeen Gimp girl! – I used Gimp to take all my frames and put them together in an animation. I thought the animation went too fast for the flame part so I went back and changed the timing on the last few frames – thank you stick figure Gimp boy! (This can be done by right clicking on the layer, selecting Edit Layer Attributes and putting the frame delay (in milliseconds) in paranthesis next to the layer name. Like this: “Layer 1 (250ms)”. The default layer delay is 100ms.)
Here is my animation:
I also wanted to signal heat for a different part of my presentation so I made this simple one using Excel to create the shapes, copying them into Paint to make it a .png file and then Gimp to animate my two frames. Much easier!
Here is heat:

Next post – getting rid of the background in your picture (.png) using Gimp!
“GIFs, Gimp and Me” a 3M #ds106 Salon blog repost. JS’s adventures animating a Flame Ioniziation Detector. @cogdog http://t.co/10P4IoAj8J
Wow, this is really impressive JS, it is a lot to take on learning GIMP and creating a complex animation for the first go around.
Although it was a lot of end arounds, you now have a better sense of what GIMP can do. It’s limit (compared to Photoshop) is that each layer is a full frame of your animation, so you have to find a way to create each one. In PhotoShop, you can toggle on an off layers per animation frame, so you can keep the background and moving elements separate. In GIMP they way to go seems to make one document on layers to construct one animation frame, then copy the output to a second file to generate the animation.
But what I really like seeing here is the use of the animation applied in a real life situation, and in science. Perhaps a second one might show a different condition where the flame ionation fails to ignite?
Of course I have no idea what Flame Ionization Detector (FID) does!
This is where the shark jumps #ds106 00 Participant in @Rockylou22 3M Salon applying GIFs to science animation http://t.co/Z5DO2N5k3W
[…] today, Rochelle Lockridge posted an article in which someone (a colleague?) created an animated GIF for a presentation they were doing for work. This animation is great (and probably beyond my own GIMP chops) and it […]
Hi @cogdog! Thanks for your feedback. I never would have thought to create a gif for this presentation without 3M-DS106. It’s been a great experience for me. Though I am woefully behind on the weekly projects.
An FID detects the separated gas coming through a column in gas chromatograph instrument. I like to explain my job to people by saying that I analyze the smelly stuff coming off of tape. The detector gives me a peak (upper right corner of my gif) for each different compound (smell/gas) and the higher the peak, the greater the amount of compound.
If the flame ignition fails to ignite, nothing happens. I get a flat line with no peaks and the gas just goes out into oblivion. And then I’m angry because I have to do the analysis all over. So maybe I should make a gif with the flame gone and then flash my angry face.
I also like the shark jumping over my gif. Way fun!
I love the simple visualization of heat.
[…] GIFs, GIMP & Me: Animated Flame Ionization Detector from “JS” […]
3analyses